80 - Heirloom Tool Cabinet, страница 36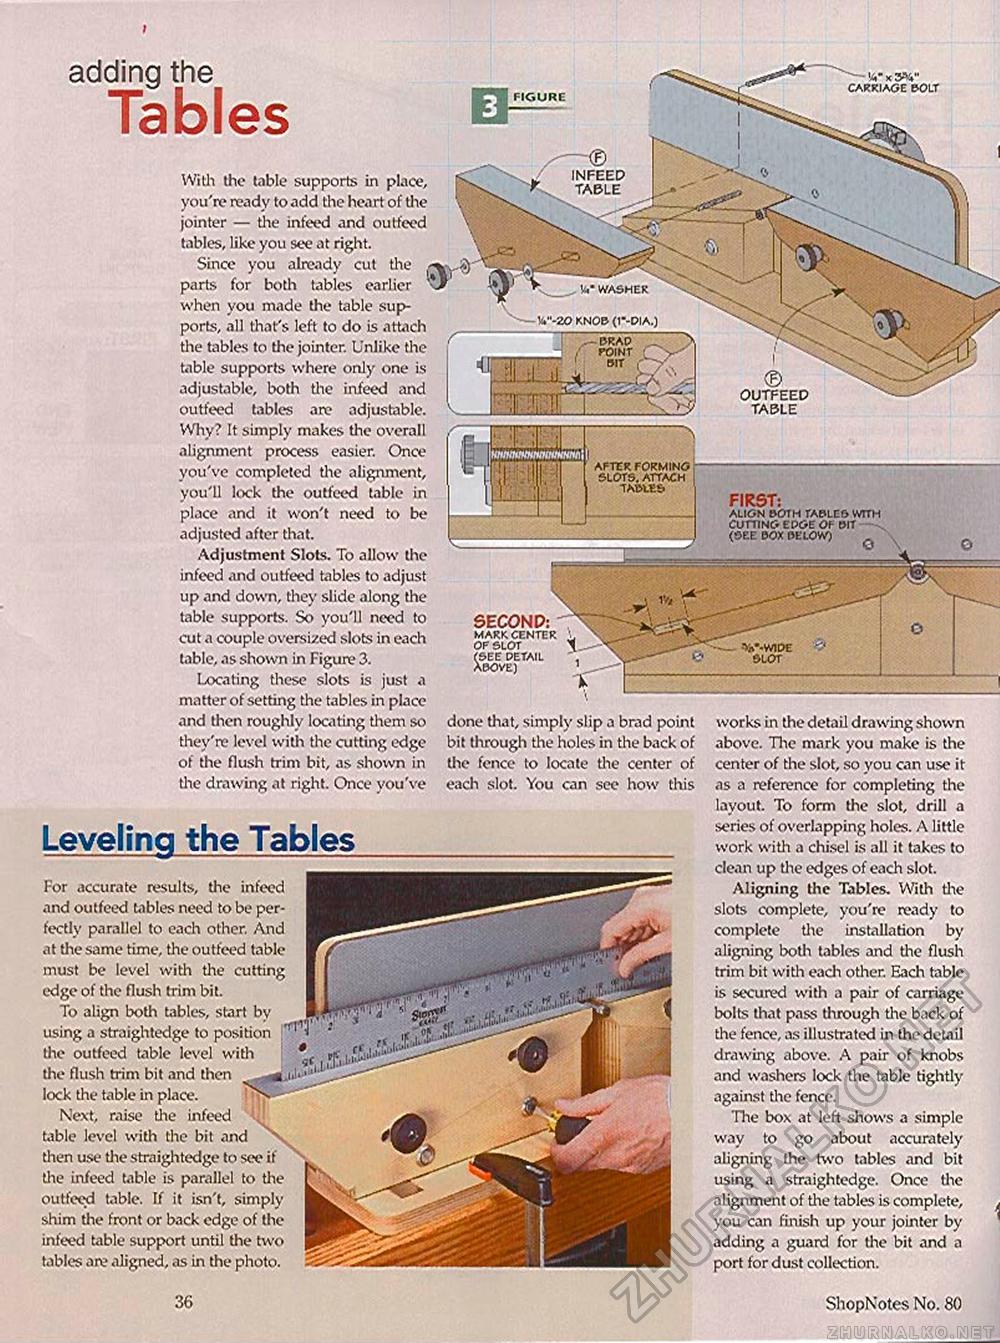
'A' x 3V' carriage bolt INFEED TABLE \l,m washer v-20 knob (1--dia.) BRAD POINT BIT adding the Tables With the table supports in place, you're ready to add the heart of the jointer — tine infeed and outfeed tables, like you see at right. Since you already cut the parts for both tables earlier when you made the table supports, all that's left to do is attach the tables to the jointer. Unlike the table supports where only one is adjustable, both the infeed and outfeed tables are adjustable. Why? It simply makes the overall alignment process easier. Once you've completed the alignment, you'll lock the outfeed table in place and it won't need to be adjusted after that. Adjustment Slots. To allow the infeed and outfeed tables to adjust up and down, they slide along the table supports. So you'll need to cut a couple oversized slots in each table, as shown in Figure 3. Locating these slots is just a matter of setting the tables in place and then roughly locating them so they're level with the cutting edge of the flush trim bit, as shown in the drawing at right. Once you've FIGURE © OUTFEED TABLE AFTER FORMING SLOTS. ATTACH TAW.ES FIRST: ALIGN BOTH TABLE6 WTTH CUTTING EDGE OF BIT (SEE BOX BELOW) bove) SECOND: mark center of slot (see detail Al done that, simply slip a brad point bit through the holes in the back of the fence to locate the center of each slot. You can see how this Leveling the Tables For accurate results, the infeed and outfeed tables need to be perfectly parallel to each other. And at the same time, the outfeed table must be level with the cutting edge of the flush trim bit. To align both tables, start by using a straightedge to position the outfeed table level with the flush trim bit and then lock the table in place. Next, raise the infeed table level with the bit and then use the straightedge to see if the infeed table is parallel to the outfeed table. If it isn't, simply shim the front or back edge of the infeed table support until the two tables are aligned, as in the photo. works in the detail drawing shown above. The mark you make is the center of the slot, so you can use it as a reference for completing the layout. To form the slot, drill a series of overlapping holes. A little work with a chisel is all it takes to clean up the edges of each slot. Aligning the Tables. With the slots complete, you're ready to complete the installation by aligning both tables and the flush trim bit with each other. Each table is secured with a pair of carriage bolts that pass through the back of the fence, as illustrated in the detail drawing above. A pair of knobs and washers lock the table tightly against the fence. The box at left shows a simple way to go about accurately aligning the two tables and bit using a straightedge. Once the alignment of the tables is complete, you can finish up your jointer by adding a guard for the bit and a port for dust collection. 36 ShopNotes No. 80 |


