81 - Ultimate Sharpening Station, страница 18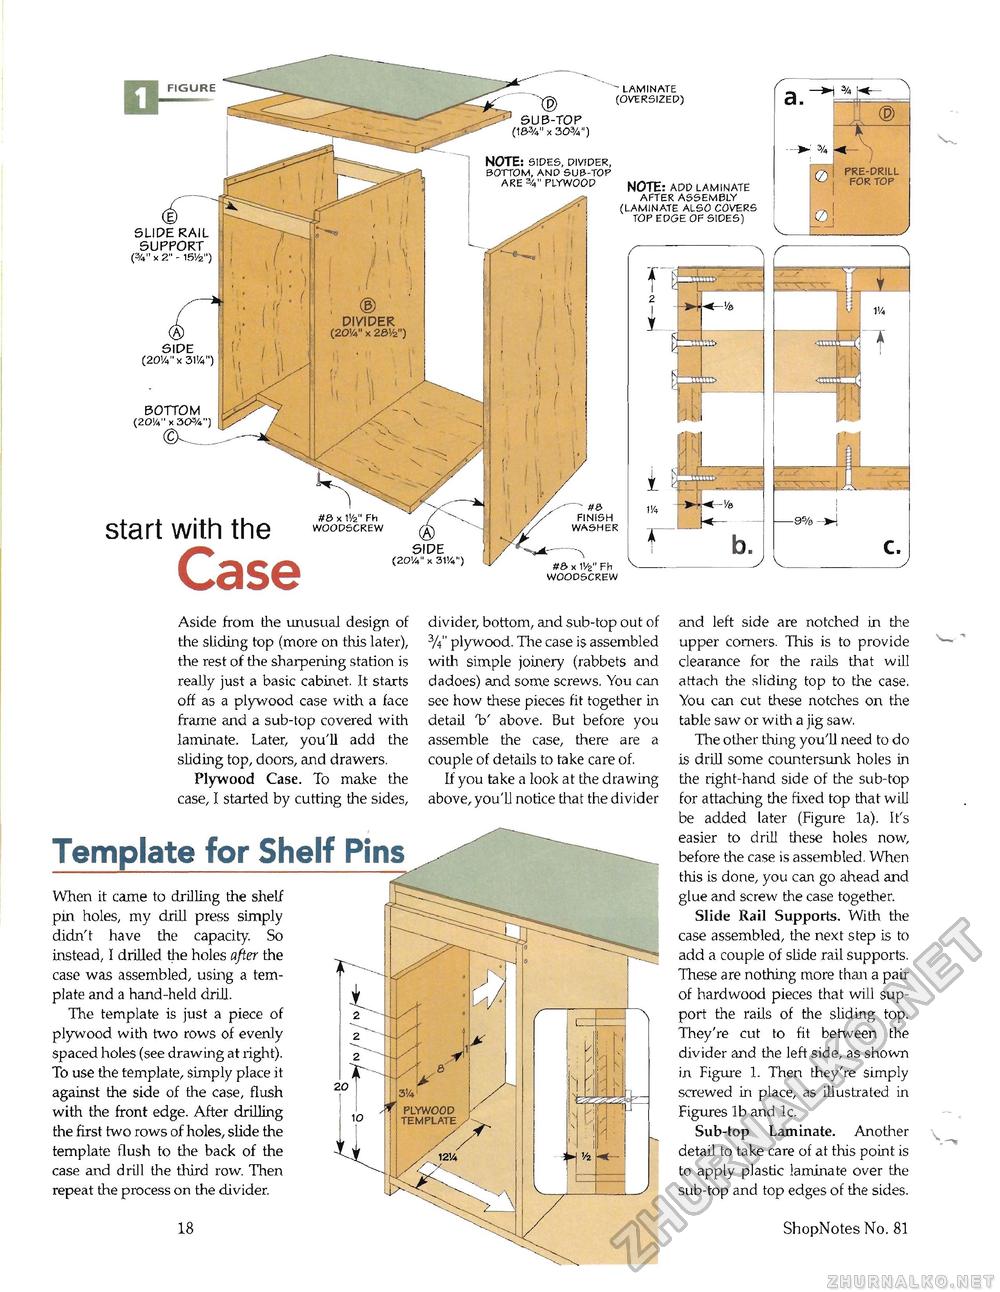
- laminate (oversized) NOTE: sides, divider, bottom, and sub-top are plywood NOTE: add laminate after assembly ' (laminate also covers ^ top edge of sides) SLIDE RAIL SUPPORT (%" x 2" - 15'/2") DIVIDER (2O'A" x 26Vi") BOTTOM (20K," x 3CW) finish washer ne> x 1!fe" Fh woodscrew ue> x iv2" Fh woodscrew V. Aside from the unusual design of the sliding top (more on this later), the rest of the sharpening station is really just a basic cabinet. It starts off as a plywood case with a face frame and a sub-top covered with laminate. Later, you'll add the sliding top, doors, and drawers. Plywood Case. To make the case, I started by cutting the sides, divider, bottom, and sub-top out of %" plywood. The case is assembled with simple joinery (rabbets and dadoes) and some screws. You can see how these pieces fit together in detail V above. But before you assemble the case, there are a couple of details to take care of. If you take a look at the drawing above, you'll notice that the divider and left side are notched in the upper corners. This is to provide clearance for the rails that will attach the sliding top to the case. You can cut these notches on the table saw or with a jig saw. The other thing you'll need to do is drill some countersunk holes in the right-hand side of the sub-top for attaching the fixed top that will be added later (Figure la). It's easier to drill these holes now, before the case is assembled. When this is done, you can go ahead and glue and screw the case together. Slide Rail Supports. With the case assembled, the next step is to add a couple of slide rail supports. These are nothing more than a pair of hardwood pieces that will support the rails of the sliding top. They're cut to fit between the divider and the left side, as shown in Figure 1. Then they're simply screwed in place, as illustrated in Figures lb and lc. Sub-top Laminate. Another detail to take care of at this point is to apply plastic laminate over the sub-top and top edges of the sides. ShopNotes No. 81 Template for Shelf Pins When it came to drilling the shelf pin holes, my drill press simply didn't have the capacity. So instead, I drilled the holes after the case was assembled, using a template and a hand-held drill. The template is just a piece of plywood with two rows of evenly spaced holes (see drawing at right). To use the template, simply place it against the side of the case, flush with the front edge. After drilling the first two rows of holes, slide the template flush to the back of the case and drill the third row. Then repeat the process on the divider. |


