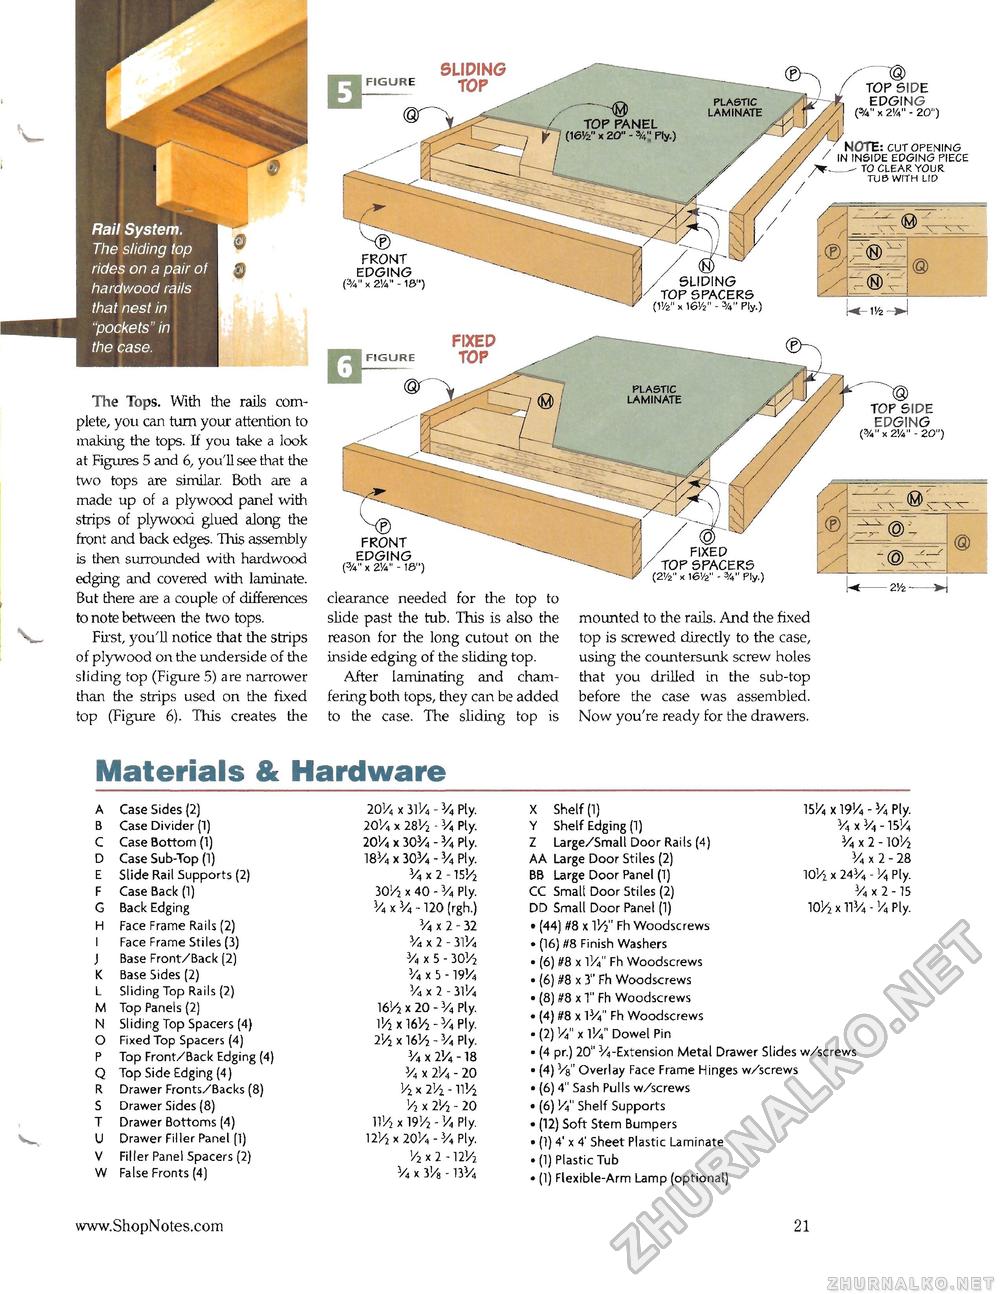
The Tops. With the rails complete, you can turn your attention to making the tops. If you take a look at Figures 5 and 6, you'll see that the two tops are similar. Both are a made up of a plywood panel with strips of plywood glued along the front and back edges. This assembly is then surrounded with hardwood edging and covered with laminate. But there are a couple of differences to note between the two tops.
First, you'll notice that the strips of plywood on the underside of the sliding top (Figure 5) are narrower than the strips used on the fixed top (Figure 6). This creates the
Materials & Hardware
|
A |
Case Sides (2) |
20'A x 311/4 - 3/4 Ply. |
X Shelf (1) |
15'/, x 191/4 - 3/4 Ply. |
|
B |
Case Divider (1) |
201/„ x 28Vi - 3/4 Ply. |
Y Shelf Edging (1) |
3/4 x 3/4 -151/4 |
|
C |
Case Bottom (1) |
20V4 X 30V4 - 3/4 Ply. |
Z Large/Small Door Rails (4) |
3/4 x 2 - 10V2 |
|
D |
Case Sub-Top (1) |
183/, x 303/4 - 3/4 Ply. |
AA Large Door Stiles (2) |
3/4 x 2 - 28 |
|
E |
Slide Rail Supports (2) |
¥4 x 2 -15'/2 |
BB Large Door Panel (1) |
101/2 x 243/4 - ]A Ply- |
|
F |
Case Back (1) |
30'/2 x 40 - V4 Ply. |
CC Small Door Stiles (2) |
3/„ x 2 -15 |
|
G |
Back Edging |
V4 x V4 -120 (rgh.) |
DD Small Door Panel (1) |
10l/2 x 11V4 - Vi Ply. |
|
H |
Face Frame Rails (2) |
3/4 x 2 - 32 |
• (44) #8 x V/i' Fh Woodscrews |
|
|
|
Face Frame Stiles (3) |
3/4 x 2 - 3lVi |
• (16) #8 Finish Washers |
|
|
J |
Base Front/Back (2) |
V4 x 5 - 301/2 |
• (6) #8 x VA" Fh Woodscrews |
|
|
K |
Base Sides (2) |
3/4 x 5 -191/4 |
• (6) #8 x 3" Fh Woodscrews |
|
|
L |
Sliding Top Rails (2) |
3/4 x 2 - 31V4 |
• (8) #8 x T' Fh Woodscrews
• (4) H8 x 13/4'' Fh Woodscrews ■ (2) '/4" x VA" Dowel Pin |
|
|
M
N O |
Top Panels (2) Sliding Top Spacers (4) Fixed Top Spacers (4) |
16'/2 x 20 - 3/4 Ply. V/i x 16!/2 - 3/4 Ply. 2V2 x 16J/, - V4 Ply. |
|
|
P |
Top Front/Back Edging (4) |
3/4 x 2!/4 -18 |
• (4 pr.) 20 V4-Extension Metal Drawer Slides w/screws |
|
Q |
Top Side Edging (4) |
3/4 x 2'/4 - 20 |
• (4) /s" Overlay Face Frame Hinges w/screws |
|
|
R |
Drawer Fronts/Backs (8) |
Vz x 2Vi - ll!/2 |
• (6) 4" Sash Pulls w/screws |
|
|
S |
Drawer Sides (8) |
Vi x 2V2 - 20 |
• (6) '/4" Shelf Supports |
|
|
T |
Drawer Bottoms (4) |
IT/2 x 19V2 - V* Ply. |
• (12) Soft Stem Bumpers |
|
|
U |
Drawer Filler Panel (1) |
12V2 x 20V4 - 3/4 Ply. |
• (1) 4' x 4' Sheet Plastic Laminate |
|
|
V |
Filler Panel Spacers (2) |
'/2 x 2 - I2V2 |
• (1) Plastic Tub |
|
|
w |
False Fronts (4) |
V4 x 3Va - I3V4 |
• (1) Flexible-Arm Lamp (optional) |
|
Rail System.
The sliding top rides on a pair of hardwood rails that nest in "pockets" in the case.
FIGURE
sliding top
TOP SIDE EDGING
(%" X 2V - 20")
clearance needed for the top to slide past the tub. This is also the reason for the long cutout on the inside edging of the sliding top.
After laminating and chamfering both tops, they can be added to the case. The sliding top is
mounted to the rails. And the fixed top is screwed directly to the case, using the countersunk screw holes that you drilled in the sub-top before the case was assembled. Now you're ready for the drawers.
FRONT EDGING
(%" x 2V - IB")
fixed top
EDGING
(%" X 2V - 20")
,, NOTE: CUT OPENING ' IN INSIDE EDGING PIECE
------ to clear your
7 tub with lid
FIXED ... SPACERS
(2'/2" x 16V - Ply.)
www.ShopNotes.com
21