81 - Ultimate Sharpening Station, страница 22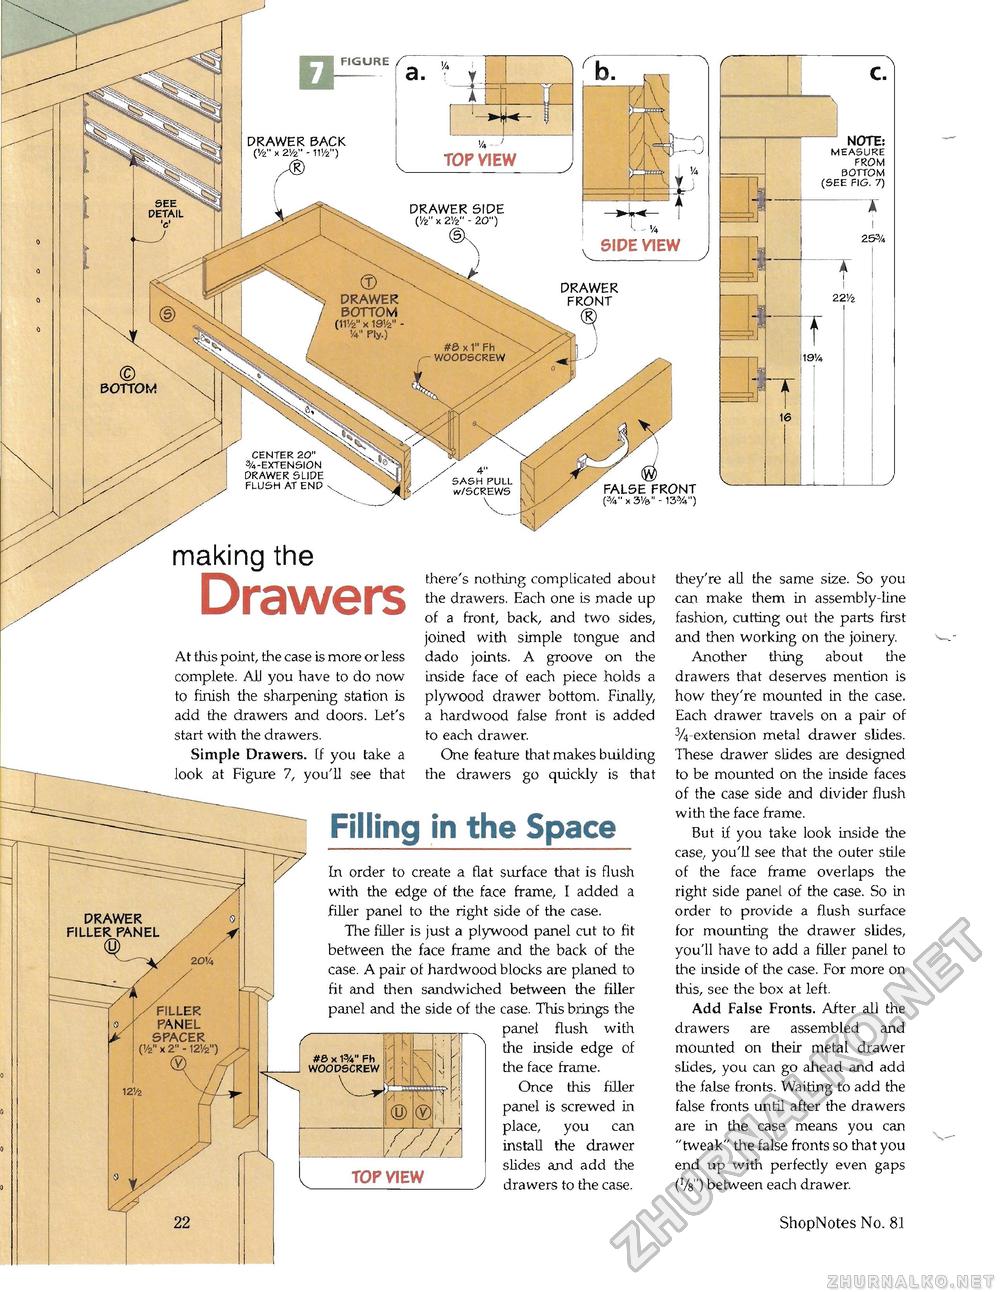
NOTE: MEASURE FROM BOTTOM (SEE FIG. 7) DRAWER BACK (Vz" X 2V2" -1114") SEE DETAIL DRAWER SIDE 0/2" X 2'/2" - 20") DRAWER FRONT DRAWER BOTTOM (11Vi>" x I9V2" V Ply.) #e> X1" Fh WOODSCREW BOTTOM CENTER 20" %-EXTENSION DRAWER SLIDE FLUSH AT END ' 4" 5ASH PULL w/SCREWS / FALSE FRONT (%" x 3V»" -13%") making the Drawersthey're all the same size. So you can make them in assembly-line fashion, cutting out the parts first and then working on the joinery. Another thing about the drawers that deserves mention is how they're mounted in the case. Each drawer travels on a pair of ^-extension metal drawer slides. These drawer slides are designed to be mounted on the inside faces of the case side and divider flush with the face frame. But if you take look inside the case, you'll see that the outer stile of the face frame overlaps the right side panel of the case. So in order to provide a flush surface for mounting the drawer slides, you'll have to add a filler panel to the inside of the case. For more on this, see the box at left. Add False Fronts. After all the drawers are assembled and mounted on their metal drawer slides, you can go ahead and add the false fronts. Waiting to add the false fronts until after the drawers are in the case means you can "tweak" the false fronts so that you end up with perfectly even gaps (Vs") between each drawer. there's nothing complicated about the drawers. Each one is made up of a front, back, and two sides, joined with simple tongue and dado joints. A groove on the inside face of each piece holds a plywood drawer bottom. Finally, a hardwood false front is added to each drawer. One feature that makes building the drawers go quickly is that At this point, the case is more or less complete. Ail you have to do now to finish the sharpening station is add the drawers and doors. Let's start with the drawers. Simple Drawers. If you take a look at Figure 7, you'll see that In order to create a flat surface that is flush with the edge of the face frame, I added a filler panel to the right side of the case. The filler is just a plywood panel cut to fit between the face frame and the back of the case. A pair of hardwood blocks are planed to fit and then sandwiched between the filler panel and the side of the case. This brings the panel flush with the inside edge of the face frame. Once this filler panel is screwed in place, you can install the drawer slides and add the J drawers to the case. DRAWER FILLER PANEL / FILLER PANEL SPACER (Vz" x 2" - 12!fc") #» x W Fh WOODSCREW top view 22 ShopNotes No. 81 |


