81 - Ultimate Sharpening Station, страница 19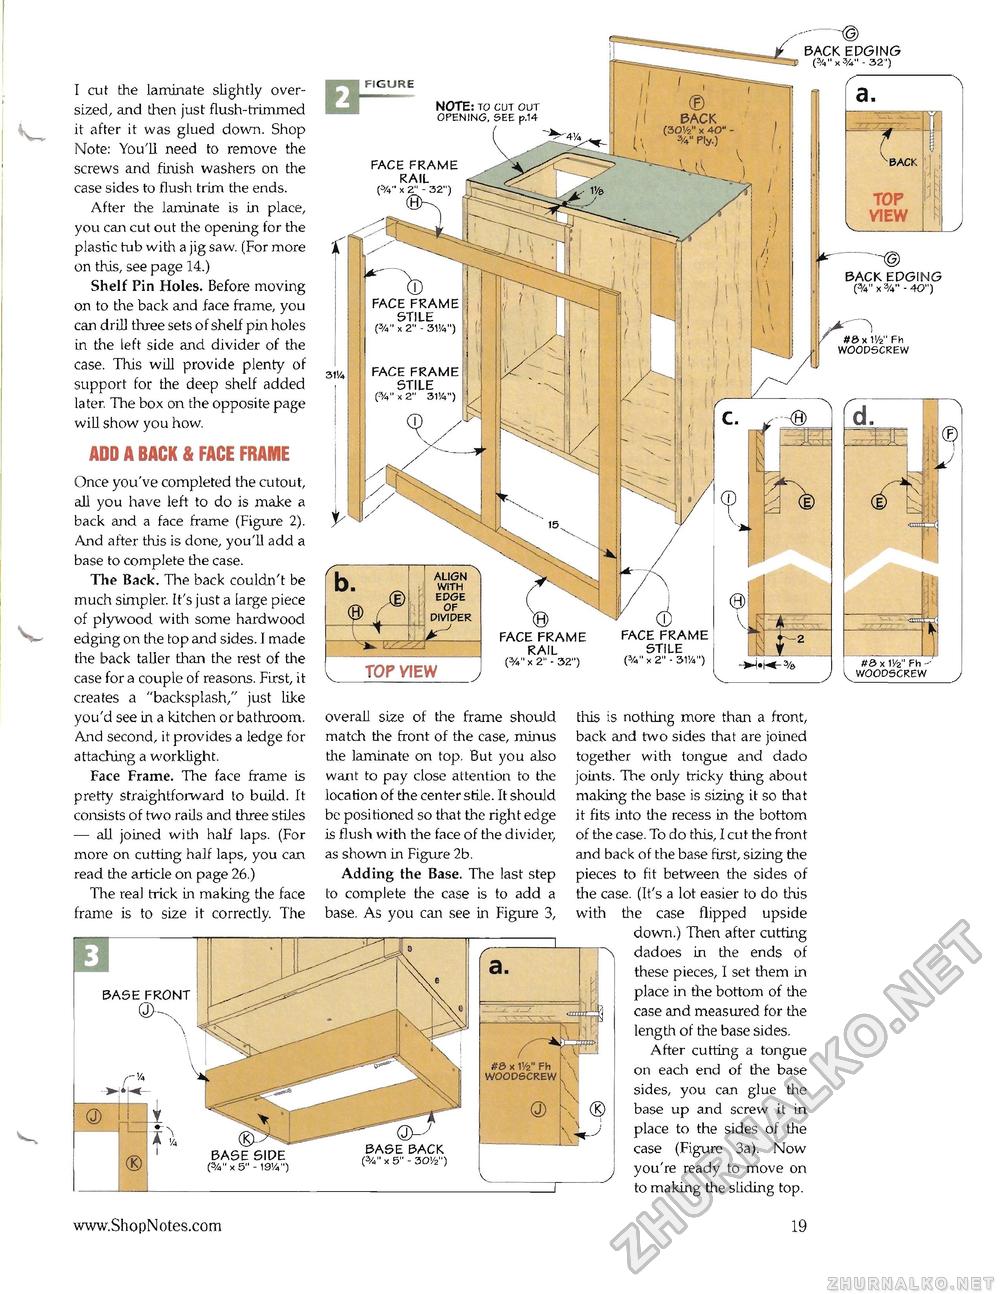
I cut the laminate slightly oversized, and then just flush-trimmed it after it was glued down. Shop Note: You'll need to remove the screws and finish washers on the case sides to flush trim the ends. After the laminate is in place, you can cut out the opening for the plastic tub with a jig saw. (For more on this, see page 14.) Shelf Pin Holes. Before moving on to the back and face frame, you can drill three sets of shelf pin holes in the left side and divider of the case. This will provide plenty of support for the deep shelf added later. The box on the opposite page will show you how. ADD A BACK & FACE FRAME Once you've completed the cutout, all you have left to do is make a back and a face frame (Figure 2). And after this is done, you'll add a base to complete the case. The Back. The back couldn't be much simpler. It's just a large piece of plywood with some hardwood edging on the top and sides. I made the back taller than the rest of the case for a couple of reasons. First, it creates a "backsplash," just like you'd see in a kitchen or bathroom. And second, it provides a ledge for attaching a worklight. Face Frame. The face frame is pretty straightforward to build. It consists of two rails and three stiles — all joined with half laps. (For more on cutting half laps, you can read the article on page 26.) The real trick in making tire face frame is to size it correctly. The overall size of the frame should match the front of the case, minus the laminate on top. But you also want to pay close attention to the location of the center stile. It should be positioned so that the right edge is flush with the face of the divider, as shown in Figure 2b. Adding the Base. The last step to complete the case is to add a base. As you can see in Figure 3, CUBASE SIDE (%" X 5" - 19'/,") BASE BACK X 5" - 30'/2") this is nothing more than a front, back and two sides that are joined together with tongue and dado joints. The only tricky thing about making the base is sizing it so that it fits into the recess in the bottom of the case. To do this, I cut the front and back of the base first, sizing the pieces to fit between the sides of the case. (It's a lot easier to do this with the case flipped upside down.) Then after cutting dadoes in the ends of these pieces, I set them in place in the bottom of the case and measured for the length of the base sides. After cutting a tongue on each end of the base sides, you can glue the base up and screw it in place to the sides of the case (Figure 3a). Now you're ready to move on to making the sliding top. 19 BACK EDGING (%" x%" - 32') NOTE: to cut out opening, see p.14 BACK (30V2" x AO' 3A" Ply.) BACK FACE FRAME RAIL (%'■ x 2" - 32") BACK EDGING (3A" x %" - AO") FACE FRAME STILE (%" X 2" - 31'A") #»x WFh WOODSCREW FACE FRAME STILE x 2" 31V4") ALIGN WITH EDGE OF DIVIDER FACE FRAME STILE (%"x 2" - 31'/4") FACE FRAME RAIL (%" x 2" - 32") #3 x 1 Vz Fh -WOODSCREW |


