81 - Ultimate Sharpening Station, страница 23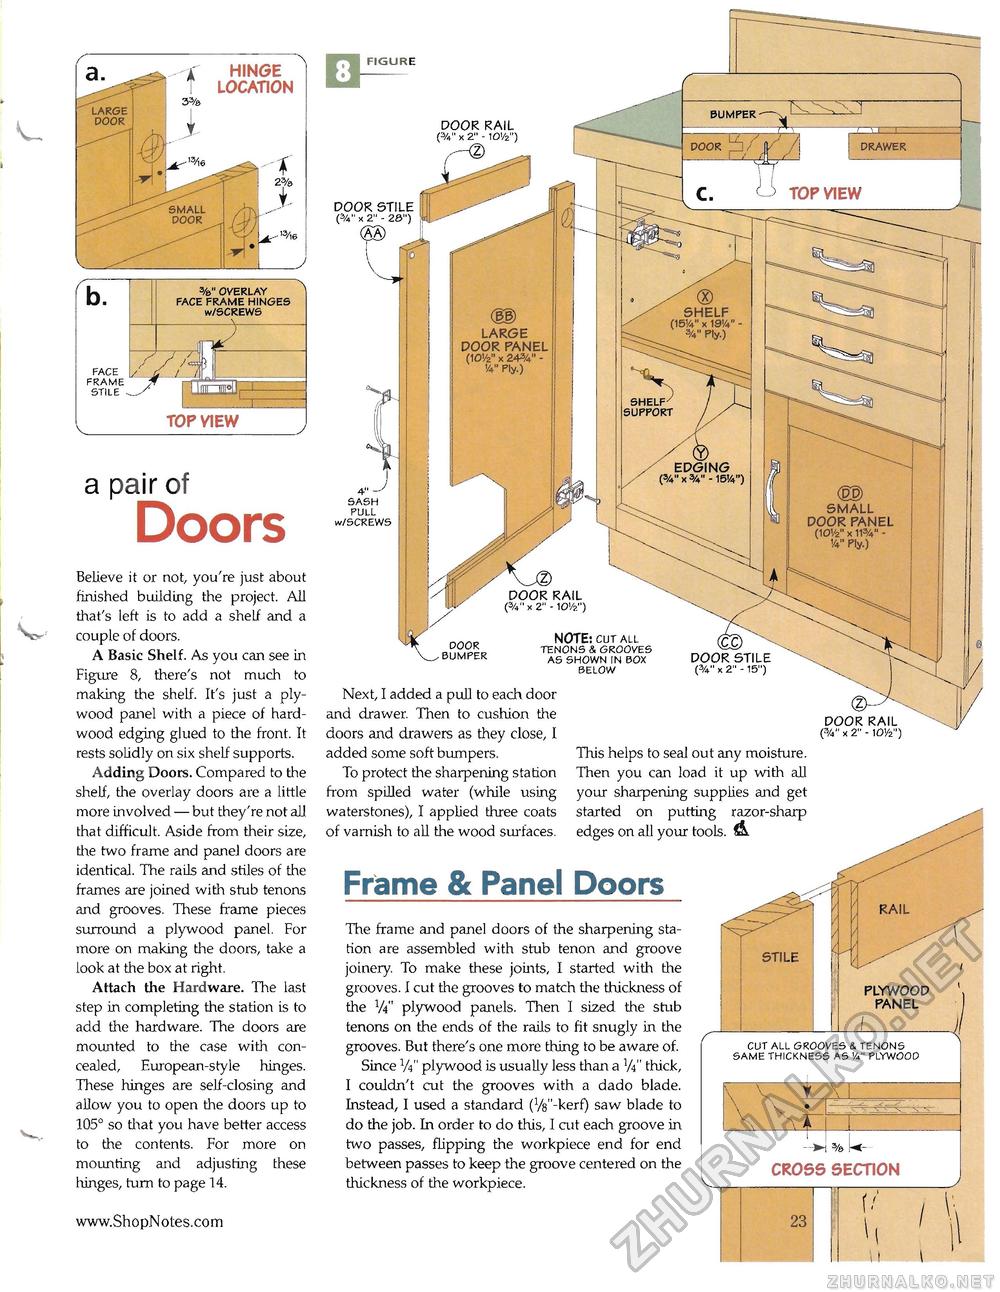
X hinge ! location b. face frame stile %" OVERLAY FACE FRAME HINGES w/SCREWS 2 .-/---41J____ top view □ DOOR RAIL (%" x 2" - 10'/2") DOOR 5TILE (%" X 2" - 20") (SS) P
a pair of Doors Believe it or not, you're just about finished building the project. Ail that's left is to add a shelf and a couple of doors. A Basic Shelf. As you can see in Figure 8, there's not much to making the shelf. It's just a plywood panel with a piece of hardwood edging glued to the front. It rests solidly on six shelf supports. Adding Doors. Compared to the shelf, the overlay doors are a little more involved — but they're not all that difficult. Aside from their size, the two frame and panel doors are identical. The rails and stiles of the frames are joined with stub tenons and grooves. These frame pieces surround a plywood panel. For more on making the doors, take a look at the box at right. Attach the Hardware. The last step in completing the station is to add the hardware. The doors are mounted to the case with concealed, European-style hinges. These hinges are self-closing and allow you to open the doors up to 105° so that you have better access to the contents. For more on mounting and adjusting these hinges, turn to page 14. 4" SASH pull w/SCREWS door v^ bumper NOTE: cut all tenons & grooves as shown in box below Next, I added a pull to each door and drawer. Then to cushion the doors and drawers as they close, I added some soft bumpers. To protect the sharpening station from spilled water (while using waterstones), I applied three coats of varnish to all the wood surfaces. DOOR RAIL (%" x 2" - IOV2'1) This helps to seal out any moisture. Then you can load it up with all your sharpening supplies and get started on putting razor-shaxp edges on all your tools. Frame & Panel Doors The frame and panel doors of the sharpening station are assembled with stub tenon and groove joinery. To make these joints, I started with the grooves. I cut the grooves to match the thickness of the W plywood panels. Then I sized the stub tenons on the ends of the rails to fit snugly in the grooves. But there's one more thing to be aware of. Since V4" plywood is usually less than a V4" thick, I couldn't cut the grooves with a dado blade. Instead, I used a standard (Vs'-kerf) saw blade to do the job. In order to do this, I cut each groove in two passes, flipping the workpiece end for end between passes to keep the groove centered on the thickness of the workpiece. cut all grooves & tenons same thickness as vt" plywood - % U- cross section |
||||||||||||||||


