82 - The Complete Miter Saw Workstation, страница 45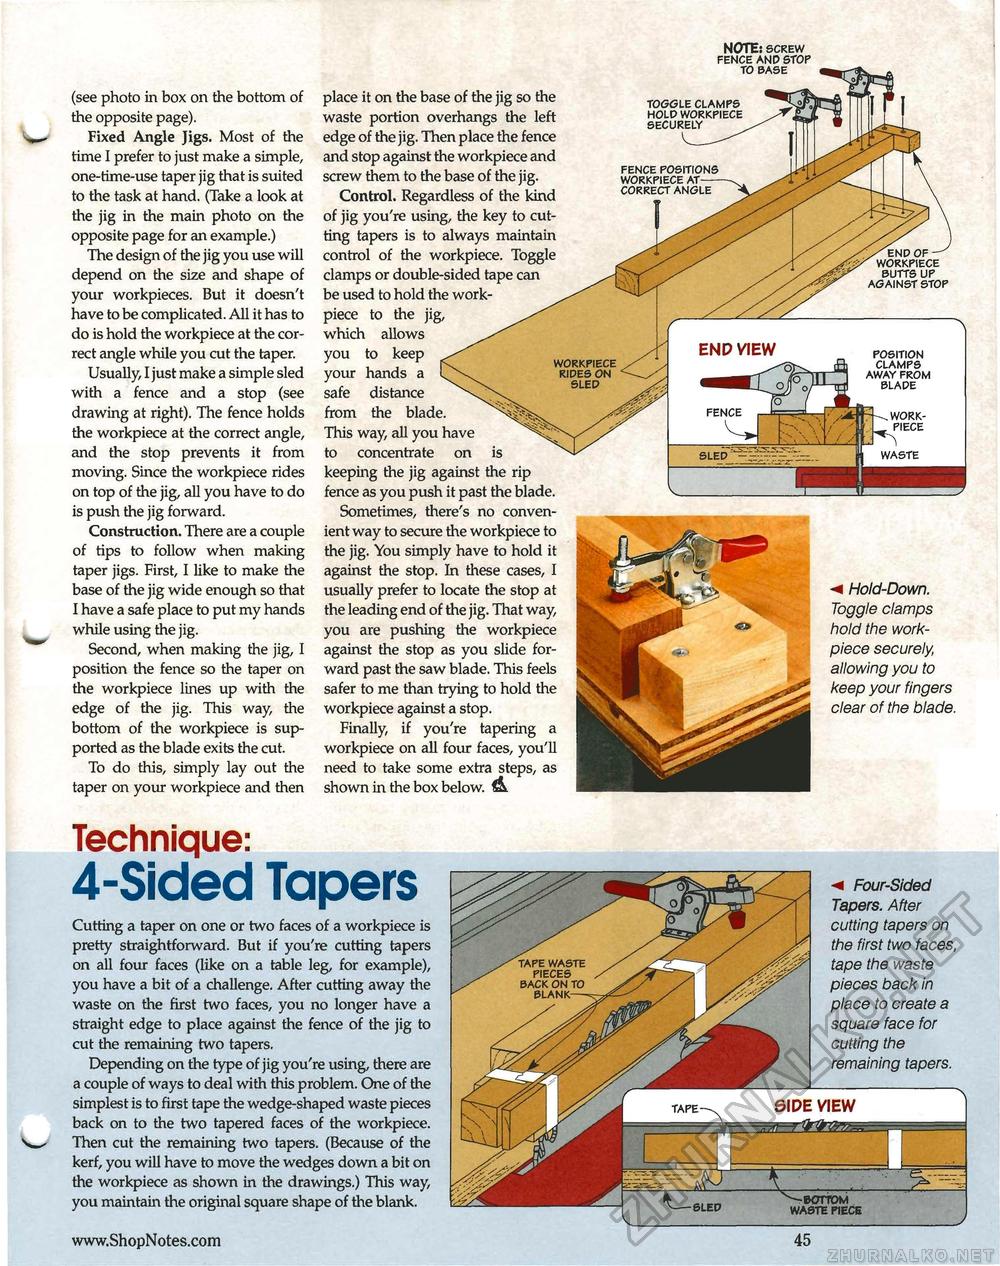
(see photo in box on the bottom of the opposite page). Fixed Angle Jigs. Most of the time I prefer to just make a simple, one-time-use taper jig that is suited to the task at hand. (Take a look at the jig in the main photo on the opposite page for an example.) The design of the jig you use will depend on the size and shape of your workpieces. But it doesn't have to be complicated. All it has to do is hold the workpiece at the correct angle while you cut the taper. Usually, I just make a simple sled with a fence and a stop (see drawing at right). The fence holds the workpiece at the correct angle, and the stop prevents it from moving. Since the workpiece rides on top of the jig, all you have to do is push the jig forward. Construction. There are a couple of tips to follow when making taper jigs. First, I like to make the base of the jig wide enough so that I have a safe place to put my hands while using the jig. Second, when making the jig, I position the fence so the taper on the workpiece lines up with the edge of the jig. This way, the bottom of the workpiece is supported as the blade exits the cut. To do this, simply lay out the taper on your workpiece and then Technique: 4-Sided Tapers Cutting a taper on one or two faces of a workpiece is pretty straightforward. But if you're cutting tapers on all four faces (like on a table leg, for example), you have a bit of a challenge. After cutting away the waste on the first two faces, you no longer have a straight edge to place against the fence of the jig to cut the remaining two tapers. Depending on the type of jig you're using, there are a couple of ways to deal with this problem. One of the simplest is to first tape the wedge-shaped waste pieces back on to the two tapered faces of the workpiece. Then cut the remaining two tapers. (Because of the kerf, you will have to move the wedges down a bit on the workpiece as shown in the drawings.) This way, you maintain the original square shape of the blank. place it on the base of the jig so the waste portion overhangs the left edge of the jig. Then place the fence and stop against the workpiece and screw them to the base of the jig. Control. Regardless of the kind of jig you're using, the key to cutting tapers is to always maintain control of the workpiece. Toggle clamps or double-sided tape can be used to hold the work-piece to the jig, which allows you to keep your hands a safe distance from the blade. This way, all you have to concentrate on is keeping the jig against the rip fence as you push it past the blade. Sometimes, there's no convenient way to secure the workpiece to the jig. You simply have to hold it against the stop. In these cases, I usually prefer to locate the stop at the leading end of the jig. That way, you are pushing the workpiece against the stop as you slide forward past the saw blade. This feels safer to me than trying to hold the workpiece against a stop. Finally, if you're tapering a workpiece on all four faces, you'll need to take some extra steps, as shown in the box below. & Hold-Down. Toggle clamps hold the work-piece securely, allowing you to keep your fingers clear of the blade. fence positions workpiece at correct angle workpiece butts up against stop NOTE: screw fence and stop to base toggle clamps hold workpiece securely position clamps away from blade work-piece waste END VIEW fence /tape waste pieces back on to ' blank—■ SIDE VIEW tape ■< Four-Sided Tapers. After cutting tapers on the first two faces, tape the waste pieces back in place to create a square face for cutting the remaining tapers. ^--sled bottom waste piece |


