85 - Router Table, страница 22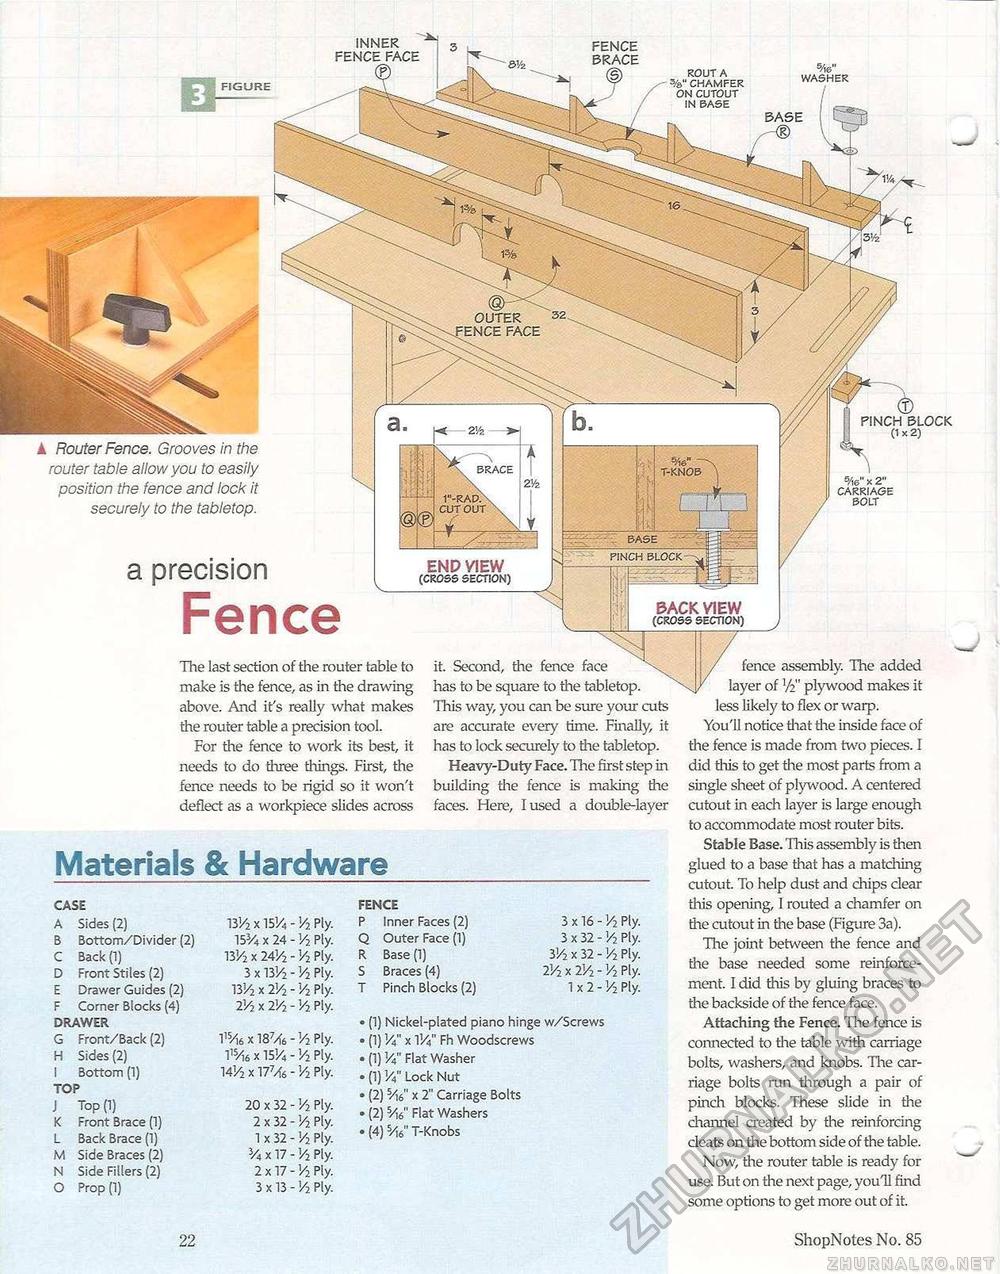
PINCH BLOCK (1x2) 5/16" X 2" CARRIAGE BOLT fence assembly. The added of V2" plywood makes it less likely to flex or warp. You'll notice that the inside face of the fence is made from two pieces. I did this to get the most parts from a single sheet of plywood. A centered cutout in each layer is large enough to accommodate most router bits. Stable Base. This assembly is then glued to a base that has a matching cutout. To help dust and chips clear this opening, 1 routed a chamfer on the cutout in the base (Figure 3a). The joint between the fence and the base needed some reinforcement. I did this by gluing braces to the backside of the fence face. Attaching the Fence. Tire fence is connected to the table with carriage bolts, washers, and knobs. The carriage bolts run through a pair of pinch blocks. These slide in the channel created by the reinforcing cleats on the bottom side of the table. Now, the router table is ready for use. But on the next page, youH find some options to get more out of it. CASE A Sides (2) B Bottom/Divider (2) C Back (1) D Front Stiles (2) E Drawer Guides (2) F Corner Blocks (4) DRAWER G Front/Back (2) H Sides (2) I Bottom (1) TOP J Top (1) K Front Brace (1) L Back Brace (1) M Side Braces (2) N Side Fillers (2) O Prop (1) 131^2 X 151/4 ' 19A x 24 ■ 13'/2 x 24V2 ■ 3 x 13V2 • 1314 x 2V2 ■ 2'/j x 2V-1 - '/?. Ply-Vi Ply. Vi Ply. Vi Ply. V2 Ply. Vi Ply- Iis/i6 x 18^6 - V2 Ply. T5/,6 X 15H - '/2 Ply. UV2 X 177/f6 - Vi Ply. 20 x 32 - V2 Ply. 2 x 32 - V2 Ply. 1 x 32 - V2 Ply. V4 x 17 - Vi Ply. 2x17- V2 Ply. 3x13- Vi Ply. FENCE P Inner Faces (2) Q Outer Face (1) R Base (1) S Braces (4) T Pinch Blocks (2) 3x16 3x32 3'/2 x 32 2V2 x 2y2 1x2 ■ Vi Ply. ■ y2 Ply. • y2 Ply. ■ '/2 Ply. ■ y2 Ply. • (1) Nickel-plated piano hinge w/Screws > (1) i/4" x VA" Fh Woodscrews ■ (1) y4" Flat Washer • (1) y4" Lock Nut «(2) Via" x 2" Carriage Bolts . (2) s/)6" Flat Washers • (4) 5/i6" T-Knobs INNER FENCE FACE FIGURE ▲ Router Fence. Grooves in the router table allow you to easily position the fence and lock it securely to the tabletop. J a precision FenceBACK VIEW (cross section) The last section of the router table to make is the fence, as in the drawing above. And it's really what makes the router table a precision tool. For the fence to work its best, it needs to do three tilings. First, the fence needs to be rigid so it won't deflect as a workpiece slides across Materials & Hardware it. Second, the fence face has to be square to the tabletop. This way, you can be sure your cuts are accurate every time. Finally, it has to lock securely to the tabletop. Heavy-Duty Face. The first step in building the fence is making the faces. Here, I used a double-layer sAe" WASHER END VIEW (cross section) 22 ShopNotes No. 85 |


