86, страница 25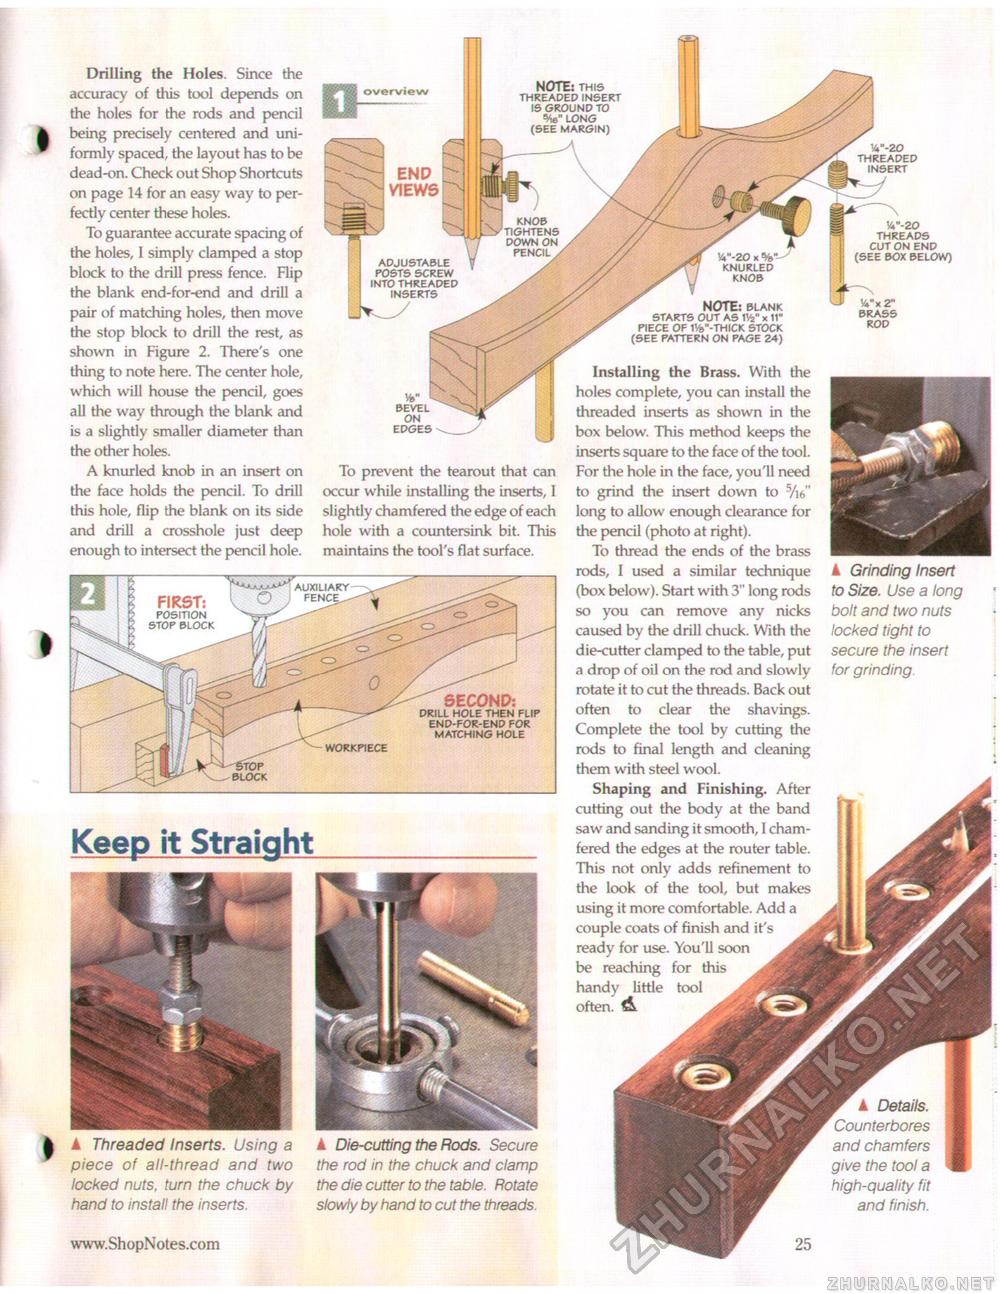
Drilling the Holes. Since the accuracy of this tool depends on the holes for the rods and pencil being precisely centered and uniformly spaced, the layout has to be dead-on. Check out Shop Shortcuts on page 14 for an easy way to perfectly center these holes. To guarantee accurate spacing of the holes, I simply clamped a stop block to the drill press fence. Hip the blank end-for-end and drill a pair of matching holes, then move the stop block to drill the rest, as shown in Figure 2. There's one thing to note here. The center hole, which will house the pencil, goes all the way through the blank and is a slightly smaller diameter than the other holes. A knurled knob in an insert on the face holds the pencil. To drill this hole, flip the blank on its side and drill a crosshole just deep enough to intersect the pencil hole. To prevent the tearout that can occur while installing the inserts, I slightly chamfered the edge of each hole with a countersink bit. This maintains the tool's flat surface. Keep it Straight NOTE: BLANK STARTS OUT AS W x 11" PIECE OF 1V»"-THICK STOCK (SEE PATTERN ON PAGE 24) Installing the Brass. With the holes complete, you can install the threaded inserts as shown in the box below. This method keeps the inserts square to the face of the tool. For the hole in the face, you'll need to grind the insert down to 5/i6" long to allow enough clearance for the pencil (photo at right). To thread the ends of the brass rods, I used a similar technique (box below). Start with 3" long rods so you can remove any nicks caused by the drill chuck. With the die-cutter clamped to the table, put a drop of oil on the rod and slowly rotate it to cut the threads. Back out often to clear the shavings. Complete the tool by cutting the rods to final length and cleaning them with steel wool. Shaping and Finishing. After cutting out the body at the band saw and sanding it smooth, I chamfered the edges at the router table. This not only adds refinement to the look of the tool, but makes using it more comfortable. Add a couple coats of finish and it's ready for use. You'll soon be reaching for this handy little tool often. A y4"-2o THREADS CUT ON END (SEE BOX BELOW) Vx 2" BRASS ROD ▲ Grinding Insert to Size. Use a long bolt and two nuts locked tight to secure the insert for grinding. ▲ Threaded Inserts. Using a piece of all-thread and two locked nuts, turn the chuck by hand to install the inserts. ▲ Die-cutting the Rods. Secure the rod in the chuck and clamp the die cutter to the table. Rotate slowly by hand to cut the threads. 25 |


