86, страница 23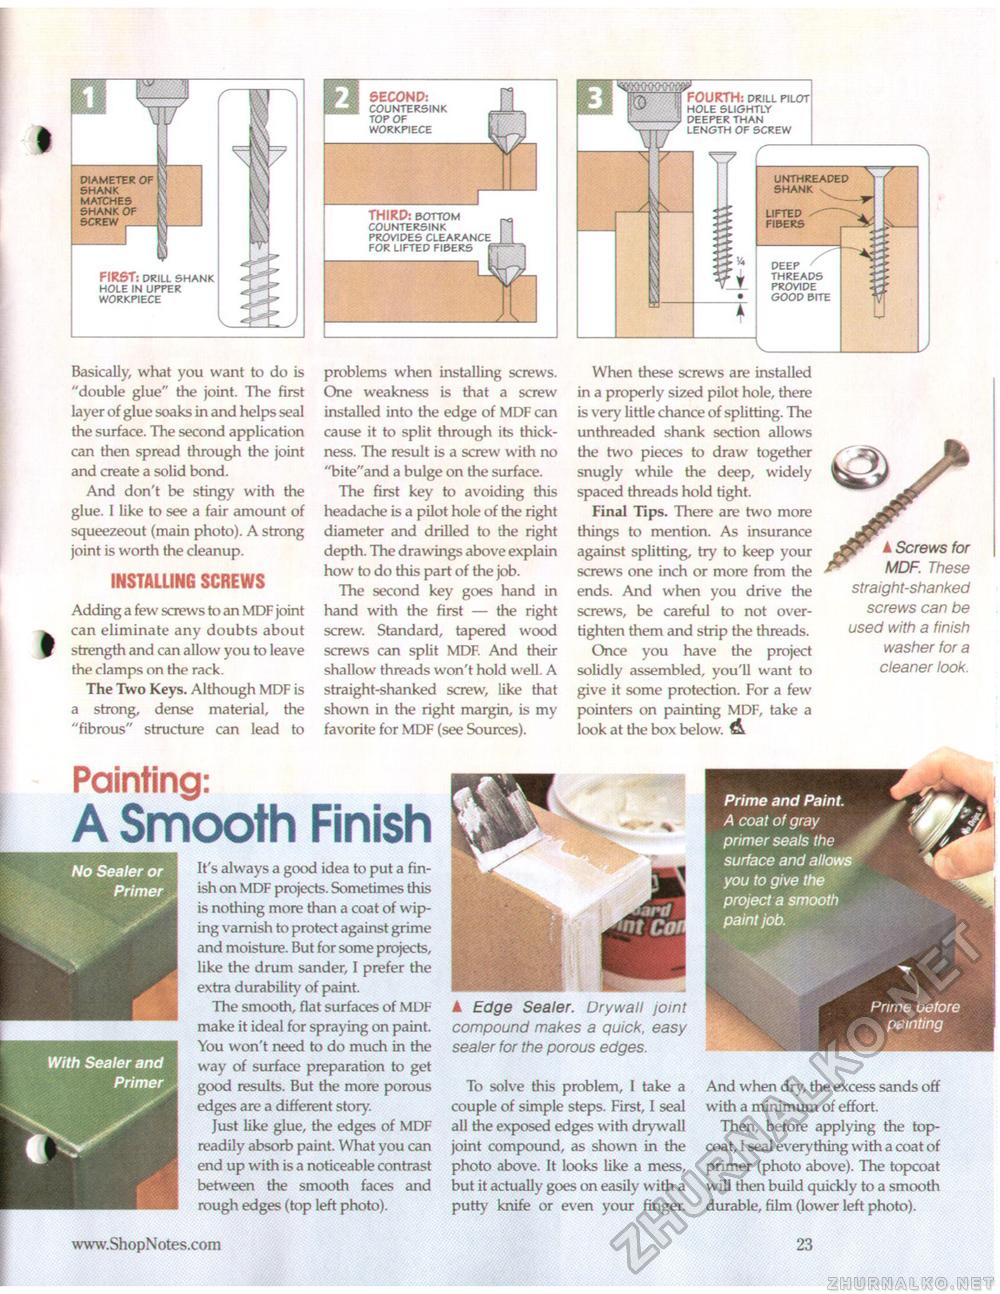
w diameter of shank matches shank of screw ■H FIRST: drill shank hole in upper workpiece SECOND: countersink top of workpiece THIRD: bottom countersink provides clearance for lifted fibers FOURTH: drill pilot hole slightly deeper than length of screw Basically, what you want to do is "double glue" the joint. The first layer of glue soaks in and helps seal the surface. The second application can then spread through the joint and create a solid bond. And don't be stingy with the glue. 1 like to see a fair amount of squeezeout (main photo). A strong joint is worth the cleanup. INSTALLING SCREWS Adding a few screws to an MDF joint can eliminate any doubts about strength and can allow you to leave the clamps on the rack. The Two Keys. Although MDF is a strong, dense material, the "fibrous" structure can lead to problems when installing screws. One weakness is that a screw installed into the edge of MDF can cause it to split through its thickness. The result is a screw with no "bite"and a bulge on the surface. The first key to avoiding this headache is a pilot hole of the right diameter and drilled to the right depth. The drawings above explain how to do this part of the job. The second key goes hand in hand with the first — the right screw. Standard, tapered wood screws can split MDF. And their shallow threads won't hold well. A straight-shanked screw, like that shown in the right margin, is my favorite for MDF (see Sources). Painting: A Smooth FinishIt's always a good idea to put a finish on MDF projects. Sometimes this is nothing more than a coat of wiping varnish to protect against grime and moisture. But for some projects, like the drum sander, I prefer the extra durability of paint. The smooth, flat surfaces of MDF make it ideal for spraying on paint. You won't need to do much in the way of surface preparation to get good results. But the more porous edges are a different story. Just like glue, the edges of MDF readily absorb paint. What you can end up with is a noticeable contrast between the smooth faces and rough edges (top left photo). When these screws are installed in a properly sized pilot hole, there is very little chance of splitting. The unthreaded shank section allows the two pieces to draw together snugly while the deep, widely spaced threads hold tight. Final Hps. There are two more things to mention. As insurance against splitting, try to keep your screws one inch or more from the ends. And when you drive the screws, be careful to not overtighten them and strip the threads. Once you have the project solidly assembled, you'll want to give it some protection. For a few pointers on painting MDF, take a look at the box below. A Prime and Paint. A coat of gray primer seals the surface and allows you to give the project a smooth paint job. A Screws for MDF. These straight-shanked screws can be used with a finish washer for a cleaner look. / A Edge Sealer. Drywall joint compound makes a quick, easy sealer for the porous edges. To solve this problem, I take a couple of simple steps. First, I seal all the exposed edges with drywall joint compound, as shown in the photo above. It looks like a mess, but it actually goes on easily with a putty knife or even your finger. Prime before 9 And when dry, the excess sands off with a minimum of effort. Then, before applying the topcoat, I seal everything with a coat of primer (photo above). The topcoat will then build quickly to a smooth durable, film (lower left photo). 23 |


