87, страница 45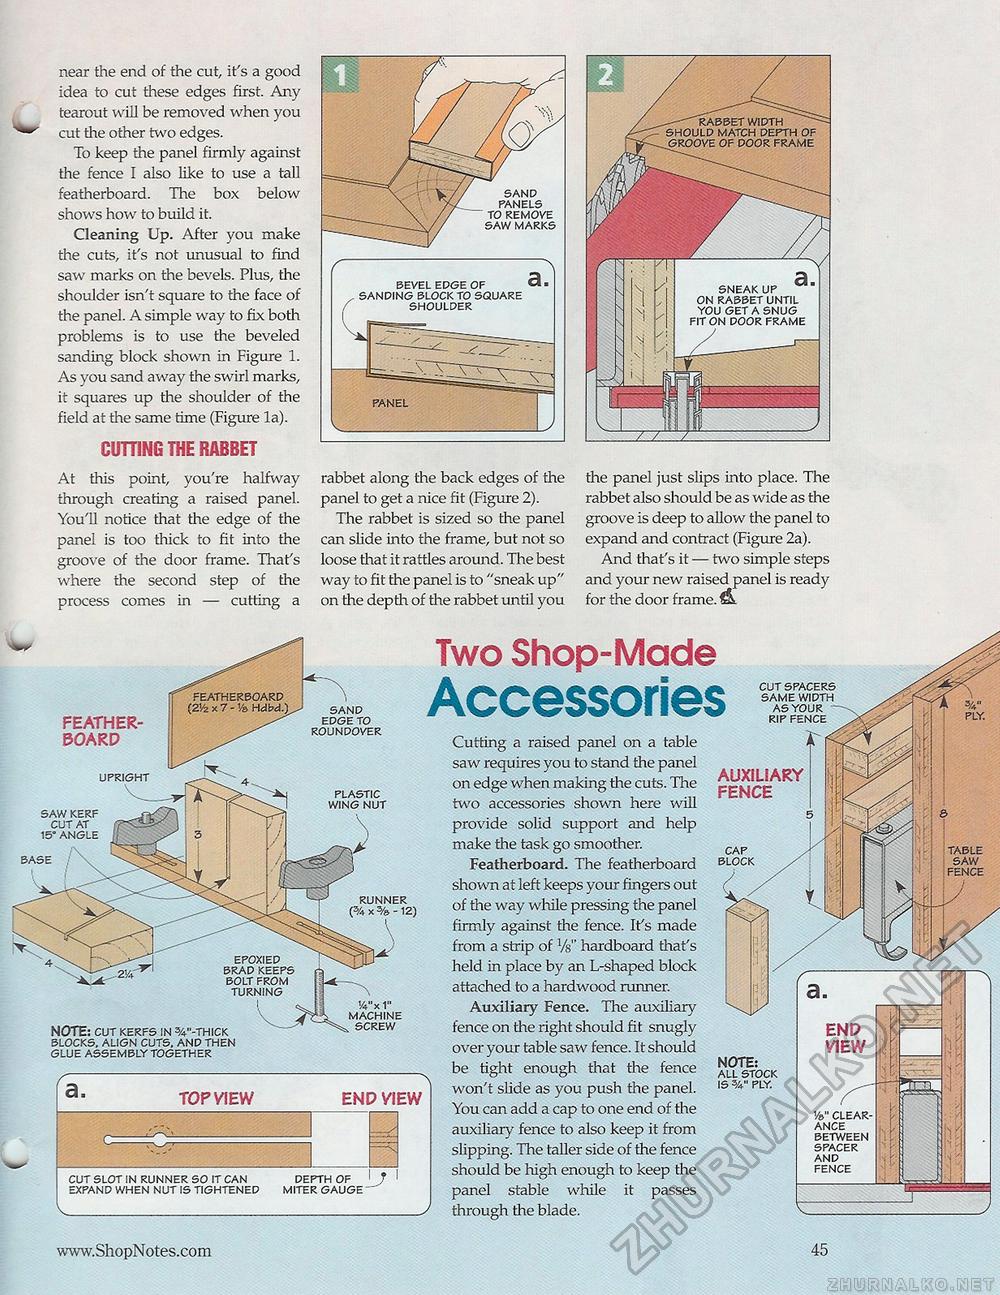
near the end of the cut, it's a good idea to cut these edges first. Any tearout will be removed when you cut the other two edges. To keep the panel firmly against the fence I also like to use a tall featherboard. The box below shows how to build it. Cleaning Up. After you make the cuts, it's not unusual to find saw marks on the bevels. Plus, the shoulder isn't square to the face of the panel. A simple way to fix both problems is to use the beveled sanding block shown in Figure 1. As you sand away the swirl marks, it squares up the shoulder of the field at the same time (Figure la). CUTTING THE RABBET At this point, you're halfway through creating a raised panel. You'll notice that the edge of the panel is too thick to fit into the groove of the door frame. That's where the second step of the process comes in — cutting a rabbet along the back edges of the panel to get a nice fit (Figure 2). The rabbet is sized so the panel can slide into the frame, but not so loose that it rattles around. The best way to fit the panel is to "sneak up" on the depth of die rabbet until you the panel just slips into place. The rabbet also should be as wide as the groove is deep to allow the panel to expand and contract (Figure 2a). And that's it — two simple steps and your new raised panel is ready for the door frame, SAND PANELS TO REMOVE SAW MARKS BEVEL EDGE OF SANDING BLOCK TO SQUARE SHOULDER PANEL ^-- FEATHER-BOARD SAND EDGE TO ROUNDOVER UPRIGHT PLASTIC WING NUT SAW KzKr CUT AT 15" ANGLE BASE Two Shop-Made Accessories CUT SPACERS SAME WIDTH AS YOUR RIP FENCE RUNNER (% x % - 12) NOTE: CUT KERFS IN %"-THICK BLOCKS, ALIGN CUTS, AND THEN GLUE ASSEMBLY TOGETHER J4"x 1" MACHINE SCREW TOP VIEW END VIEW CUT SLOT IN RUNNER SO IT CAN EXPAND WHEN NUT IS TIGHTENED I T I DEPTH OF 1 J MITER GAUGE Cutting a raised panel on a table saw requires you to stand the panel on edge when making the cuts. The two accessories shown here will provide solid support and help make the task go smoother. Featherboard. The featherboard shown at left keeps your fingers out of the way while pressing the panel firmly against the fence. Ifs made from a strip of Vs" hardboard that's held in place by an L-shaped block attached to a hardwood runner. Auxiliary Fence. The auxiliary fence on the right should fit snugly over your table saw fence. It should be tight enough that the fence won't slide as you push the panel. You can add a cap to one end of the auxiliary fence to also keep it from slipping. The taller side of the fence should be high enough to keep the panel stable while it passes through the blade. AUXILIARY FENCE CAP BLOCK NOTE: ALL STOCK IS V PLY. END VIEW '/a" CLEARANCE BETWEEN SPACER AND FENCE TABLE SAW FENCE 19 |


