87, страница 9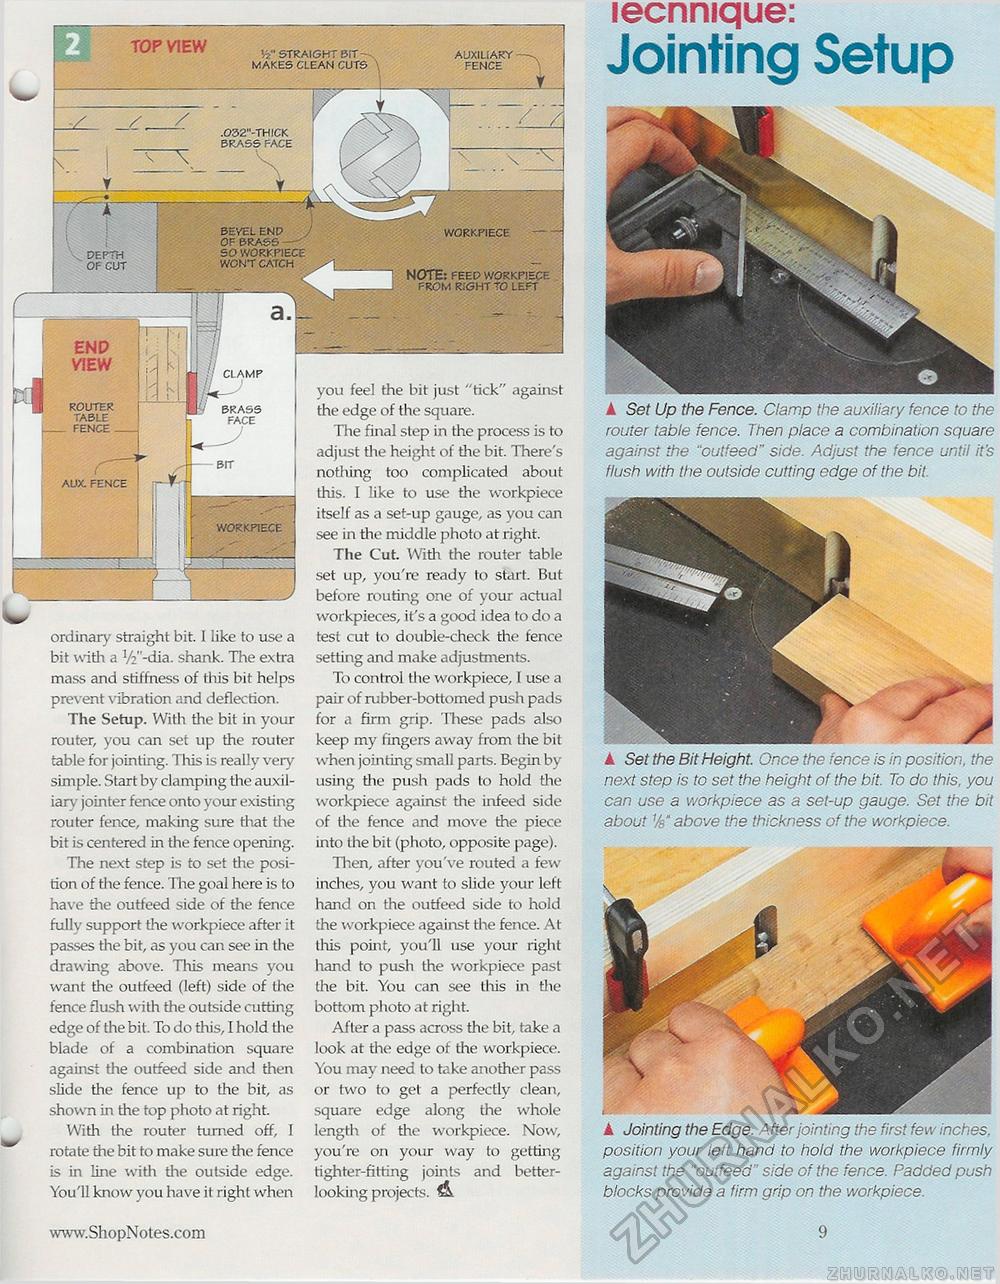
Vi" STRAIGHT BIT MAKES CLEAN CUTS TOP VIEW lecnnique: Jointing Setup A Set the Bit Height. Once the fence is in position, the next step is to set the height of the bit. To do this, you can use a workpiece as a set-up gauge. Set the bit about Vs" above the thickness of the workpiece. ▲ Set Up the Fence. Clamp the auxiliary fence to the router table fence. Then place a combination square against the "outfeed" side. Adjust the fence until it's flush with the outside cutting edge of the bit. AUXILIARY -FENCE ordinary straight bit. I like to use a bit with a Vf'-dia. shank. The extra mass and stiffness of this bit helps prevent vibration and deflection. The Setup. With the bit in your router, you can set up the router table for jointing. This is really very simple. Start by clamping the auxiliary jointer fence onto your existing router fence, making sure that the bit is centered in the fence opening. The next step is to set the position of the fence. The goal here is to have the outfeed side of the fence fully support the workpiece after it passes the bit, as you can see in the drawing above. This means you want the outfeed (left) side of the fence flush with the outside cutting edge of the bit. To do this, I hold the blade of a combination square against the outfeed side and then slide the fence up to the bit, as shown in the top photo at right. With the router turned off, I rotate the bit to make sure the fence is in line with the outside edge. You'll know you have it right when WORKPIECE NOTE: FEED WORKPIECE FROM RiGHT TO LEFT you feel the bit just "tick" against the edge of the square. The filial step in the process is to adjust the height of the bit. There's nothing too complicated about this. I like to use the workpiece itself as a set-up gauge, as you can see in the middle photo at right. The Cut. With the router table set up, you're ready to start. But before routing one of your actual workpieces, it's a good idea to do a test cut to double-check the fence setting and make adjustments. To control the workpiece, I use a pair of mbber-bottomed push pads for a firm grip. These pads also keep my fingers away from the bit when jointing small parts. Begin by using the push pads to hold the workpiece against the infeed side of the fence and move the piece into the bit (photo, opposite page). Then, after you've routed a few inches, you want to slide your left hand on the outfeed side to hold the workpiece against the fence. At this point, you'll use your right hand to push the workpiece past the bit. You can see tliis in the bottom photo at right. After a pass across the bit, take a look at the edge of the workpiece. You may need to take another pass or two to get a perfectly clean, square edge along the whole length of the workpiece. Now, you're on your way to getting tighter-fitting joints and better-looking projects. & END VIEW ROUTER TABLE FENCE - AUX. FENCE CLAMP BRASS BIT WORKPIECE k Jointing the Edge. After jointing the firs! few inches, position your left hand to hold the workpiece firmly against the "outfeed" side of the fence. Padded push blocks provide a firm grip on the workpiece. 19 |


