90 - Get the Most out of a Plunge Router, страница 21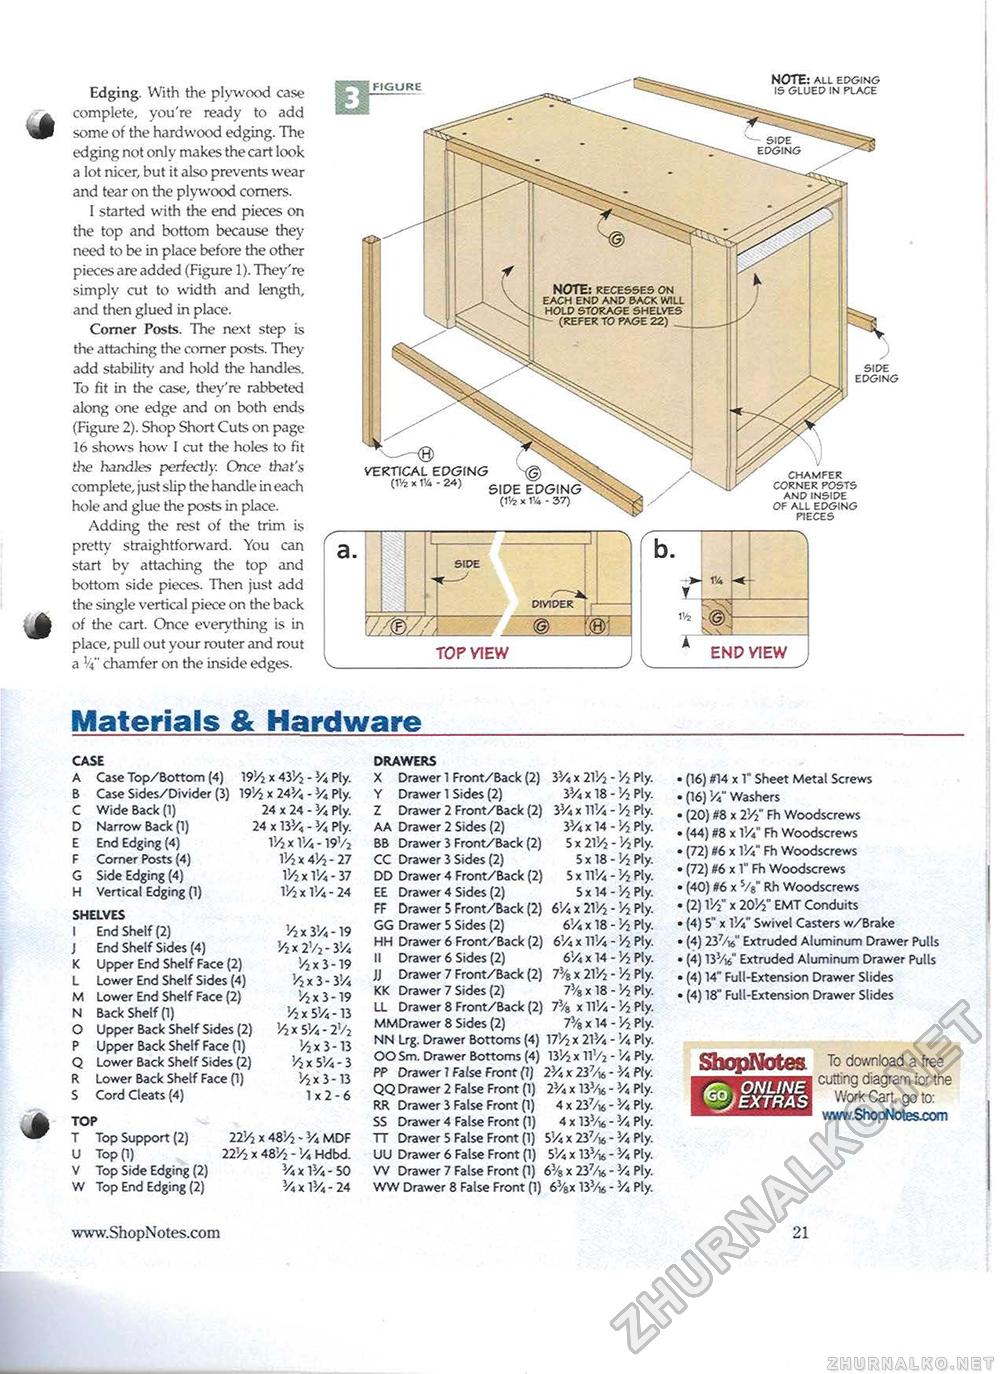
Edging. With the plywood case complete, you're ready to add some of the hardwood edging. The edging not only makes the cart look a lot nicer, but it also prevents wear and tear on the plywood comers. I started with the end pieces on the top and bottom because they need to be in place before the other pieces are added (Figure 1). They're simply cut to width and length, and then glued in place. Comer Posts. The next step is the attaching the comer posts. They add stability and hold the handles. To fit in the case, they're rabbeted along one edge and on both ends (Figure 2). Shop Short Cuts on page 16 shows how I cut the holes to fit the handles perfectly. Once that's complete, just slip the handle in each hole and glue the posts in place. Adding the rest of the trim is pretty straightforward. You can start by attaching the top and bottom side pieces. Then just add the single vertical piece on the back of the cart. Once everything is in place, pull out your router and rout a V chamfer on the inside edges. side divider '/M//\ < TOP VIEW b. y 1V4 VA w END VIEW Materials & Hardware CASE A Case Top/Bottom (4) B Case Sides/Divider (3) C Wide Back (1) D Narrow Back (1) E End Edging (4) F Corner Posts (4) G Side Edging (4) H Vertical Edging (1) SHELVES I End Shelf (2) J End Shelf Sides (4) K Upper End Shelf Face (2) L Lower End Shelf Sides (4) M Lower End Shelf Face (2) N Back Shelf (1) O Upper Back Shelf Sides (2) P Upper Back Shelf Face 0) Q Lower Back Shelf Sides (2) R Lower Back Shelf Face (1) S Cord Cleats (4) 19'/2 x 43Vj - Vt, Ply. 19'/2 x 24V, - V4 Ply. 24 x 24 - V* Ply. 24 x 13V; - Vi Ply. V/ixVA-nVi V/2 x 4'/2 - 27 1 Vi x VA ■ 37 V/2 x VA - 24 V2 x VA -19 V2 x 2'/2 - VA '/j x 3 -19 '/2 x 3 - VA '/2 x 3 -19 V2 x 5Vi • 13 Vi x 5Vi - 2V2 '/2 x 3 -13 Vj x 5Vi - 3 y2 x 3 -13 1x2-6 TOP T Top Support (2) U Top (1) V Top Side Edging (2) W Top End Edging (2) 22'/j x 48'/2 - 5/4 MDF 22V2 x 48"/2 - V4 Hdbd. Vi x lVi - 50 Vi x lVi - 24 DRAWERS X Drawer 1 Front/Back (2) 3Vi x 2l'/2 - V2 Ply. Y Drawer 1 Sides (2) 3Vi x 18 - '/2 Ply. Z Drawer 2 Front/Back (2) 3}/« x ll'/i - '/2 Ply. AA Drawer 2 Sides (2) 3Vi x 14 - >/2 Ply. BB Drawer 3 Front/Back (2) 5 x 21'/2 - V2 Ply. CC Drawer 3 Sides (2) 5 x 18-'/2 Ply. DD Drawer 4 Front/Back (2) S x llVi - Vi Ply. EE Drawer 4 Sides (2) 5 x 14 - V2 Ply. FF Drawer 5 Front/Back (2) 6V< x 2V/2 - V2 Ply. GG Drawer 5 Sides (2) 6'/i x 18 -V2 Ply. HH Drawer 6 Front/Back (2) 6'/< x llVi - V2 Ply. II Drawer 6 Sides (2) 6'/< x 14 - V2 Ply. JJ Drawer 7 Front/Back (2) 73/8 x 2lV2 - V2 Ply. KK Drawer 7 Sides (2) 7% x 18 - V2 Ply. LL Drawer 8 Front/Back (2) 73/8 x lT/4 - V2 Ply. MMDrawer 8 Sides (2) l\ x 14 - V2 Ply. NN Lrg. Drawer Bottoms (4) 17'/2 x 2lVi - '/4 Ply. OO Sm. Drawer Bottoms (4) 13'/2 x llV2 - Vi Ply. PP Drawer! False Front (?) 2}A x 23 V* - 3/< Ply. QQ Drawer 2 False Front (1) 2Vi x 13V* - 3/4 Ply. RR Drawer 3 False Front (1) 4 x 237/K - Vi Ply. SS Drawer 4 False Front (1) 4 x 133/i6 - 3/4 Ply. TT Drawer 5 False Front (1) SV* x 237* - Vi Ply. UU Drawer 6 False Front (1) 5Vi x 133/*, - Vi Ply. W Drawer 7 False Front (1) 63/8 x 237/* - Vi Ply. WW Drawer 8 Faise Front (1) 63/8x 133/* - Vi Ply. (16) #14 x 1" Sheet Metal Screws (16) Vi" Washers (20) I8 x 2'/2" Fh Woodscrews (44) #8 x lVi" Fh Woodscrews (72) D6 x lVi" Fh Woodscrews (72) K6 x 1" Fh Woodscrews (40) 06 x s/8" Rh Woodscrews (2) T/2" x 20'/2" EMT Conduits (4) 5" x lVi" Swivel Casters w/Brake (4) 237/«" Extruded Aluminum Drawer Pulls (4) 133/]«" Extruded Aluminum Drawer Pulls (4) 14" Full-Extension Drawer Slides (4) 18" Full-Extension Drawer Slides To download a free cutting diagram for the Work Cart, go to: wwwShopNotesxom FIGURE NOTE: ALL EDGING IS GLUED IN PLACE VERTICAL EDGING (114x1% -24) 5lpE («4x SIDE EDGING CHAMFER CORNER POSTS AND INSIDE OF ALL EDGING PIECES 21 |


