91 - Planer Stand, страница 21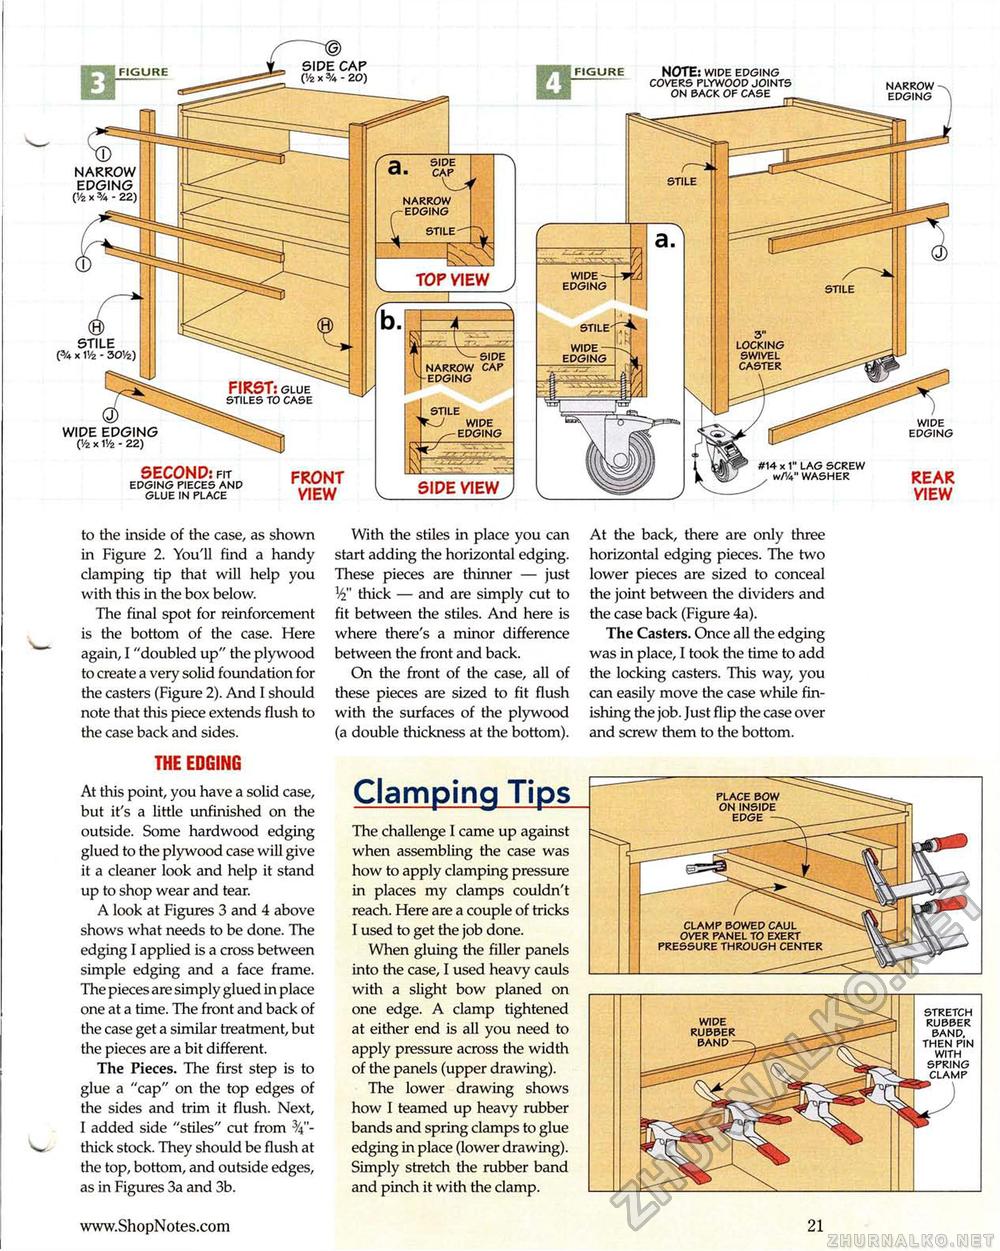
SIDE VIEW ^ FIGURE SIDE CAP ('/2 x 3A - 20)
NARROW EDGING ('/2 x % - 22) '"•a side a. cap narrow edging v TOP VIEW STILE (% x 1'/2 - 30'/2) FIRST: glue stiles to case WIDE EDGING (V2 X 1'/2 - 22) SECOND: fit edging pieces and glue in place FRONT VIEW NOTE: wide edging covers plywood joints on back of case narrow edging wide-edging locking swivel caster wide -edging wide edging #14 x 1" LAG SCREW _ wW WASHER REAR VIEW to the inside of the case, as shown in Figure 2. You'll find a handy clamping tip that will help you with this in the box below. The final spot for reinforcement is the bottom of the case. Here again, I "doubled up" the plywood to create a very solid foundation for the casters (Figure 2). And I should note that this piece extends flush to the case back and sides. THE EDGING At this point, you have a solid case, but it's a little unfinished on the outside. Some hardwood edging glued to the plywood case will give it a cleaner look and help it stand up to shop wear and tear. A look at Figures 3 and 4 above shows what needs to be done. The edging I applied is a cross between simple edging and a face frame. The pieces are simply glued in place one at a time. The front and back of the case get a similar treatment, but the pieces are a bit different. The Pieces. The first step is to glue a "cap" on the top edges of the sides and trim it flush. Next, I added side "stiles" cut from 3/4"-thick stock. They should be flush at the top, bottom, and outside edges, as in Figures 3a and 3b. With the stiles in place you can start adding the horizontal edging. These pieces are thinner — just V thick — and are simply cut to fit between the stiles. And here is where there's a minor difference between the front and back. On the front of the case, all of these pieces are sized to fit flush with the surfaces of the plywood (a double thickness at the bottom). Clamping Tips The challenge I came up against when assembling the case was how to apply clamping pressure in places my clamps couldn't reach. Here are a couple of tricks I used to get the job done. When gluing the filler panels into the case, I used heavy cauls with a slight bow planed on one edge. A clamp tightened at either end is all you need to apply pressure across the width of the panels (upper drawing). The lower drawing shows how I teamed up heavy rubber bands and spring clamps to glue edging in place (lower drawing). Simply stretch the rubber band and pinch it with the clamp. At the back, there are only three horizontal edging pieces. The two lower pieces are sized to conceal the joint between the dividers and the case back (Figure 4a). The Casters. Once all the edging was in place, I took the time to add the locking casters. This way, you can easily move the case while finishing the job. Just flip the case over and screw them to the bottom. wide rubber band stretch rubber band. then pin with spring clamp 21 |
||||||||||||


