91 - Planer Stand, страница 31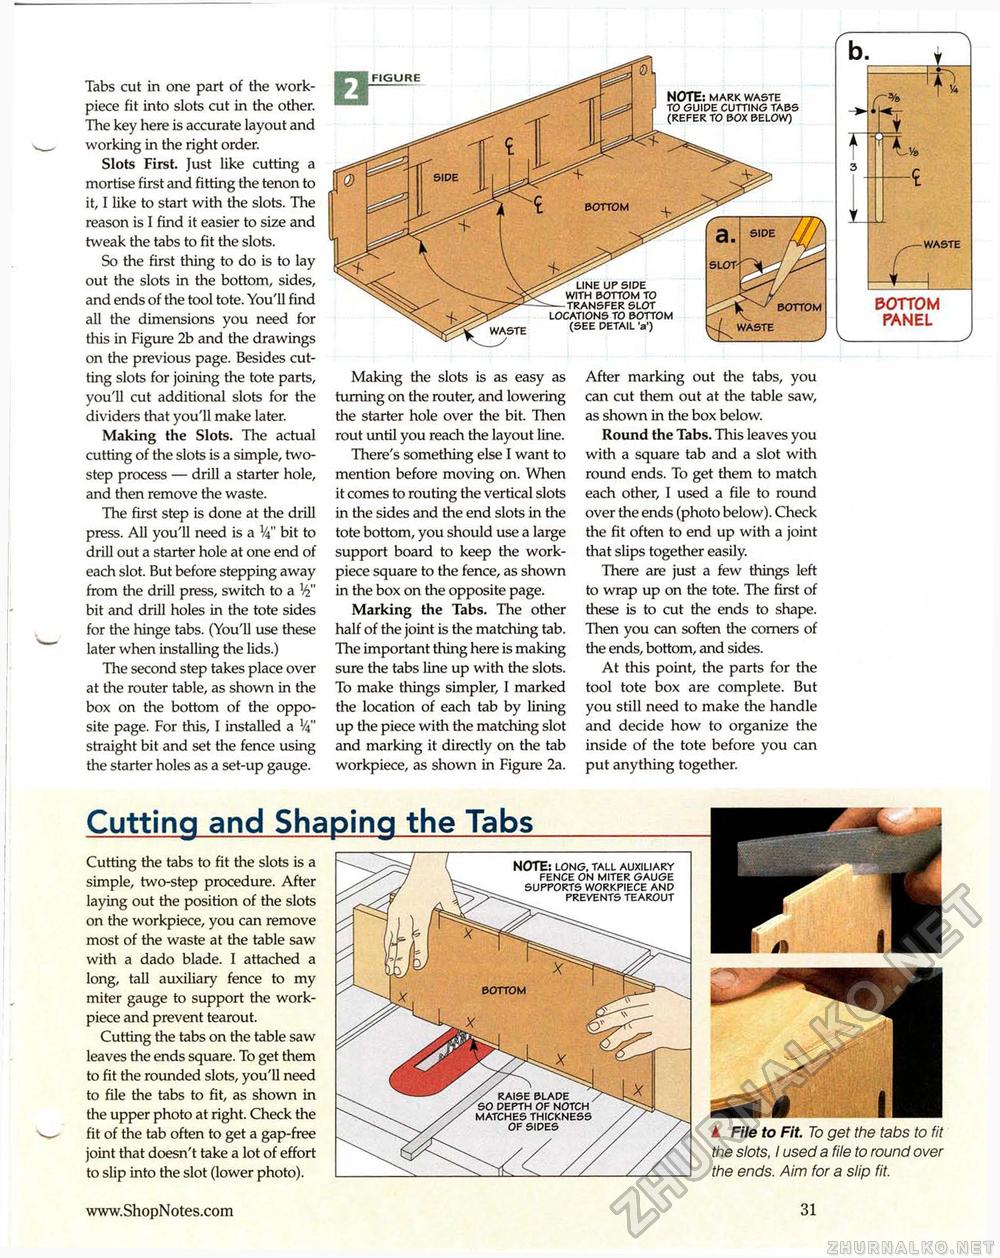
Tabs cut in one part of the work-piece fit into slots cut in the other. The key here is accurate layout and working in the right order. Slots First. Just like cutting a mortise first and fitting the tenon to it, I like to start with the slots. The reason is I find it easier to size and tweak the tabs to fit the slots. So the first thing to do is to lay out the slots in the bottom, sides, and ends of the tool tote. You'll find all the dimensions you need for this in Figure 2b and the drawings on the previous page. Besides cutting slots for joining the tote parts, you'll cut additional slots for the dividers that you'll make later. Making the Slots. The actual cutting of the slots is a simple, two-step process — drill a starter hole, and then remove the waste. The first step is done at the drill press. All you'll need is a V4" bit to drill out a starter hole at one end of each slot. But before stepping away from the drill press, switch to a bit and drill holes in the tote sides for the hinge tabs. (You'll use these later when installing the lids.) The second step takes place over at the router table, as shown in the box on the bottom of the opposite page. For this, I installed a V4" straight bit and set the fence using the starter holes as a set-up gauge. Making the slots is as easy as turning on the router, and lowering the starter hole over the bit. Then rout until you reach the layout line. There's something else I want to mention before moving on. When it comes to routing the vertical slots in the sides and the end slots in the tote bottom, you should use a large support board to keep the work-piece square to the fence, as shown in the box on the opposite page. Marking the Tabs. The other half of the joint is the matching tab. The important thing here is making sure the tabs line up with the slots. To make things simpler, I marked the location of each tab by lining up the piece with the matching slot and marking it directly on the tab workpiece, as shown in Figure 2a. After marking out the tabs, you can cut them out at the table saw, as shown in the box below. Round the Tabs. This leaves you with a square tab and a slot with round ends. To get them to match each other, I used a file to round over the ends (photo below). Check the fit often to end up with a joint that slips together easily. There are just a few things left to wrap up on the tote. The first of these is to cut the ends to shape. Then you can soften the corners of the ends, bottom, and sides. At this point, the parts for the tool tote box are complete. But you still need to make the handle and decide how to organize the inside of the tote before you can put anything together. Cutting and Shaping the Tabs Cutting the tabs to fit the slots is a simple, two-step procedure. After laying out the position of the slots on the workpiece, you can remove most of the waste at the table saw with a dado blade. I attached a long, tall auxiliary fence to my miter gauge to support the work-piece and prevent tearout. Cutting the tabs on the table saw leaves the ends square. To get them to fit the rounded slots, you'll need to file the tabs to fit, as shown in the upper photo at right. Check the fit of the tab often to get a gap-free joint that doesn't take a lot of effort to slip into the slot (lower photo). ▲ File to Fit. To get the tabs to fit the slots, I used a file to round over the ends. Aim for a slip fit. 31 bottom
NOTE: MARK WASTE TO GUIDE CUTTING TABS (REFER TO BOX BELOW) TO SLOT BOTTOM •a') bottom WASTE NOTE: LONG. TALL AUXILIARY FENCE ON MITER GAUGE SUPPORTS WORKPIECE AND PREVENTS TEAROUT |
||||||||


