91 - Planer Stand, страница 32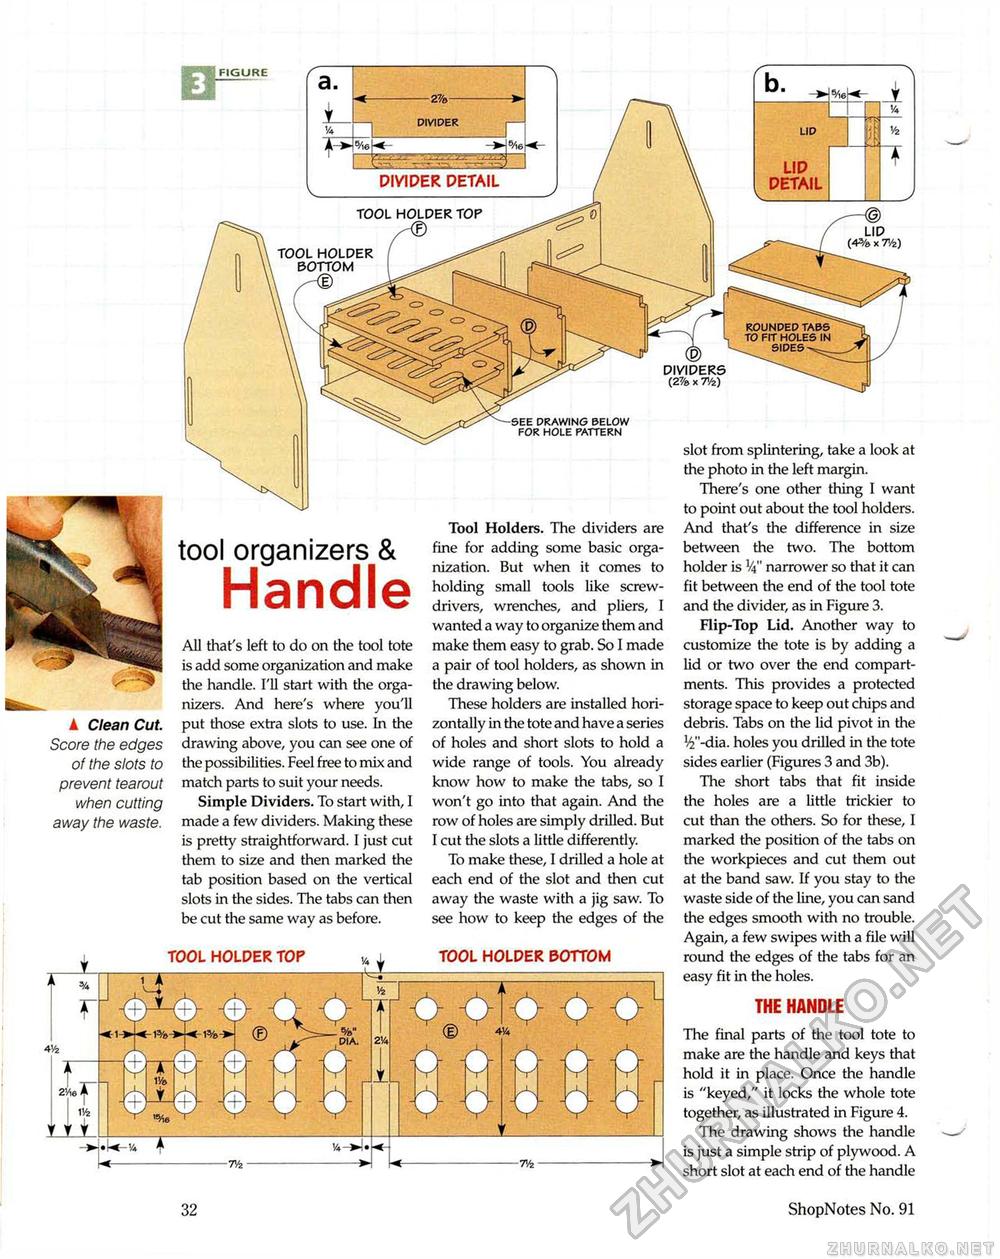
DIVIDER LID DETAIL DIVIDER DETAIL TOOL HOLDER TOP TOOL HOLDER BOTTOM rounded tabs to fit holes in sides DIVIDERS (2% X T/z) SEE DRAWING BELOW FOR HOLE PATTERN slot from splintering, take a look at the photo in the left margin. There's one other thing I want to point out about the tool holders. And that's the difference in size between the two. The bottom holder is !/i" narrower so that it can fit between the end of the tool tote and the divider, as in Figure 3. Flip-Top Lid. Another way to customize the tote is by adding a lid or two over the end compartments. This provides a protected storage space to keep out chips and debris. Tabs on the lid pivot in the ^"-dia. holes you drilled in the tote sides earlier (Figures 3 and 3b). The short tabs that fit inside the holes are a little trickier to cut than the others. So for these, I marked the position of the tabs on the workpieces and cut them out at the band saw. If you stay to the waste side of the line, you can sand the edges smooth with no trouble. Again, a few swipes with a file will round the edges of the tabs for an easy fit in the holes. Tool Holders. The dividers are fine for adding some basic organization. But when it comes to holding small tools like screwdrivers, wrenches, and pliers, I wanted a way to organize them and make them easy to grab. So I made a pair of tool holders, as shown in the drawing below. These holders are installed horizontally in the tote and have a series of holes and short slots to hold a wide range of tools. You already know how to make the tabs, so I won't go into that again. And the row of holes are simply drilled. But I cut the slots a little differently. To make these, I drilled a hole at each end of the slot and then cut away the waste with a jig saw. To see how to keep the edges of the tool organizers & Handle All that's left to do on the tool tote is add some organization and make the handle. I'll start with the organizers. And here's where you'll put those extra slots to use. In the drawing above, you can see one of the possibilities. Feel free to mix and match parts to suit your needs. Simple Dividers. To start with, I made a few dividers. Making these is pretty straightforward. I just cut them to size and then marked the tab position based on the vertical slots in the sides. The tabs can then be cut the same way as before. ▲ Clean Cut. Score the edges of the slots to prevent tearout when cutting away the waste. TOOL HOLDER BOTTOM TOOL HOLDER TOP The final parts of the tool tote to make are the handle and keys that hold it in place. Once the handle is "keyed," it locks the whole tote together, as illustrated in Figure 4. The drawing shows the handle is just a simple strip of plywood. A short slot at each end of the handle 32 ShopNotes No. 91 |


