91 - Planer Stand, страница 33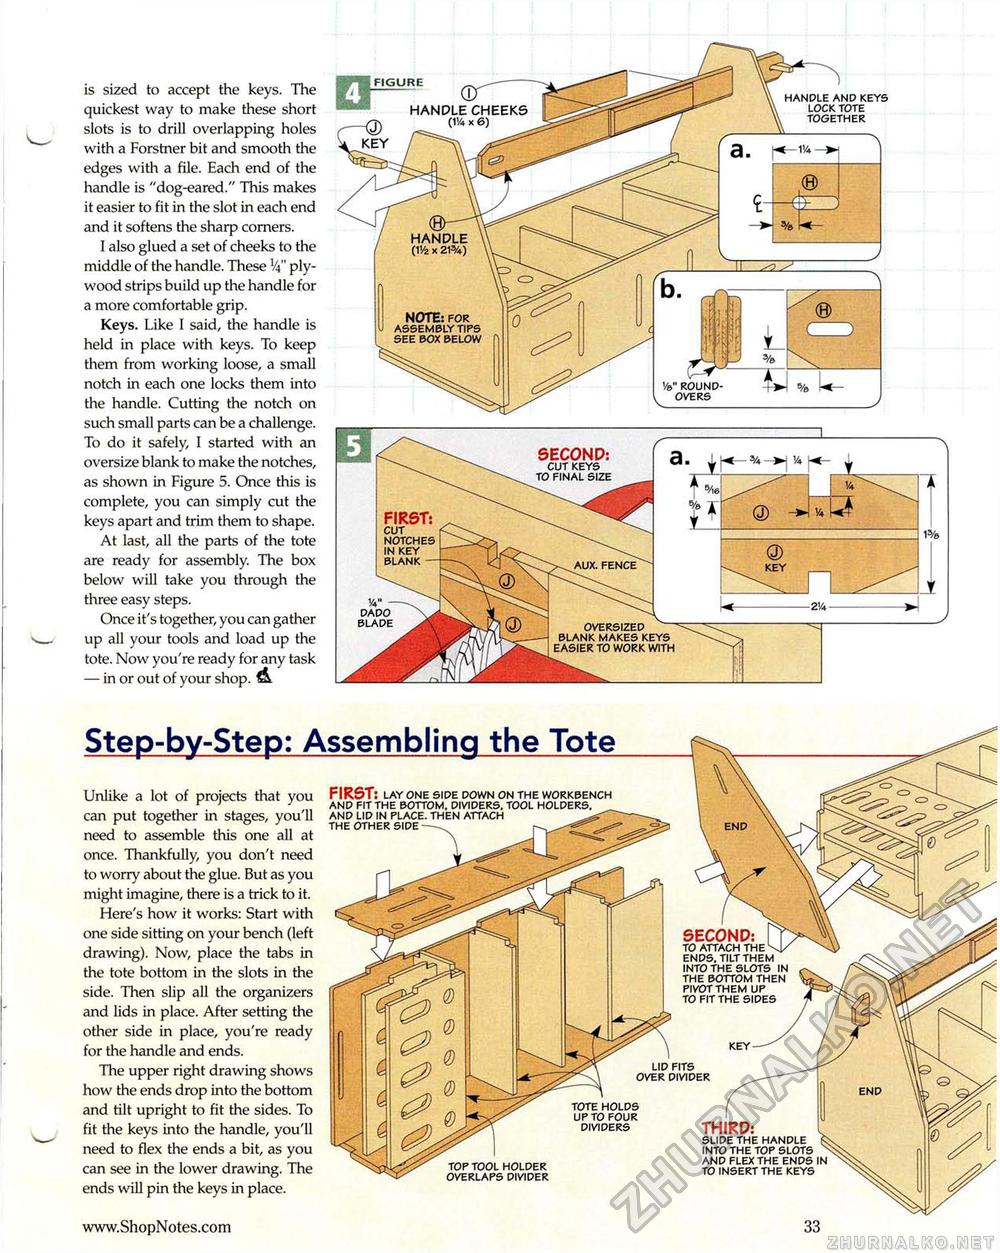
is sized to accept the keys. The quickest way to make these short slots is to drill overlapping holes with a Forstner bit and smooth the edges with a file. Each end of the handle is "dog-eared." This makes it easier to fit in the slot in each end and it softens the sharp corners. I also glued a set of cheeks to the middle of the handle. These !4" plywood strips build up the handle for a more comfortable grip. Keys. Like I said, the handle is held in place with keys. To keep them from working loose, a small notch in each one locks them into the handle. Cutting the notch on such small parts can be a challenge. To do it safely, I started with an oversize blank to make the notches, as shown in Figure 5. Once this is complete, you can simply cut the keys apart and trim them to shape. At last, all the parts of the tote are ready for assembly. The box below will take you through the three easy steps. Once it's together, you can gather up all your tools and load up the tote. Now you're ready for any task — in or out of your shop. A HANDLE AND KEYS LOCK TOTE TOGETHER Ve" ROUND-OVERS 3 . ^J*-5/4 -^j v* 14 DADO BLADE FIRST: CUT NOTCHES IN KEY BLANK aux. end SECOND: f TO ATTACH THE -ENDS. TILT THEM INTO THE SLOTS IN THE BOTTOM THEN PIVOT THEM UP TO FIT THE SIDES Step-by-Step: Assembling the Tote Unlike a lot of projects that you can put together in stages, you'll need to assemble this one all at once. Thankfully, you don't need to worry about the glue. But as you might imagine, there is a trick to it. Here's how it works: Start with one side sitting on your bench (left drawing). Now, place the tabs in the tote bottom in the slots in the side. Then slip all the organizers and lids in place. After setting the other side in place, you're ready for the handle and ends. The upper right drawing shows how the ends drop into the bottom and tilt upright to fit the sides. To fit the keys into the handle, you'll need to flex the ends a bit, as you can see in the lower drawing. The ends will pin the keys in place. FIRST: LAY ONE SIDE DOWN ON THE WORKBENCH AND FIT THE BOTTOM, DIVIDERS. TOOL HOLDERS. AND LID IN PLACE. THEN ATTACH THE OTHER SIDE LID FITS OVER DIVIDER THIRD: SLIDE THE HANDLE INTO THE TOP SLOTS AND FLEX THE ENDS IN TO INSERT THE KEYS TOTE HOLDS UP TO FOUR DIVIDERS TOP TOOL HOLDER OVERLAPS DIVIDER |


