92, страница 13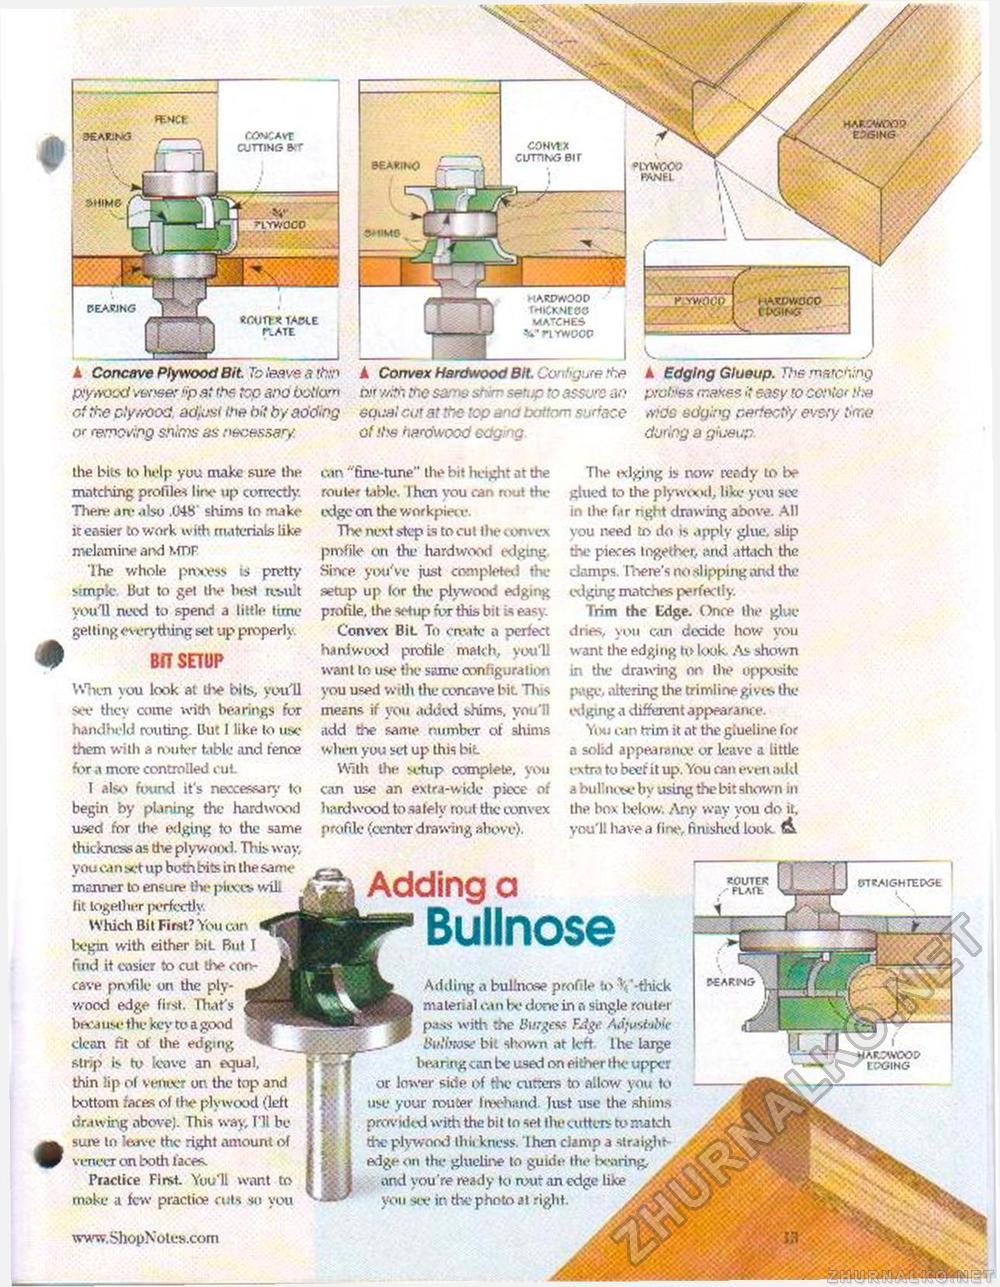
S1IIM8 PEAKING A Concave Plywood Bit. To leave a '.bm py,vood veneer Hp■$: 'he top ana bcila"< of the ply,vood. adiuei the bit by adding or removing shims as necessary. r.o>K AVT CUTTING & ' r.o>K AVT CUTTING & ' PEAKING
'(akplyoop WtjKNC VIA-CHES V nrwcicp A Convex Hardwood Bit. Configure ihe p." v/itr, the same st-;rn setup to assure an equal cur at the top a-ia bottom surface of life hardwood edging. V__ A Edging Glueup. The marching profiles makes <t easy to conic wide edging erectly even/ time during a giueup. 8E*, V.I 1,0 fanr COMVTX cunNGeir the bits to help yuu make sure the matching profiles line up correctly. There are also .048' slums to make it easier to work with materials like melnmirve ard >.fBF The whole pnxvss is pretty simple but to get llv best result you'll neeel to spend a little time gelt i ng everything set up properly. BfT SHOP When you look at tlv bits, you'll see they come with bearings for handheld routing but I like to use them with a router table and fence for a more controlled cut I also found it's neocessary to begin by planing the hardwood used for the edging to the same thickncss as die plywood. This way, you can set up botn bits in the <drtie manner to ensure tin- pieces will lit together |>erfcctly Which Bit First? You can begin with either bit But I find it easier to cut the concave profile on the plywood edge fiist. That's beca us • the key to a good clean nt ol the edging strip i-- to leave an £\qual, thin lip of veneer on the top and bottom races of ihe plywood (left drawing above}. This way, I'll be sure to leave the right amount of veneer on bodi faces. Practice First. Yuull want to make a few practios cuts so you can "fine-tune" the bit height at the router table. I hen you can rout the edge on the workpietv. Tlx* next step Is to cut Ihe corn ex profile on the hardwood edging. Since you've just completed the setup up lor the plywood edging profile, the setup for this bit is easy. Convex Bit To en-ate a perfect hardwood profile match, you'll want to us* flic same configuration you used with the concave bit Th.s me?ns if you added shims, you'll add the same number ol shims when you set up this bit With the setup complete, you can use an extra-wide piece of hardwood to safely tout the convex profile (center drawing above). The edging is now ready to be glued to the plywood, like you see in Ihe fir nght drawing above. All you need to do is apply glue, slip the pieces logether, and attach the damps. There's no slipping and the edging matches perfectly. Trim the Ldge. Once Ihe glue dries, you can dodde how you want the edging to look. As shown in the drawing or Ihe opposite page, altering the trimlioegives the edging a different appearance. You can trim it at the giueline lor a solid appearance or leave a little extra to beef it up. You can even add a bullncc*.' by using the bit shown in Ihe box below. Any way you do it. you'll have a fine, finished look A Adding a Bullnose SOUTER - FLAft Adding a bulhiose profile to V-thick material can fx- done in a single router pass with the Burgess FAge Ad}u$fab>c Bulbtose bit shown at left Ihe large bearing can be used on either the upper or lower side of the cutters to allow you to use your router froehand. lust use the shims provided with the bit to sel the cutters to r.tatdi the plywood thli kness. Then damp a straightedge on the glueiii^e to guide the bearing, and you're ready to rout an edge like you stv in the photo at right. |


