92, страница 9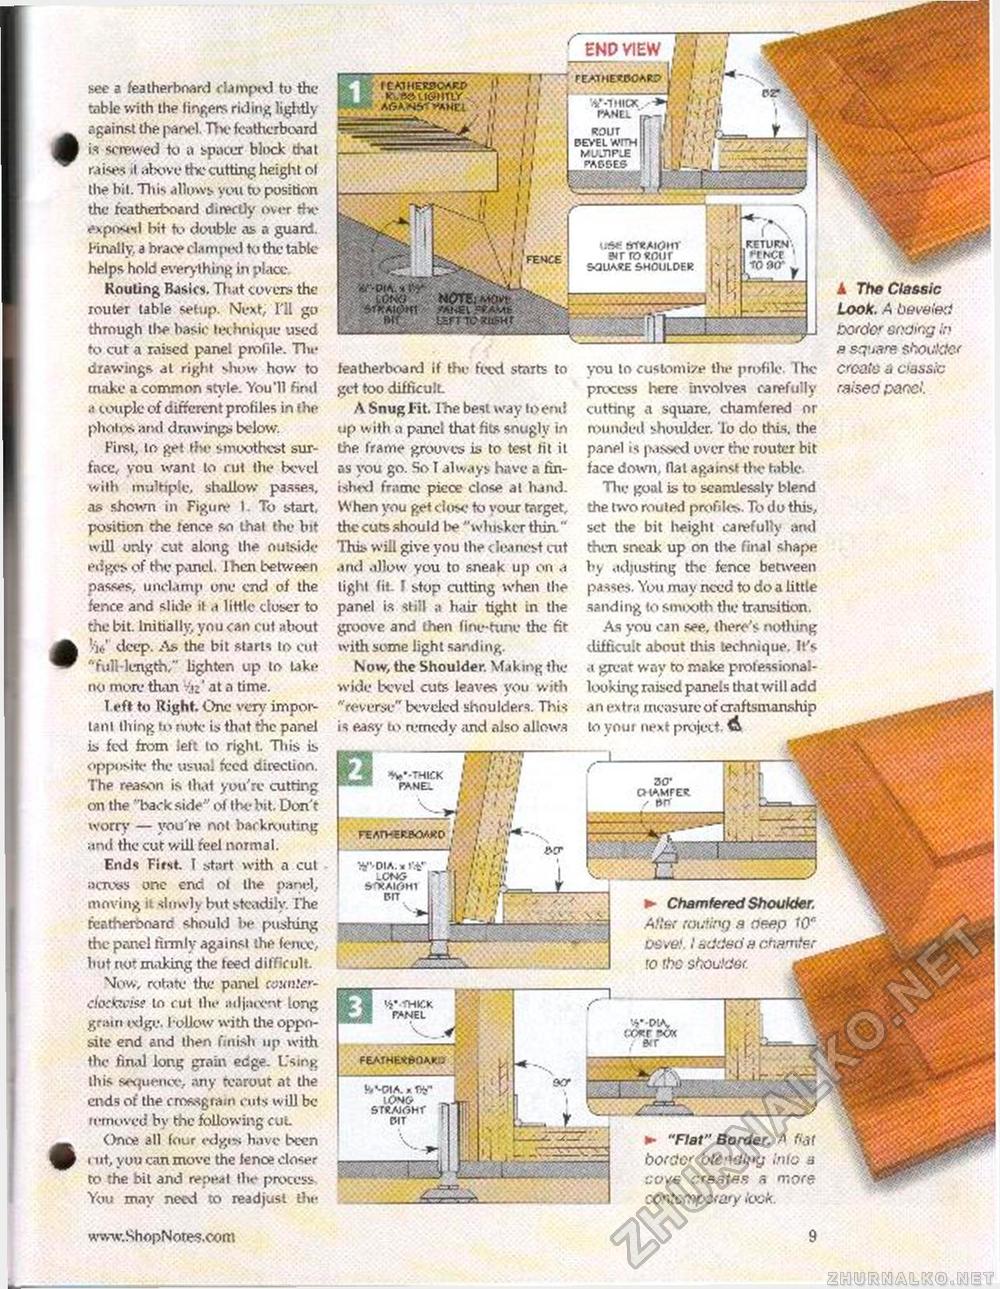
sec a featherboard clamped tu the table with the fingers riding lightly against the panel. Tlx- featherboard is screwed to a spacer block ti-iat raises above the cutting height ol the bit. Til is allows you to position the featherboard directly over the expc*t*l bit to double as a guard. Finally, a brace clamped to the table-helps hold everything in place Routing Basics. That covers the router table setup. Next, I'll go through the basic technique used to cut a raised panel profile. The drawings at right show how to make a common style. You'll find a couple of different profiles in the photon anil drawings below. First, to get the smoothest surface, you want to rut the bevel with multiple, shallow passes, as shown in Figure I To start, position the fence so thai the bit will only cut along the outside edges, of Hie panel, Ihcn between passes, unclAmp one end of the fence and slide it .1 little closer to the bit. Initially, ynu can cut about '•ic' deep. As the bit starts to cut "full-length," lighten up to take no more than Vjj' at a time. I.efl to Bight. One very important thing to note is that the panel is fed from left to right. This is opposite the usual feed direction. The reason is that you're cutting on the "back side ' of the bit. Don'r worry — you're not backixuiting and the cut will feel normal. Ends First. I start with a cut across one end ol the panel, moving it slowly but steadily. The reatherboard should be pushing the panel firmly against the fence, hut not making the teed difficult. Mow, rotate the panel counler-ciaclacise to cut the adjacent long grain edge. I'olio w with die opposite end and then finish up with the final long grain edge. Using this sequence, any tcarour at the ends of the rrossgram cuts will be rrrnoved by the following cuL Onoe all four edgi* have been 1 lit, you can move the lence closer to the bit and repeal the process^ You may need to readjust the featherboard if the feed starts to get too difficult. A Snugl-it. Ihe best way 10end up with a panel that fits snugly in the frame grooves is to test til it as you go. So I always have a finish^) frame picce close at hand. When you get close to your target, the cuts should be "whisker thin" This will give you the cleanest cut and allow you to sneak up on .1 light fit. ! stop cutting when the panel is stiil a hair tight in the groove and then fine-tune the fit with some light sanding. Now, the Shoulder. Making the wide bevel cuts leaves you with "reverse" beveled shoulders. This is easy u> remedy <uid also allows you to customize the profile. The process here involves carefully cutting a square, chamfered or rounded shoulder. To do thus, the panel is passed over the router bit face down, flat against the tabic. The goal is to seamlessly blend the two routed profiles. To do this, set the bit height carefully and then sneak up on the final shape by adjusting the fence between passes. You may need to do a little sanding to smooth the transition. As you can see. there's noticing difficult about this technique. It's a great way to make protessional-looking raised panels that will add an extra measure of craftsmanship to your next project ^ A The Classic Look. A beveled ixtrdor cnomg ir a square shoulder create n classic raises panel. SSfivJ Vi.-.-; ► Chamfered Shoulder. Afl6r muling a neap 10" osvei. i added a cnamter r0 '.ho shoulder. fEATHE«60A.n:> ■:• ; ., tl
mi&S&ZSB t» "Flat" Border. A fiat border blending inio a cove creates a more contemporary look. 9 |
|||||||||||


