93, страница 27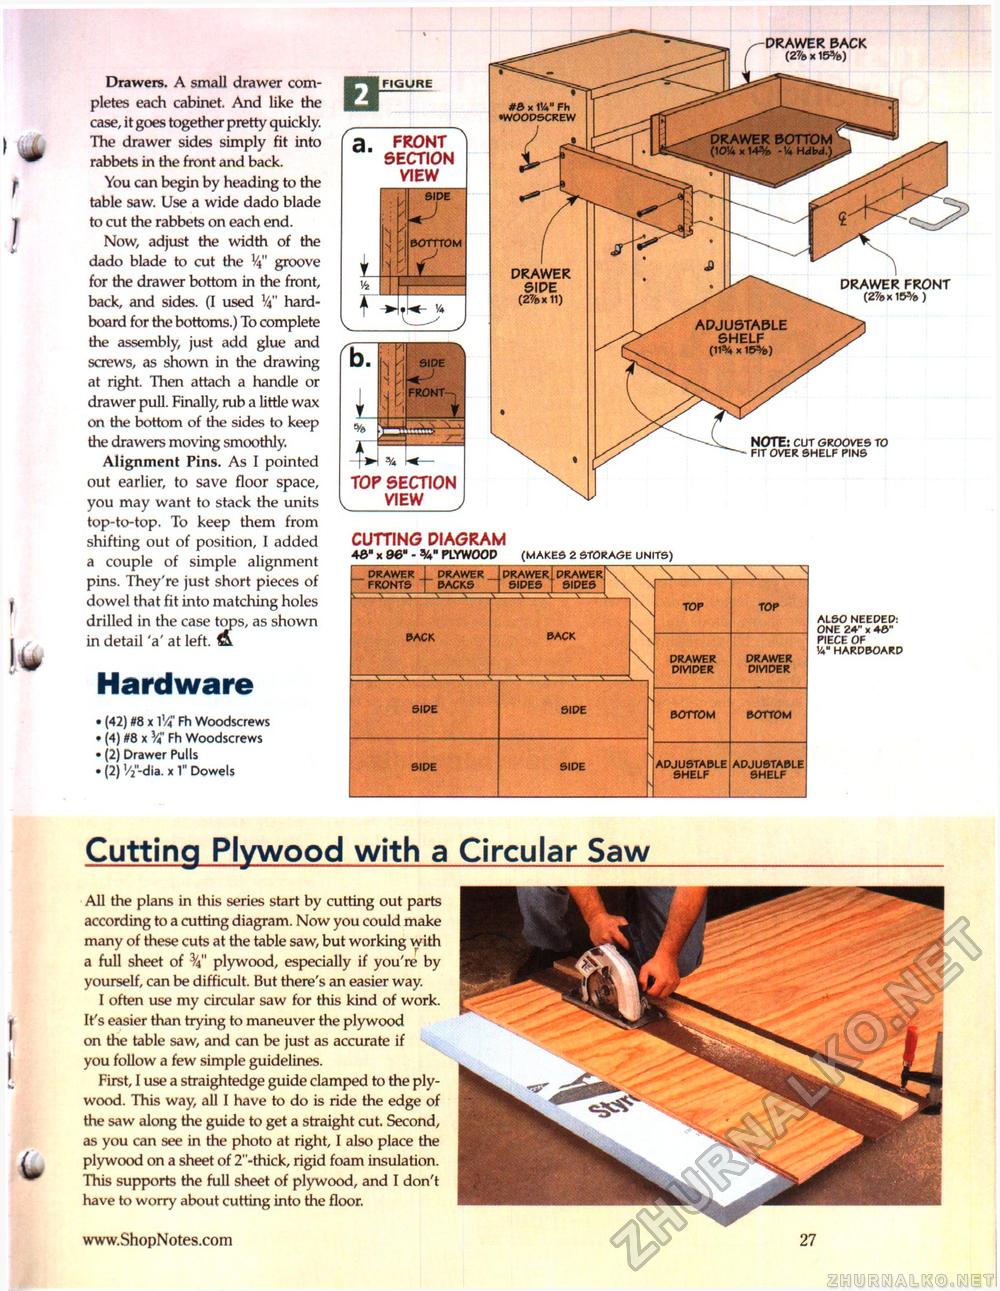
Drawers. A small drawer completes each cabinet. And like the case, it goes together pretty quickly. The drawer sides simply fit into rabbets in the front and back. You can begin by heading to the table saw. Use a wide dado blade to cut the rabbets on each end. Now, adjust the width of the dado blade to cut the H" groove for the drawer bottom in the front, back, and sides. (I used V4" hard-board for the bottoms.) To complete the assembly, just add glue and screws, as shown in the drawing at right. Then attach a handle or drawer pull. Finally, rub a little wax on the bottom of the sides to keep the drawers moving smoothly. Alignment Pins. As I pointed out earlier, to save floor space, you may want to stack the units top-to-top. To keep them from shifting out of position, I added a couple of simple alignment pins. They're just short pieces of dowel that fit into matching holes drilled in the case tops, as shown in detail 'a' at left. & Hardware • (42) #8 x 1V4" Fh Woodscrews • (4) #8 x V4" Fh Woodscrews • (2) Drawer Pulls • (2) V2"-dia. x 1" Dowels cutting diagram 48" x 96" - V PLYWOOD (MAKES 2 STORAGE UNITS) Cutting Plywood with a Circular Saw DRAWER BACK (2% * 15%) DRAWER BOTTOM (1014x14% Hdbd.) ADJUSTABLE SHELF (11*4 * ie%) a. front section view BOTTTOM U. j\| AX SIDE f PfS top section view DRAWER SIDE (2%x11) FIGURE NOTE: cut grooves to fit over shelf pins x 114" Fh •WOODSCREW DRAWER FRONT (27/»x15%) All the plans in this series start by cutting out parts according to a cutting diagram. Now you could make many of these cuts at the table saw, but working with a full sheet of plywood, especially if you're by yourself, can be difficult. But there's an easier way. I often use my circular saw for this kind of work. It's easier than trying to maneuver the plywood on the table saw, and can be just as accurate if you follow a few simple guidelines. First, I use a straightedge guide clamped to the plywood. This way, all I have to do is ride the edge of the saw along the guide to get a straight cut. Second, as you can see in the photo at right, I also place the plywood on a sheet of 2"-thick, rigid foam insulation. This supports the full sheet of plywood, and I don't have to worry about cutting into the floor. |


