93, страница 25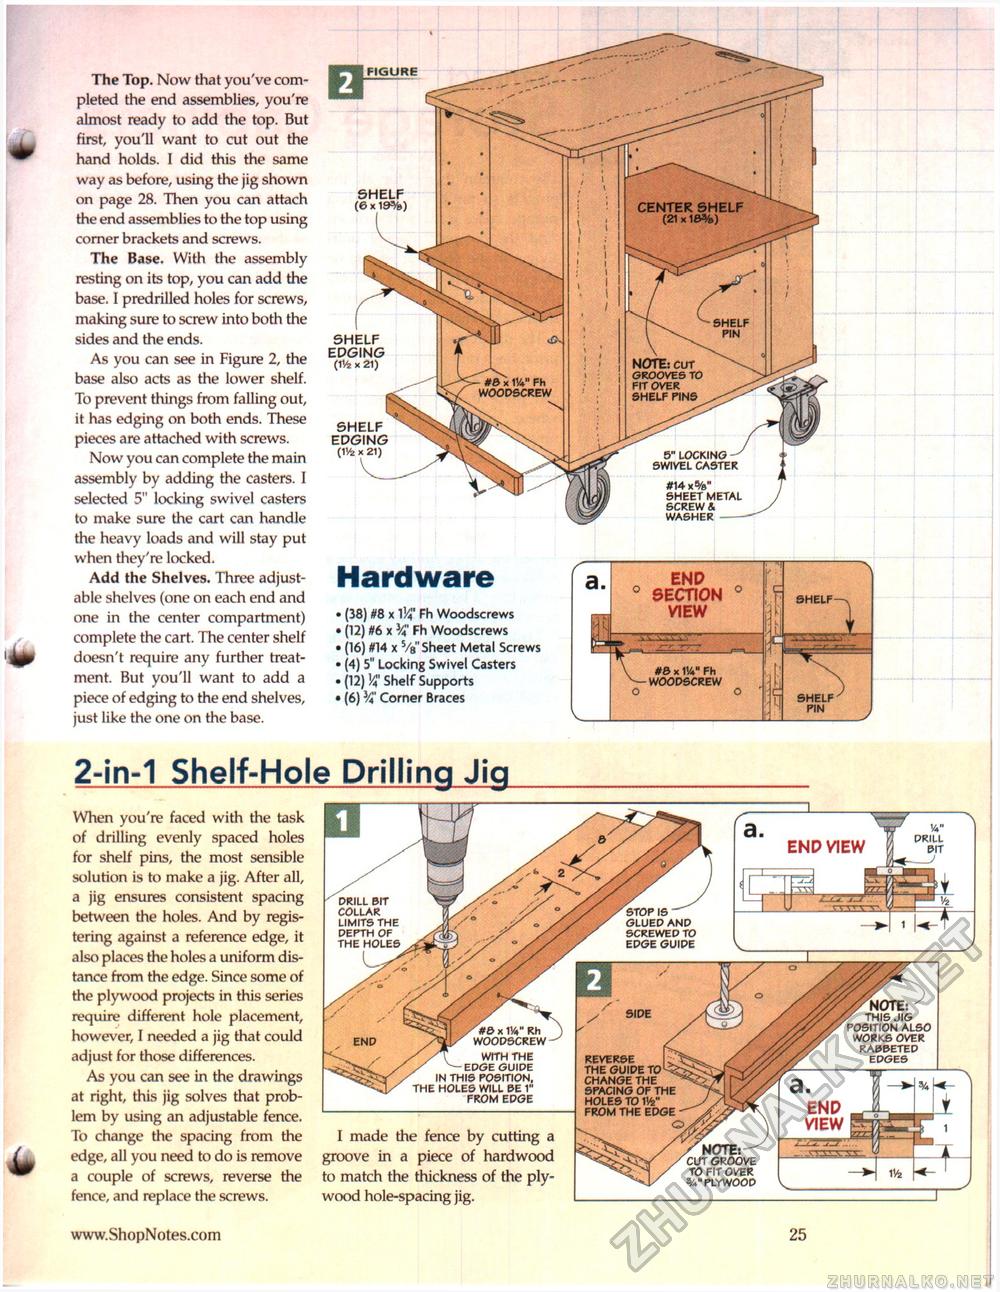
The Top. Now that you've completed the end assemblies, you're almost ready to add the top. But first, you'll want to cut out the hand holds. I did this the same way as before, using the jig shown on page 28. Then you can attach the end assemblies to the top using corner brackets and screws. The Base. With the assembly resting on its top, you can add the base. I predrilled holes for screws, making sure to screw into both the sides and the ends. As you can see in Figure 2, the base also acts as the lower shelf. To prevent things from falling out, it has edging on both ends. These pieces are attached with screws. Now you can complete the main assembly by adding the casters. I selected 5" locking swivel casters to make sure the cart can handle the heavy loads and will stay put when they're locked. Add the Shelves. Three adjustable shelves (one on each end and one in the center compartment) complete the cart. The center shelf doesn't require any further treatment. But you'll want to add a piece of edging to the end shelves, just like the one on the base. 2-in-1 Shelf-Hole Prilling Jig When you're faced with the task of drilling evenly spaced holes for shelf pins, the most sensible solution is to make a jig. After all, a jig ensures consistent spacing between the holes. And by registering against a reference edge, it also places the holes a uniform distance from the edge. Since some of the plywood projects in this series require different hole placement, however, I needed a jig that could adjust for those differences. As you can see in the drawings at right, this jig solves that problem by using an adjustable fence. To change the spacing from the edge, all you need to do is remove a couple of screws, reverse the fence, and replace the screws. NOTE: cur grooves TO fit over SHELF HNS - #& x 114" Fh WOODSCREW 5" LOCKING SWIVEL CASTER #14 x%" SHEET METAL SCREW & WASHER - • (38) #8 x Ik," Fh Woodscrews • (12) #6 x VA' Fh Woodscrews • (16) #14 x 5/8" Sheet Metal Screws • (4) 5" Locking Swivel Casters . (12) ^ Shelf Supports • (6) Y* Corner Braces end 0 section 0 view SHELF—. —i #S X W Fh WOODSCREW o o Hardware CENTER SHELF (21 x 1 e%) SHELF SHELF EDGING (1!6 x 21) SHELF EDGING (iVfe X 21) a. end view \ w DRILL end view GLUED AND SCREWED TO EDGE GUIDE I made the fence by cutting a groove in a piece of hardwood to match the thickness of the plywood hole-spacing jig. COLLAR LIMITS THE DEPTH OF THE HOLES WITH THE EDGE GUIDE IN THIS POSITION, THE HOLES WILL BE 1" FROM EDGE THIS JIG POSITION ALSO WORKS OVER RABBETED EDGES SIDE REVERSE THE GUIDE TO CHANGE THE SPACING OF THE HOLES TO W FROM THE EDGE CUT GROOVE TO FIT OVER 3/4" PLYWOOD 25 |


