93, страница 28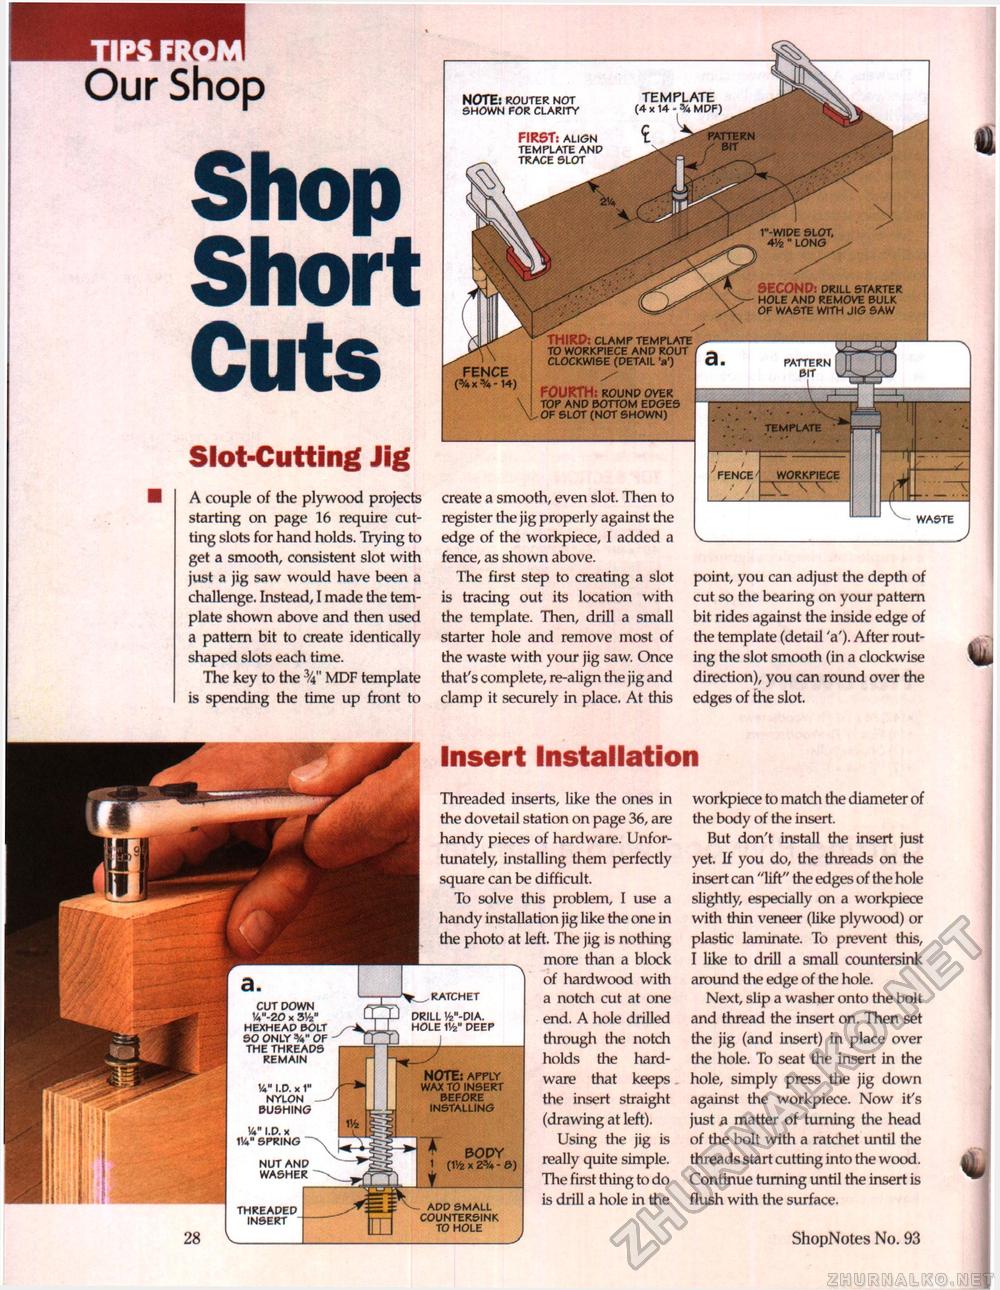
Our Shop CutsSlot-Cutting Jig A couple of the plywood projects starting on page 16 require cutting slots for hand holds. Trying to get a smooth, consistent slot with just a jig saw would have been a challenge. Instead, I made the template shown above and then used a pattern bit to create identically shaped slots each time. The key to the 3/4" MDF template is spending the time up front to SECOND: DRILL STARTER HOLE AND REMOVE BULK OF WASTE WITH JlG SAW fence (3/4 X =/4- 14) THIRD: clamp template to workpiece and rout CLOCKWISE (DETAIL 'a') / FOURTH: ROUND OVER TOP AND BOTTOM EDGES . OF SLOT (NOT SHOWN) create a smooth, even slot. Then to register the jig properly against the edge of the workpiece, I added a fence, as shown above. The first step to creating a slot is tracing out its location with the template. Then, drill a small starter hole and remove most of the waste with your jig saw. Once that's complete, re-align the jig and clamp it securely in place. At this point, you can adjust the depth of cut so the bearing on your pattern bit rides against the inside edge of the template (detail 'a'). After routing the slot smooth (in a clockwise direction), you can round over the edges of the slot. Insert Installation Threaded inserts, like the ones in the dovetail station on page 36, are handy pieces of hardware. Unfortunately, installing them perfectly square can be difficult. To solve this problem, I use a handy installation jig like the one in the photo at left. The jig is nothing more than a block of hardwood with a notch cut at one end. A hole drilled through the notch holds the hardware that keeps the insert straight (drawing at left). Using the jig is really quite simple. The first thing to do is drill a hole in the t__RATCHET DRILL Vfc"-DIA. HOLE W DEEP note: apply wax to insert before installing A PODY 1 (1Vfe * 2% - &) ADD SMALL COUNTERSINK TO HOLE workpiece to match the diameter of the body of the insert. But don't install the insert just yet. If you do, the threads on the insert can "lift" the edges of the hole slightly, especially on a workpiece with thin veneer (like plywood) or plastic laminate. To prevent this, I like to drill a small countersink around the edge of the hole. Next, slip a washer onto the bolt and thread the insert on. Then set the jig (and insert) in place over the hole. To seat the insert in the hole, simply press the jig down against the workpiece. Now it's just a matter of turning the head of the bolt with a ratchet until the threads start cutting into the wood. Continue turning until the insert is flush with the surface. 28 ShopNotes No. 93 % |


