93, страница 38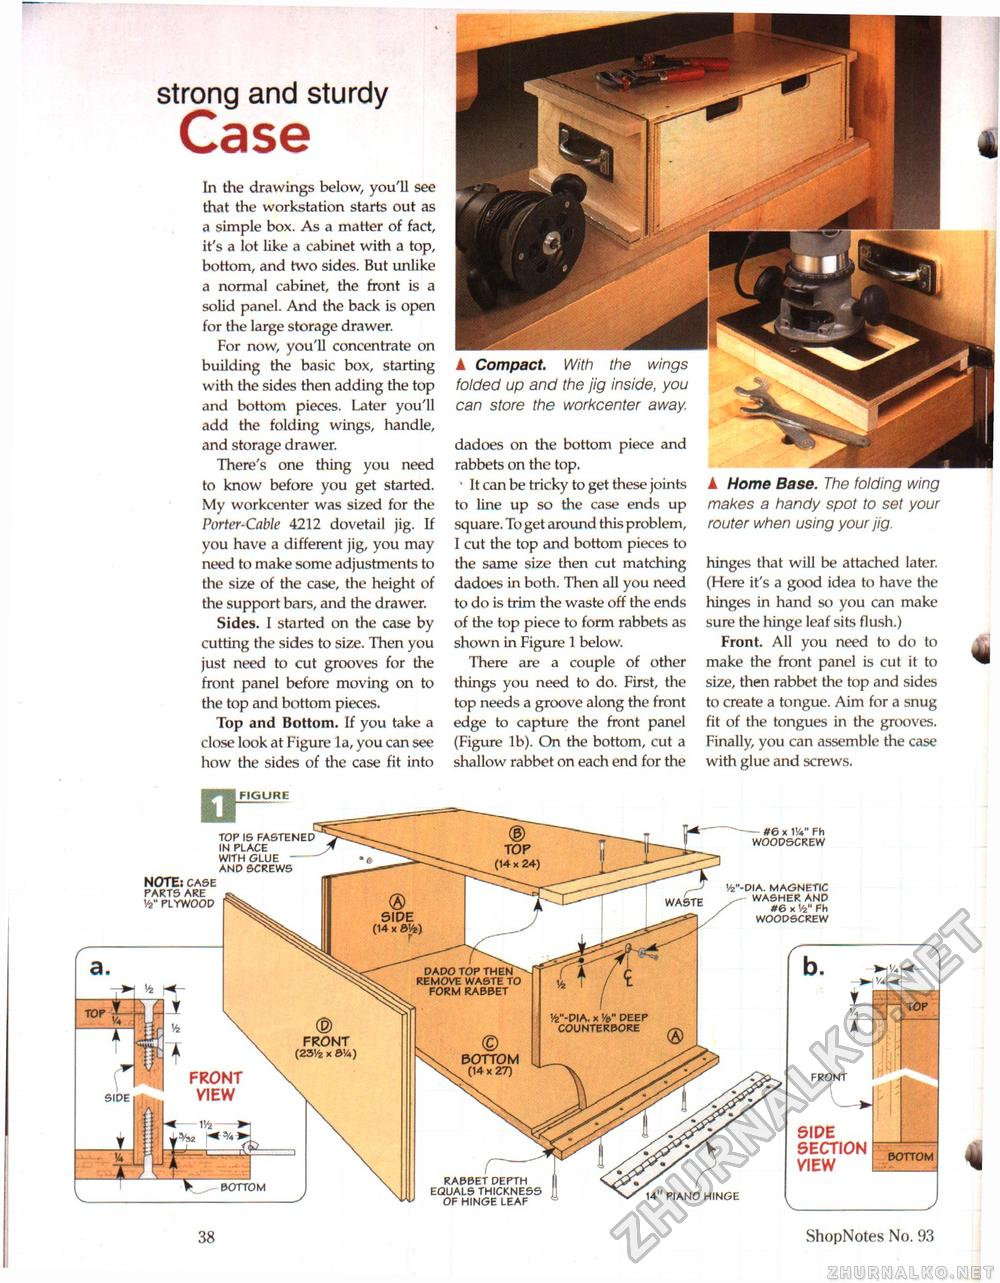
strong and sturdy In the drawings below, you'll see that the workstation starts out as a simple box. As a matter of fact, it's a lot like a cabinet with a top, bottom, and two sides. But unlike a normal cabinet, the front is a solid panel. And the back is open for the large storage drawer. For now, you'll concentrate on building the basic box, starting with the sides then adding the top and bottom pieces. Later you'll add the folding wings, handle, and storage drawer. There's one thing you need to know before you get started. My workcenter was sized for the Porter-Cable 4212 dovetail jig. If you have a different jig, you may need to make some adjustments to the size of the case, the height of the support bars, and the drawer. Sides. I started on the case by cutting the sides to size. Then you just need to cut grooves for the front panel before moving on to the top and bottom pieces. Top and Bottom. If you take a close look at Figure la, you can see how the sides of the case fit into ▲ Compact. With the wings folded up and the jig inside, you can store the workcenter away dadoes on the bottom piece and rabbets on the top. 1 It can be tricky to get these joints to line up so the case ends up square. To get around this problem, I cut the top and bottom pieces to the same size then cut matching dadoes in both. Then all you need to do is trim the waste off the ends of the top piece to form rabbets as shown in Figure 1 below. There are a couple of other things you need to do. First, the top needs a groove along the front edge to capture the front panel (Figure lb). On the bottom, cut a shallow rabbet on each end for the ▲ Home Base. The folding wing makes a handy spot to set your router when using your jig. hinges that will be attached later. (Here it's a good idea to have the hinges in hand so you can make sure the hinge leaf sits flush.) Front. All you need to do to make the front panel is cut it to size, then rabbet the top and sides to create a tongue. Aim for a snug fit of the tongues in the grooves. Finally, you can assemble the case with glue and screws. — #6 x W Fh woodscrew top is fastened in place with glue " -and screws NOTE: case parts are vfe" plywood w'-dia. magnetic washer and #6 x V2" Fh woodscrew waste DADO TOP THEN REMOVE WASTE TO FORM RABBET J£"-DIA. x V DEEP COUNTERBORE FRONT (23VZ X av*) BOTTOM (14 x 27) FRONT VIEW front SIDE SECTION VIEW BOTTOM rabbet depth equals thickness of hinge leaf bottom 14" piano hinge 38 ShopNotes No. 93 |


