93, страница 41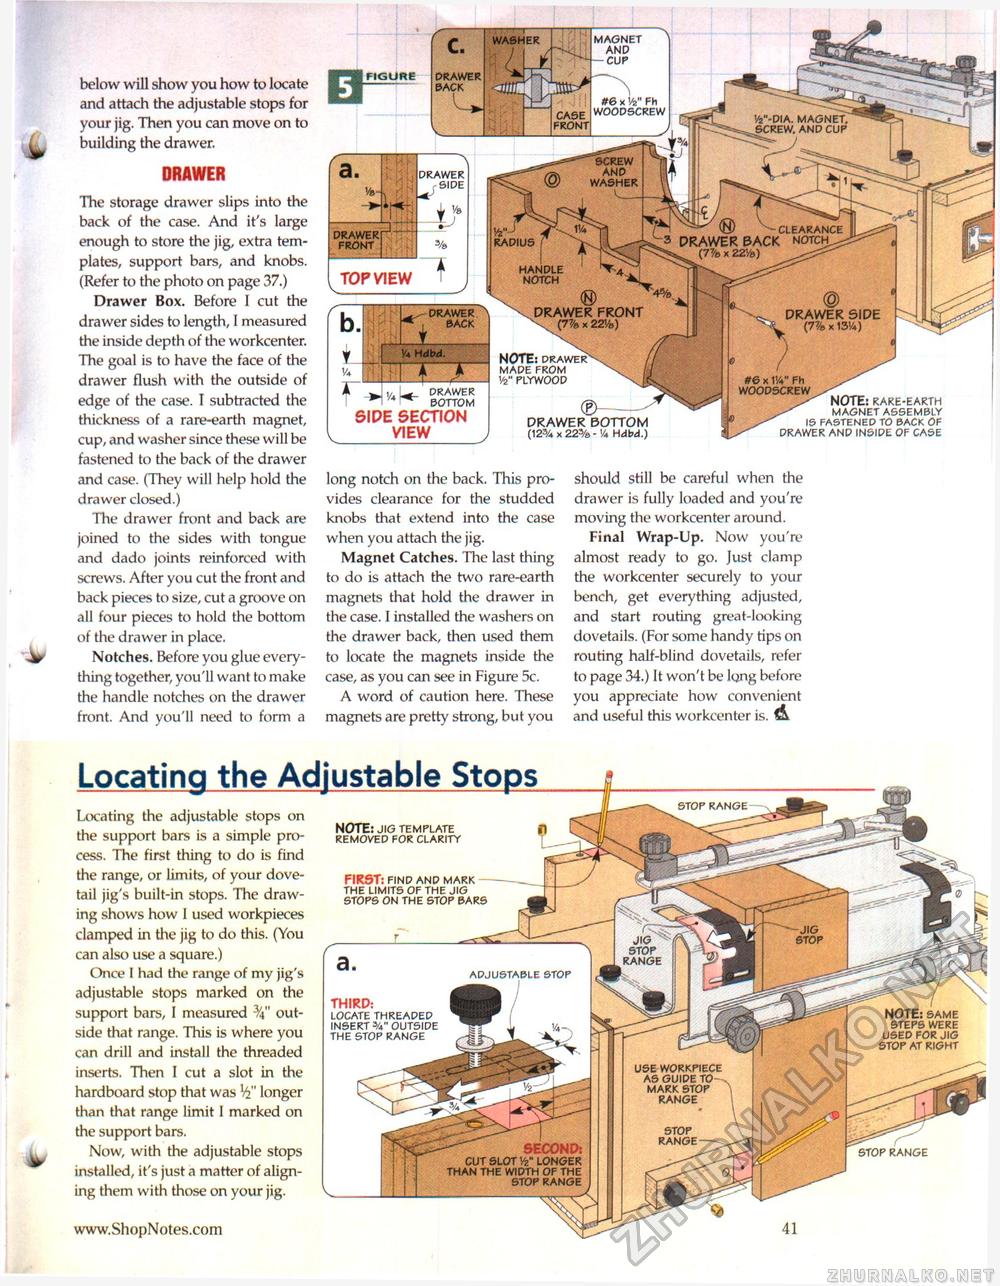
below will show you how to locate and attach the adjustable stops for your jig. Then you can move on to building the drawer. DRAWER The storage drawer slips into the back of the case. And it's large enough to store the jig, extra templates, support bars, and knobs. (Refer to the photo on page 37.) Drawer Box. Before I cut the drawer sides to length, I measured the inside depth of the workcenter. The goal is to have the face of the drawer flush with the outside of edge of the case. I subtracted the thickness of a rare-earth magnet, cup, and washer since these will be fastened to the back of the drawer and case. (They will help hold the drawer closed.) The drawer front and back are joined to the sides with tongue and dado joints reinforced with screws. After you cut the front and back pieces to size, cut a groove on all four pieces to hold the bottom of the drawer in place. Notches. Before you glue everything together, you'll want to make the handle notches on the drawer front. And you'll need to form a long notch on the back. This provides clearance for the studded knobs that extend into the case when you attach the jig. Magnet Catches. The last thing to do is attach the two rare-earth magnets that hold the drawer in the case. I installed the washers on the drawer back, then used them to locate the magnets inside the case, as you can see in Figure 5c. A word of caution here. These magnets are pretty strong, but you should still be careful when the drawer is fully loaded and you're moving the workcenter around. Final Wrap-Up. Now you're almost ready to go. Just clamp the workcenter securely to your bench, get everything adjusted, and start routing great-looking dovetails. (For some handy tips on routing half-blind dovetails, refer to page 34.) It won't be lqng before you appreciate how convenient and useful this workcenter is. 1L. #6 x Vz" Fh woodscrew CASE FRONT Vi"-DIA. MAGNET, SCREW. AND CUP ' SCREW AND WASHER n ^ ^ CLEARANCE 3 drawer back NOTCH -(77/ex221/e) drawer front (7%x22Ve) magnet AND -CUP WASHER DRAWER PACK DRAWER side Vz ■ RADIUS DRAWER FRONT HANDLE NOTCH TOP VIEW © drawer side (7% x 1314) DRAWER BACK V* Hdbd. rO note: drawer made from w plywood drawer bottom DRAWER BOTTOM (123A x 22% - Va Hdbd.) SIPE SECTION VIEW #6 x W Fh WOODSCREW „ note: rare-earth magnet assembly is fastened to back of drawer and inside of case Locating the Adjustable Stops stop range Locating the adjustable stops on the support bars is a simple process. The first thing to do is find the range, or limits, of your dovetail jig's built-in stops. The drawing shows how I used workpieces clamped in the jig to do this. (You can also use a square.) Once I had the range of my jig's adjustable stops marked on the support bars, I measured 3/4M outside that range. This is where you can drill and install the threaded inserts, Then I cut a slot in the hardboard stop that was longer than that range limit I marked on the support bars. Now, with the adjustable stops installed, it's just a matter of aligning them with those on your jig. note: jig template removed for clarity FIRST: find and mark the limits of the jig stops on the stop bars JIG STOP RANGE adjustable stop THIRD: locate threaded insert 3/4" outside the stop range note: same steps were used for jig stop at right USE WORKPIECE AS GUIDE TO—. MARK STOP RANGE STOP RANGE second: CUT SLOT </2" LONGER THAN THE WIDTH OF THE STOP RANGE stop range |


