93, страница 40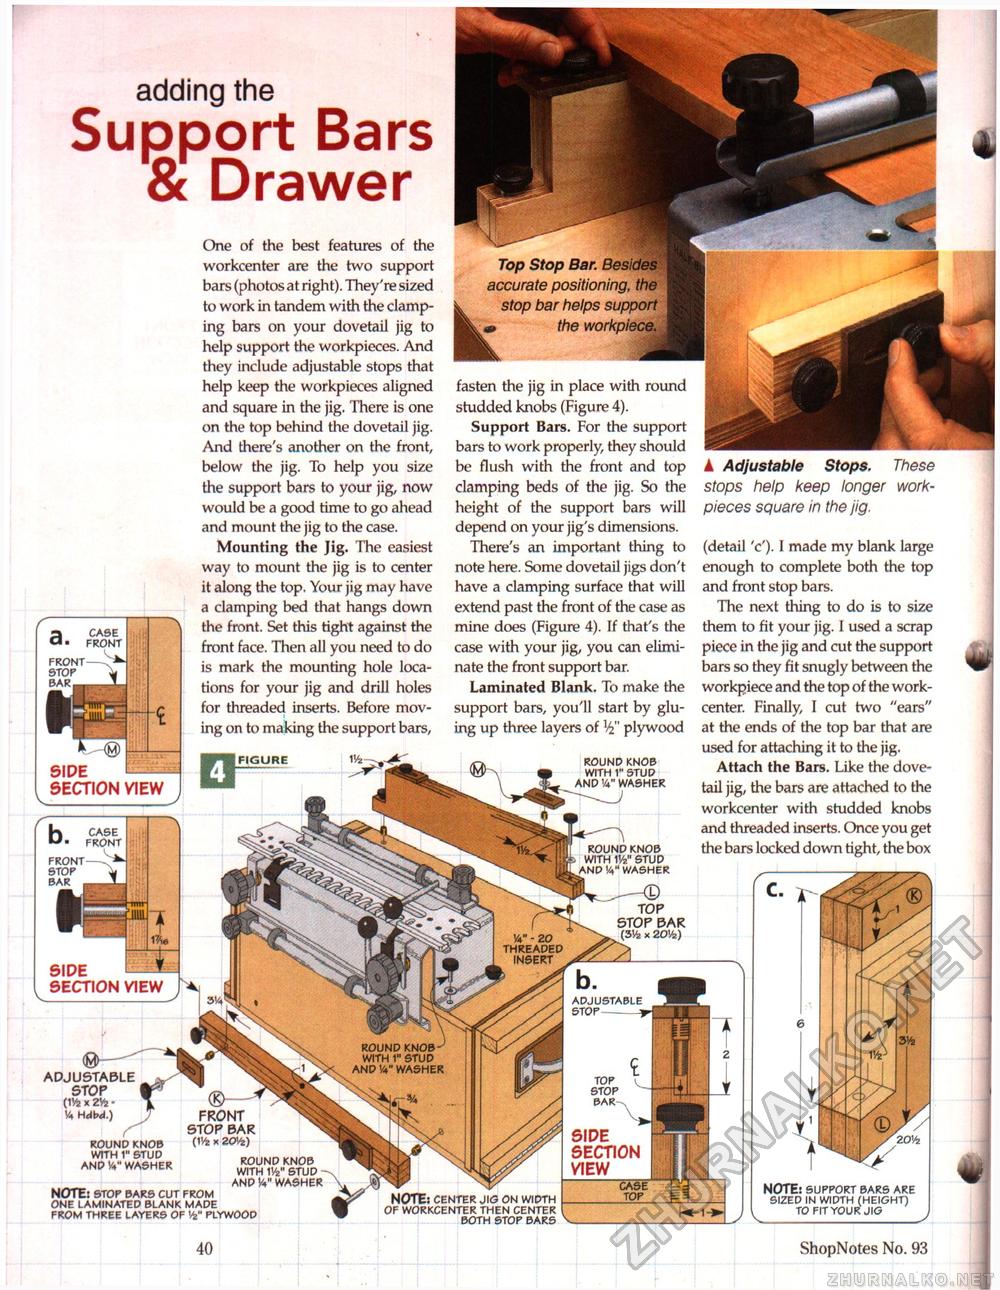
adding the Support Bars & Drawerround knob with 1v2" stud and v washer Va" - 20 threaded insert round knob-7 with 1" stud and w washer FRONT STOP BAR (IVfc x 2OVfe) round knob with 1vfem stud -snd w washer NOTE: center jl<5 on width of workcenter then center both stop bars case front front stop SIDE SECTION VIEW One of the best features of the workcenter are the two support bars (photos at right). They're sized to work in tandem with the clamping bars on your dovetail jig to help support the workpieces. And they include adjustable stops that help keep the workpieces aligned and square in the jig. There is one on the top behind the dovetail jig. And there's another on the front, below the jig. To help you size the support bars to your jig, now would be a good time to go ahead and mount the jig to the case. Mounting the Jig. The easiest way to mount the jig is to center it along the top. Your jig may have a clamping bed that hangs down the front. Set this tight against the front face. Then all you need to do is mark the mounting hole locations for your jig and drill holes for threaded inserts. Before mov- l ing on to making the support bars, Top Stop Bar. Besides accurate positioning, the stop bar helps support m the workpiece. fasten the jig in place with round studded knobs (Figure 4). Support Bars. For the support bars to work properly, they should be flush with the front and top clamping beds of the jig. So the height of the support bars will depend on your jig's dimensions. There's an important thing to note here. Some dovetail jigs don't have a clamping surface that will extend past the front of the case as mine does (Figure 4). If that's the case with your jig, you can eliminate the front support bar. Laminated Blank. To make the support bars, you'll start by gluing up three layers of xf{ plywood round knob with 1" 5tud and 14" washer FIGURE case front front stop bar . SIDE SECTION VIEW adjustable stop--^ stop bar SIDE SECTION VIEW case top ▲ Adjustable Stops. These stops help keep longer work-pieces square in the jig, (detail 'c'). I made my blank large enough to complete both the top and front stop bars. The next thing to do is to size them to fit your jig. I used a scrap piece in the jig and cut the support bars so they fit snugly between the workpiece and the top of the work-center. Finally, I cut two "ears" at the ends of the top bar that are used for attaching it to the jig. Attach the Bars. Like the dovetail jig, the bars are attached to the workcenter with studded knobs and threaded inserts. Once you get the bars locked down tight, the box <8>—^ ADJUSTABLE STOP (lVt2 x 2Vi • v4 hdbd.) round knob with 1" stud and vv washer NOTE: stop bars cut from one laminated blank made from three layers of vfe" plywood NOTE: support bars are sized in width (height) to fit your jig 40 ShopNotes No. 93 |


