94, страница 22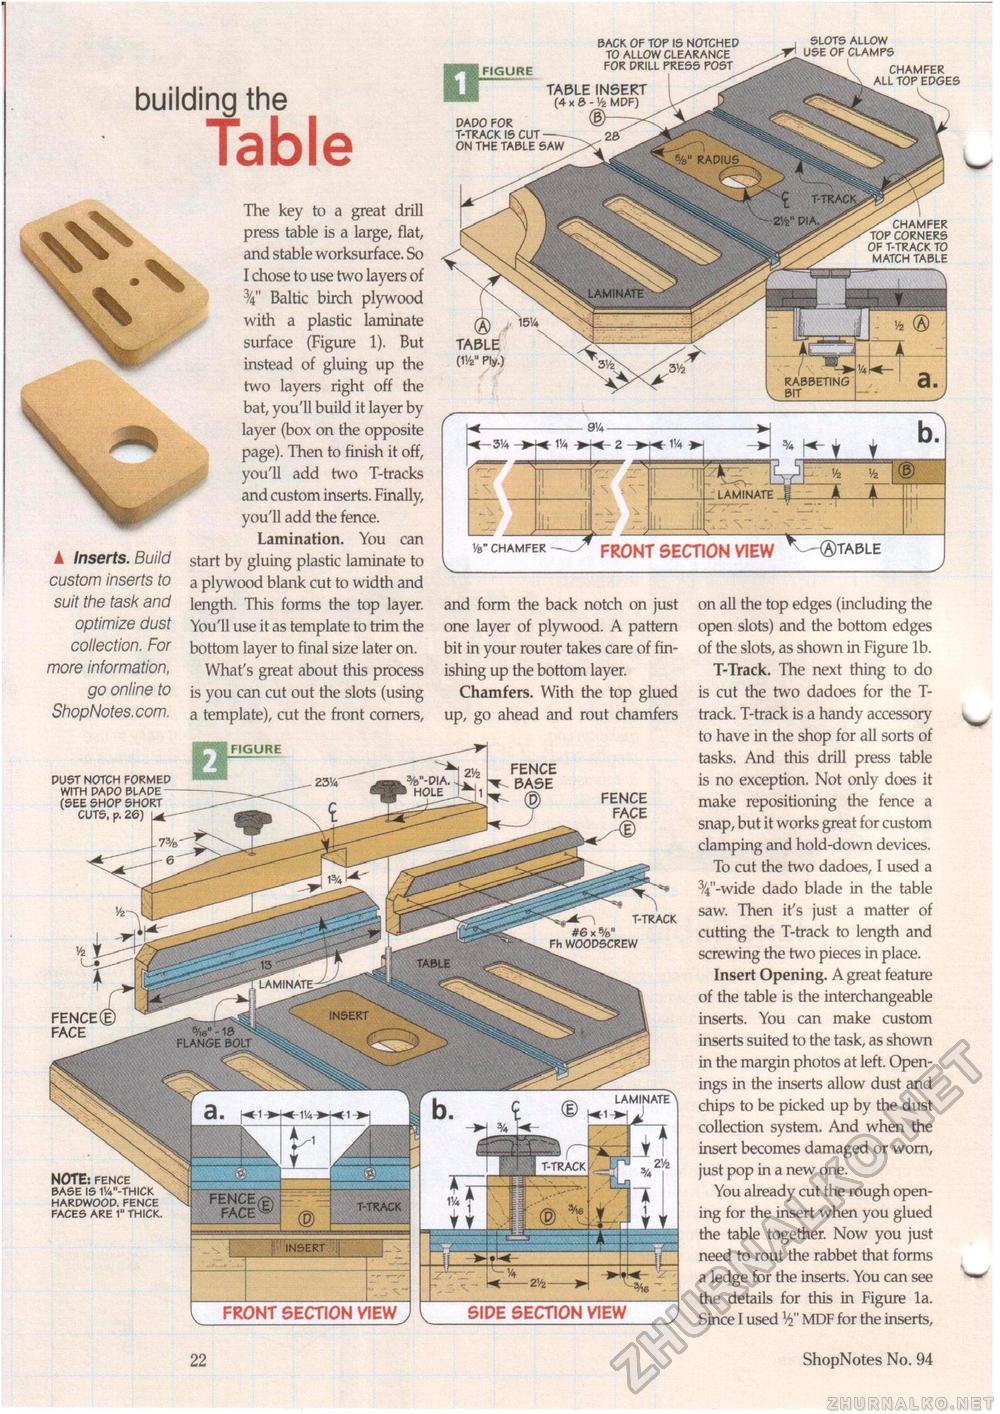
slots allow ^ use of clamps BACK OF TOP IS NOTCHED TO ALLOW CLEARANCE 0 FIGURE F0R DRILL PRESS P0ST TABLE INSERT ^ (4x0-!4 MDF) V DADO FOR T-TRACK IS CUT-20 ^ ON THE TABLE SAW - . ^^ RADIUS CHAMFER ALL TOP EDGES The key to a great drill press table is a large, flat, and stable worksurface. So I chose to use two layers of Baltic birch plywood with a plastic laminate surface (Figure 1), But instead of gluing up the two layers right off the bat, you'll build it layer by layer (box on the opposite page). Then to finish it off, you'll add two T-tracks and custom inserts. Finally, you'll add the fence. Lamination. You can start by gluing plastic laminate to a plywood blank cut to width and length. This forms the top layer. You'll use it as template to trim the bottom layer to final size later on. What's great about this process is you can cut out the slots (using a template), cut the front corners, •■li FIGURE /CHAMFER TOP CORNERS OF T-TRACK TO MATCH TABLE LAMINATE TABLE (11/2" Ply.) RABBETING LAMINATE -®TA0LE Ve" CHAMFER FRONT SECTION VIEW A Inserts. Build custom inserts to suit the task and optimize dust collection. For more information, go online to ShopNotes.com. on all the top edges (including the open slots) and the bottom edges of the slots, as shown in Figure lb. T-Track. The next thing to do is cut the two dadoes for the T-track. T-track is a handy accessory to have in the shop for all sorts of tasks. And this drill press table is no exception. Not only does it make repositioning the fence a snap, but it works great for custom clamping and hold-down devices. To cut the two dadoes, I used a 34"-wide dado blade in the table saw. Then it's just a matter of cutting the T-track to length and screwing the two pieces in place. Insert Opening. A great feature of the table is the interchangeable inserts. You can make custom inserts suited to the task, as shown in the margin photos at left. Openings in the inserts allow dust and chips to be picked up by the dust collection system. And when the insert becomes damaged or worn, just pop in a new one. You already cut the rough opening for the insert when you glued the table together. Now you just need to rout the rabbet that forms a ledge for the inserts. You can see the details for this in Figure la. Since I used W MDF for the inserts, and form the back notch on just one layer of plywood. A pattern bit in your router takes care of finishing up the bottom layer. Chamfers. With the top glued up, go ahead and rout chamfers DUST NOTCH FORMED WITH DADO BLADE (SEE SHOP SHORT CUTS, p. 26) L*- %"-DIA. > HOLE T-TRACK #6 x %" Fh WOODSCREW TABLE LAMINATE INSERT FLANGE BOLT LAMINATE^ T-TRACK NOTE: fence \ base is 1!4"-thick hardwood. fence faces are 1" thick. FENCE FACE T-TRACK insert SIDE SECTION VIEW FRONT SECTION VIEW 22 ShopNotes No. 94 |


