94, страница 25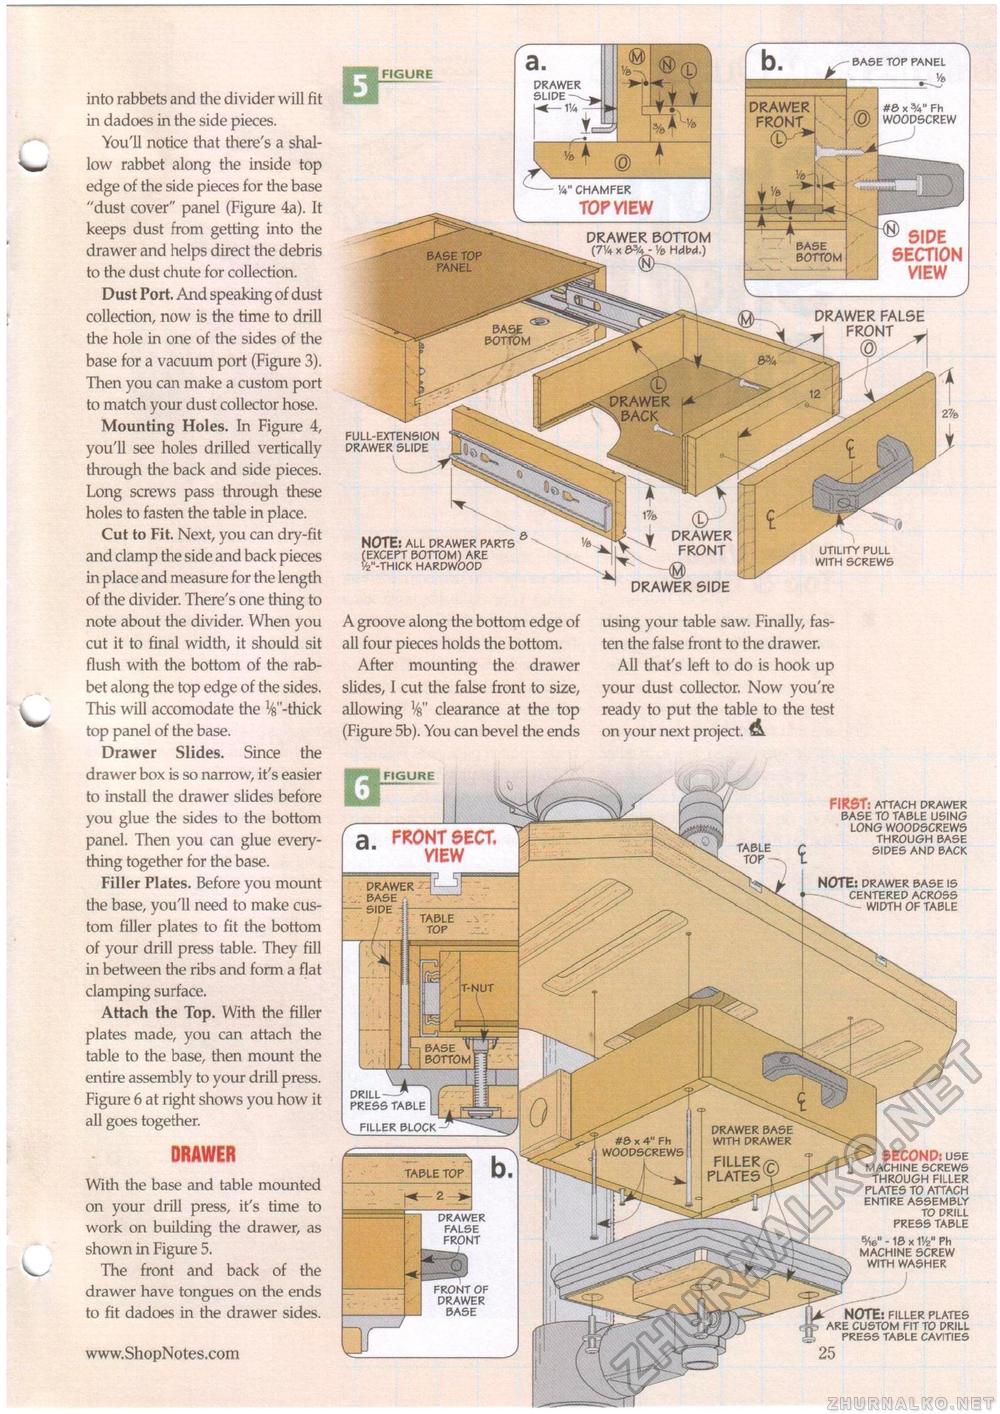
V- into rabbets and the divider will fit in dadoes in the side pieces. You'll notice that there's a shallow rabbet along the inside top edge of the side pieces for the base "dust cover" panel (Figure 4a). It keeps dust from getting into the drawer and helps direct the debris to the dust chute for collection. Dust Port. And speaking of dust collection, now is the time to drill the hole in one of the sides of the base for a vacuum port (Figure 3). Then you can make a custom port to match your dust collector hose. Mounting Holes. In Figure 4, you'll see holes drilled vertically through the back and side pieces. Long screws pass through these holes to fasten the table in place. Cut to Fit. Next, you can dry-fit and clamp the side and back pieces in place and measure for the length of the divider. There's one thing to note about the divider. When you cut it to final width, it should sit flush with the bottom of the rabbet along the top edge of the sides. This will accomodate the ^"-thick top panel of the base. Drawer Slides. Since the drawer box is so narrow, it's easier to install the drawer slides before you glue the sides to the bottom panel. Then you can glue everything together for the base. Filler Plates. Before you mount the base, you'll need to make custom filler plates to fit the bottom of your drill press table. They fill in between the ribs and form a flat clamping surface. Attach the Top. With the filler plates made, you can attach the table to the base, then mount the entire assembly to your drill press. Figure 6 at right shows you how it all goes together. DRAWER With the base and table mounted on your drill press, it's time to work on building the drawer, as shown in Figure 5. The front and back of the drawer have tongues on the ends to fit dadoes in the drawer sides. full-extension drawer slide NOTE: all drawer parts (except bottom) are vfe"-thick hardwood utility pull with screws DRAWER SIDE A groove along the bottom edge of all four pieces holds the bottom. After mounting the drawer slides, I cut the false front to size, allowing V clearance at the top (Figure 5b). You can bevel the ends using your table saw. Finally, fasten the false front to the drawer. All that's left to do is hook up your dust collector. Now you're ready to put the table to the test on your next project. & BASE * BOTTOM drill—^ press table v filler block DRAWER BASE WITH DRAWER #& x 4" Fh WOODSCREWS FILLER PLATES FIGURE a. FRONT SECT. VIEW DRAWER BASE -SIDE j TABLE TABLE FIRST: attach drawer base to table using long woodscrews through base sides and back NOTE: drawer base is —centered across width of table SECOND: use machine screws through filler plates to attach entire assembly to drill press table 5/,6" -15 x 1V2" Ph machine screw with washer NOTE: filler plates ae are custom fit to drill press table cavities • 25 TABLE TOP drawer false |


