94, страница 23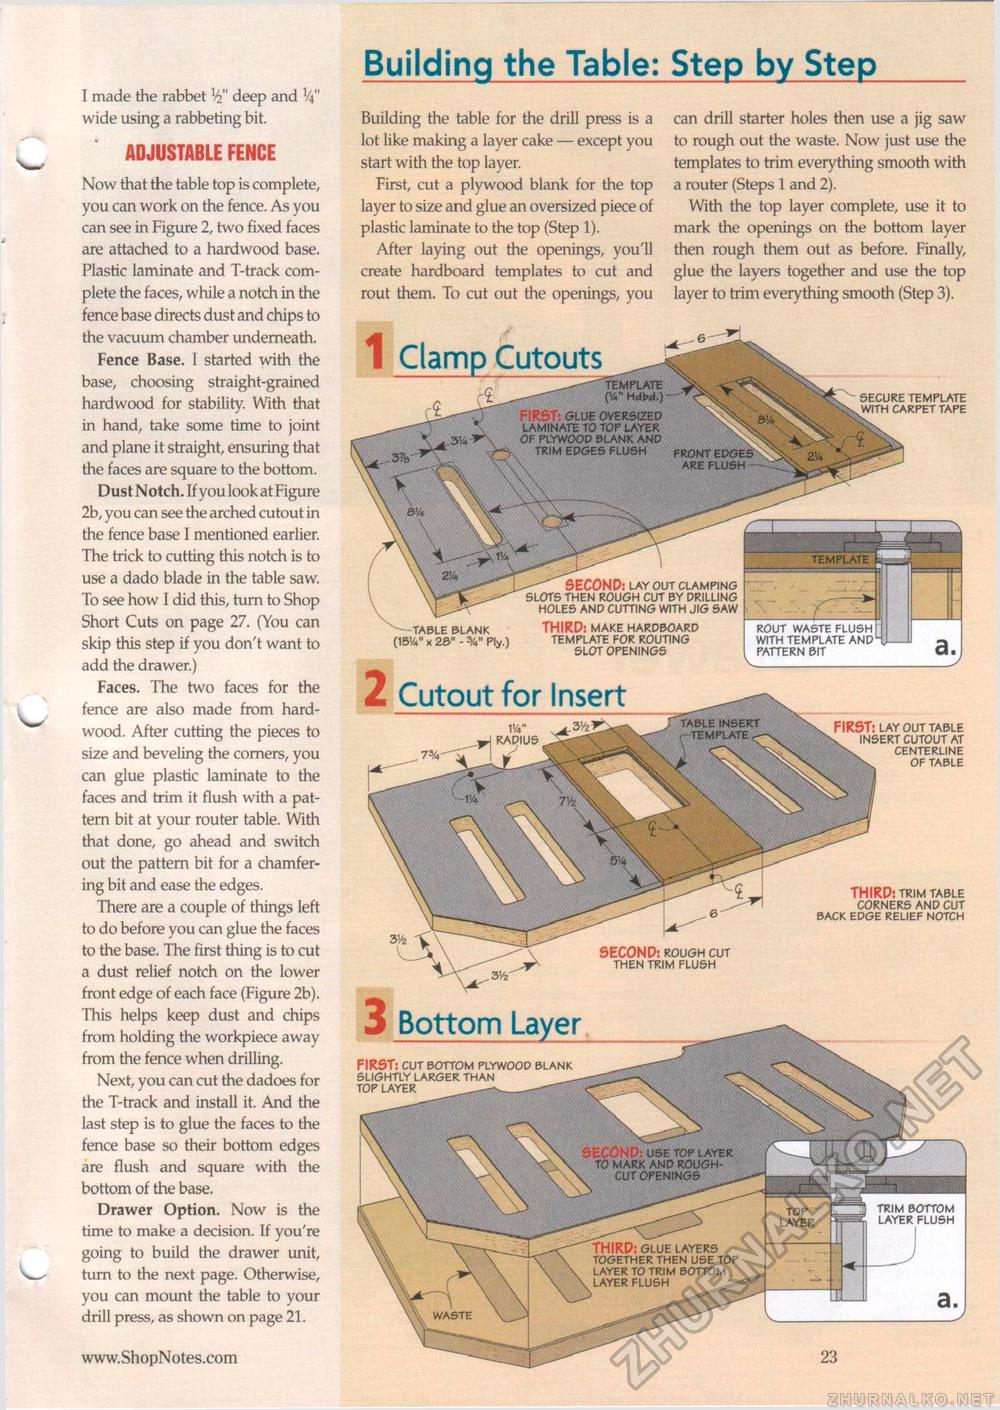
Building the Table: Step by Step 1 made the rabbet deep and V4" wide using a rabbeting bit. ADJUSTABLE FENCE - Now that the table top is complete, you can work on the fence. As you can see in Figure 2, two fixed faces are attached to a hardwood base. Plastic laminate and T-track complete the faces, while a notch in the fence base directs dust and chips to the vacuum chamber underneath. Fence Base. I started with the base, choosing straight-grained hardwood for stability. With that in hand, take some time to joint and plane it straight, ensuring that the faces are square to the bottom. Dust Notch. If you look at Figure 2b, you can see the arched cutout in the fence base I mentioned earlier. The trick to cutting this notch is to use a dado blade in the table saw. To see how I did this, turn to Shop Short Cuts on page 27. (You can skip this step if you don't want to add the drawer.) Faces. The two faces for the ^^ fence are also made from hardwood. After cutting the pieces to size and beveling the corners, you can glue plastic laminate to the faces and trim it flush with a pattern bit at your router table. With that done, go ahead and switch out the pattern bit for a chamfering bit and ease the edges. There are a couple of things left to do before you can glue the faces to the base. The first thing is to cut a dust relief notch on the lower front edge of each face (Figure 2b). This helps keep dust and chips from holding the workpiece away from the fence when drilling. Next, you can cut the dadoes for the T-track and install it. And the last step is to glue the faces to the fence base so their bottom edges are flush and square with the bottom of the base. Drawer Option. Now is the time to make a decision. If you're going to build the drawer unit, turn to the next page. Otherwise, you can mount the table to your drill press, as shown on page 21. • TEMPLATE ^ck (VV HdM.)— F: RS > GLUE OVERSIZED LAMINATE TO TOP LAYER X OF PLYWOOD BLANK AND TRIM EDGES FLUSH FR0NT EDGES ARE FLUSH- SECOND: USE TOP LAYER TO MARK AND ROUGHS' CUT OPENINGS top layer THIRD: glue layers together then use top layer to trim bottom layer flush ^^ Building the table for the drill press is a lot like making a layer cake — except you start with the top layer. First, cut a plywood blank for the top layer to size and glue an oversized piece of plastic laminate to the top (Step 1). After laying out the openings, you'll create hardboard templates to cut and rout them. To cut out the openings, you can drill starter holes then use a jig saw to rough out the waste. Now just use the templates to trim everything smooth with a router (Steps 1 and 2). With the top layer complete, use it to mark the openings on the bottom layer then rough them out as before. Finally, glue the layers together and use the top layer to trim everything smooth (Step 3). 1 Clamp Cutouts secure template with carpet tape table blank (15'A" x 2ft" - 3/4" Ply.) SECOND: layout clamping slots then rough cut by drilling holes and cutting with jig saw THIRD: make hardboard template for routing slot openings TEMPLATE rout waste flush with template and pattern bit 2 Cutout for Insert FIRST: lay out table insert cutout at centerline of table SECOND: rough cut then trim flush THIRD: trim table corners and cut back edge relief notch 3 Bottom Layer FIRST: cut bottom plywood blank slightly larger than top layer trim bottom layer flush |


