95, страница 20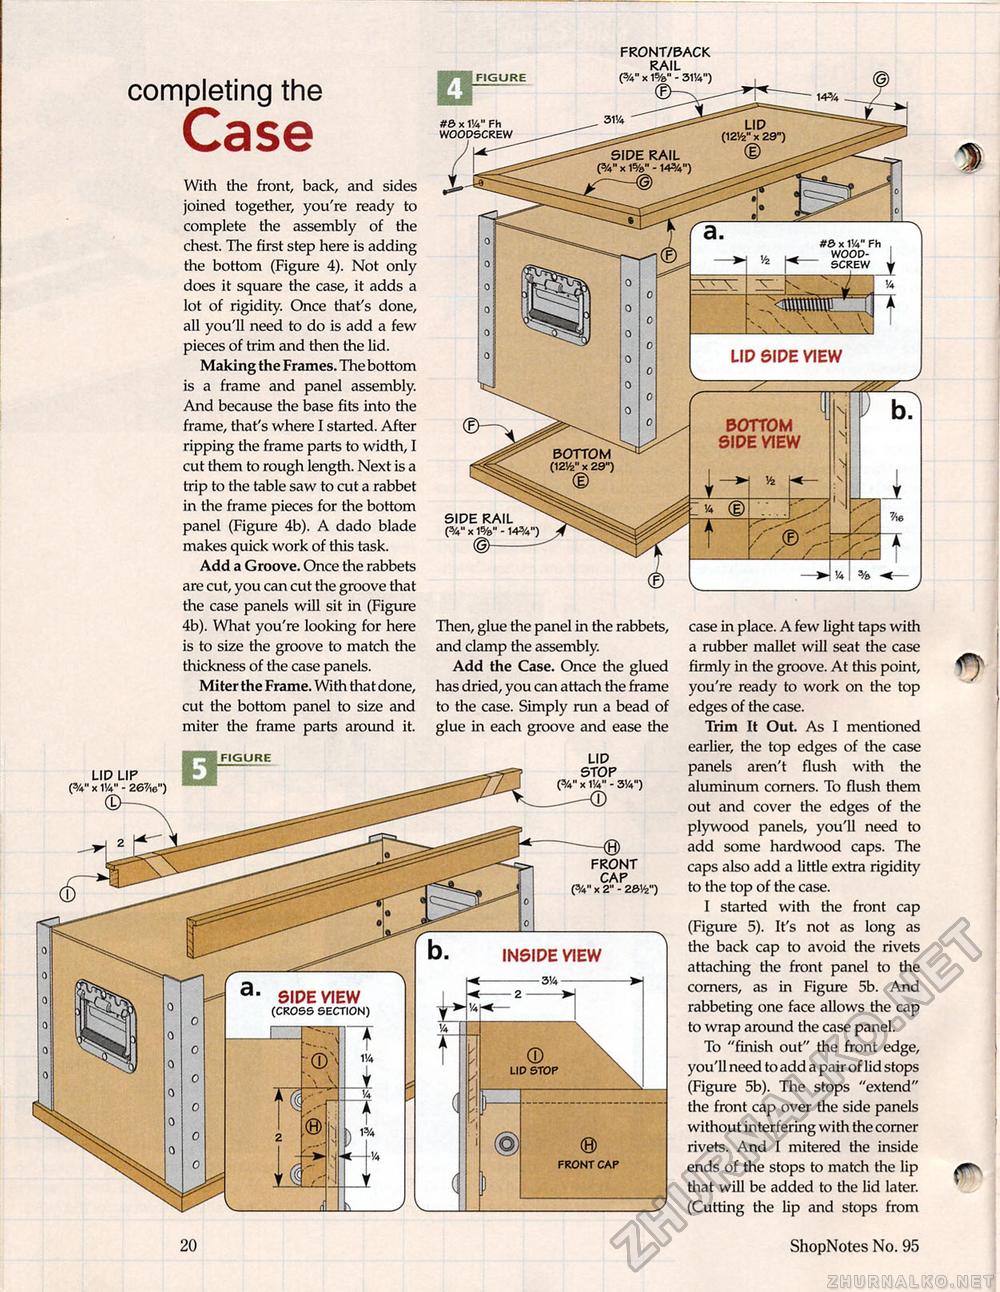
FRONT/BACK RAIL (%" x 15/»" - 31V4") completing the #& x W Fh WOODSCREW With the front, back, and sides ® joined together, you're ready to complete the assembly of the —1 chest. The first step here is adding 0 A the bottom (Figure 4). Not only 0 /fiCTfsv-^ does it square the case, it adds a o J cC^pSj) lot of rigidity. Once that's done, o 1 o all you'll need to do is add a few 0 pieces of trim and then the lid. o o Making the Frames. The bottom 0 0 is a frame and panel assembly. o And because the base fits into the 0 frame, that's where I started. After ©— ripping the frame parts to width, I ^^BOTTOM""11^^ cut them to rough length. Next is a 02Vi" x 29") trip to the table saw to cut a rabbet ® in the frame pieces for the bottom panel (Figure 4b). A dado blade jfw - 1W-) makes quick work of this task. ©——— Add a Groove. Once the rabbets are cut, you can cut the groove that © the case panels will sit in (Figure 4b). What you're looking for here Then, glue the panel in the rabbets, is to size the groove to match the and clamp the assembly, thickness of the case panels. Add the Case. Once the glued Miter the Frame. With that done, has dried, you can attach the frame cut the bottom panel to size and to the case. Simply run a bead of miter the frame parts around it. glue in each groove and ease the I 'H FIGURE LID tt& x IV4" Fh WOOD-SCREW BOTTOM SIDE VIEW case in place. A few light taps with a rubber mallet will seat the case firmly in the groove. At this point, you're ready to work on the top edges of the case. Trim It Out. As I mentioned earlier, the top edges of the case panels aren't flush with the aluminum comers. To flush them out and cover the edges of the plywood panels, you'll need to add some hardwood caps. The caps also add a little extra rigidity to the top of the case. I started with the front cap (Figure 5). It's not as long as the back cap to avoid the rivets attaching the front panel to the comers, as in Figure 5b. And rabbeting one face allows the cap to wrap around the case panel. To "finish out" the front edge, you'll need to add a pair of lid stops (Figure 5b). The stops "extend" the front cap over the side panels without interfering with the comer rivets. And I mitered the inside ends of the stops to match the lip that will be added to the lid later. (Cutting the lip and stops from ——® FRONT CAP PV' x 2" - 2614") INSIDE VIEW SIDE VIEW (CROSS SECTION) front cap 20 ShopNotes No. 95 |


