Woodworker's Journal 101-Projects-for-Woodworkers, страница 11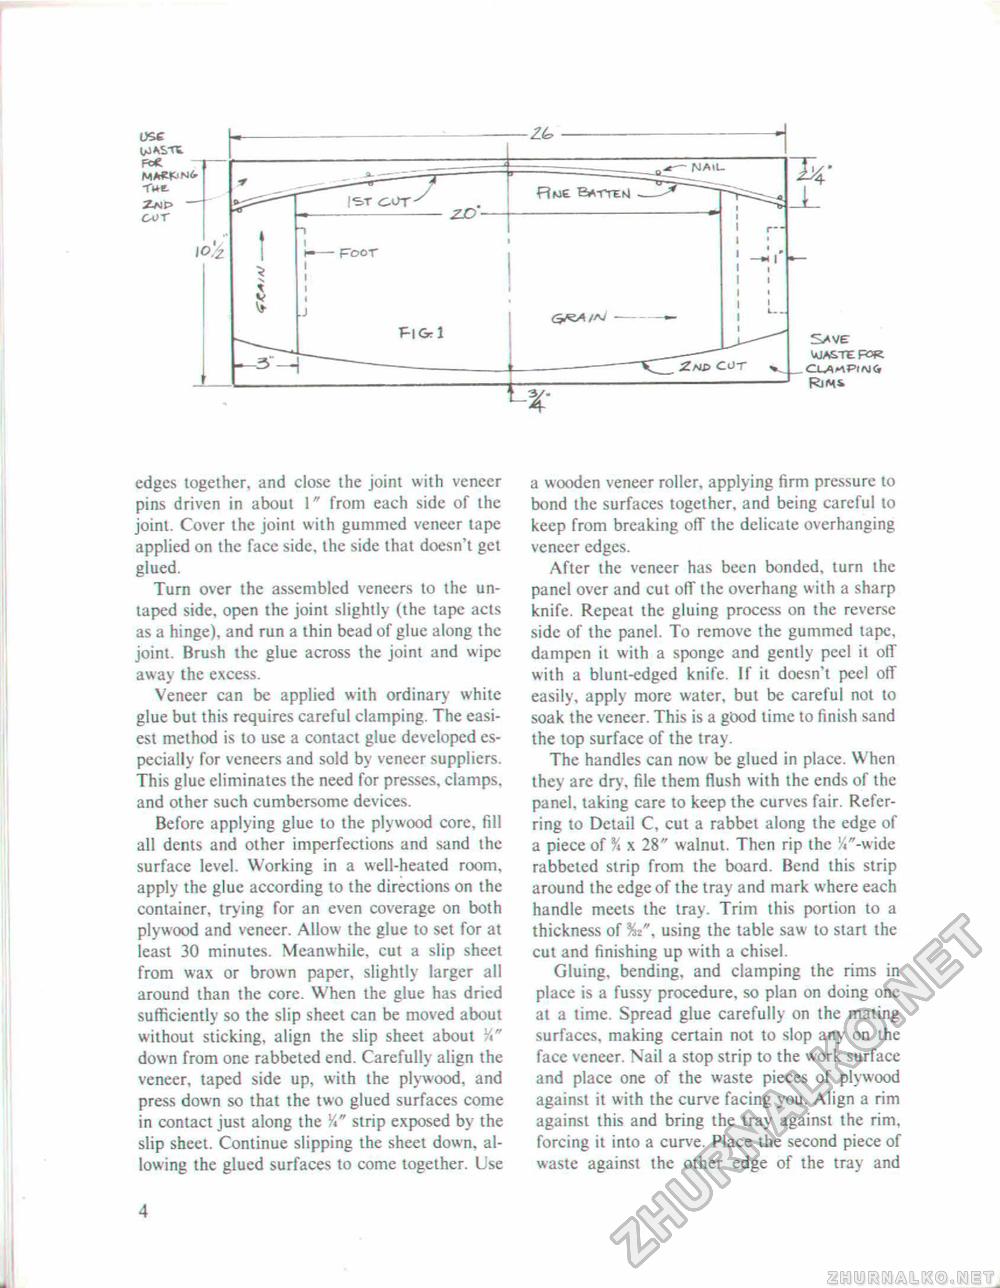
edges together, and close the joint with veneer pins driven in about 1" from each side of the joint. Cover the joint with gummed veneer tape applied on the face side, the side that doesn't get glued. Turn over the assembled veneers to the un-taped side, open the joint slightly (the tape acts as a hinge), and run a thin bead of glue along the joint. Brush the glue across the joint and wipe away the excess. Veneer can be applied with ordinary white glue but this requires careful clamping. The easiest method is to use a contact glue developed especially for veneers and sold by veneer suppliers. This glue eliminates the need for presses, clamps, and other such cumbersome devices. Before applying glue to the plywood core, fill all dents and other imperfections and sand the surface level. Working in a well-heated room, apply the glue according to the directions on the container, trying for an even coverage on both plywood and veneer. Allow the glue to set for at least 30 minutes. Meanwhile, cut a slip sheet from wax or brown paper, slightly larger all around than the core. When the glue has dried sufficiently so the slip sheet can be moved about without sticking, align the slip sheet about K" down from one rabbeted end. Carefully align the veneer, taped side up, with the plywood, and press down so that the two glued surfaces come in contact just along the Yt" strip exposed by the slip sheet. Continue slipping the sheet down, allowing the glued surfaces to come together. Use a wooden veneer roller, applying firm pressure to bond the surfaces together, and being careful to keep from breaking off the delicate overhanging veneer edges. After the veneer has been bonded, turn the panel over and cut off the overhang with a sharp knife. Repeat the gluing process on the reverse side of the panel. To remove the gummed tape, dampen it with a sponge and gently peel it off with a blunt-edged knife. If it doesn't peel off easily, apply more water, but be careful not to soak the veneer. This is a good time to finish sand the top surface of the tray. The handles can now be glued in place. When they are dry, file them flush with the ends of the panel, taking care to keep the curves fair. Referring to Detail C, cut a rabbet along the edge of a piece of % x 28" walnut. Then rip the Zi'-wide rabbeted strip from the board. Bend this strip around the edge of the tray and mark where each handle meets the tray. Trim this portion to a thickness of %z", using the table saw to start the cut and finishing up with a chisel. Gluing, bending, and clamping the rims in place is a fussy procedure, so plan on doing one at a time. Spread glue carefully on the mating surfaces, making certain not to slop any on the face veneer. Nail a stop strip to the work surface and place one of the waste pieces of plywood against it with the curve facing you. Align a rim against this and bring the tray against the rim, forcing it into a curve. Place the second piece of waste against the other edge of the tray and 4 |


