Woodworker's Journal 101-Projects-for-Woodworkers, страница 74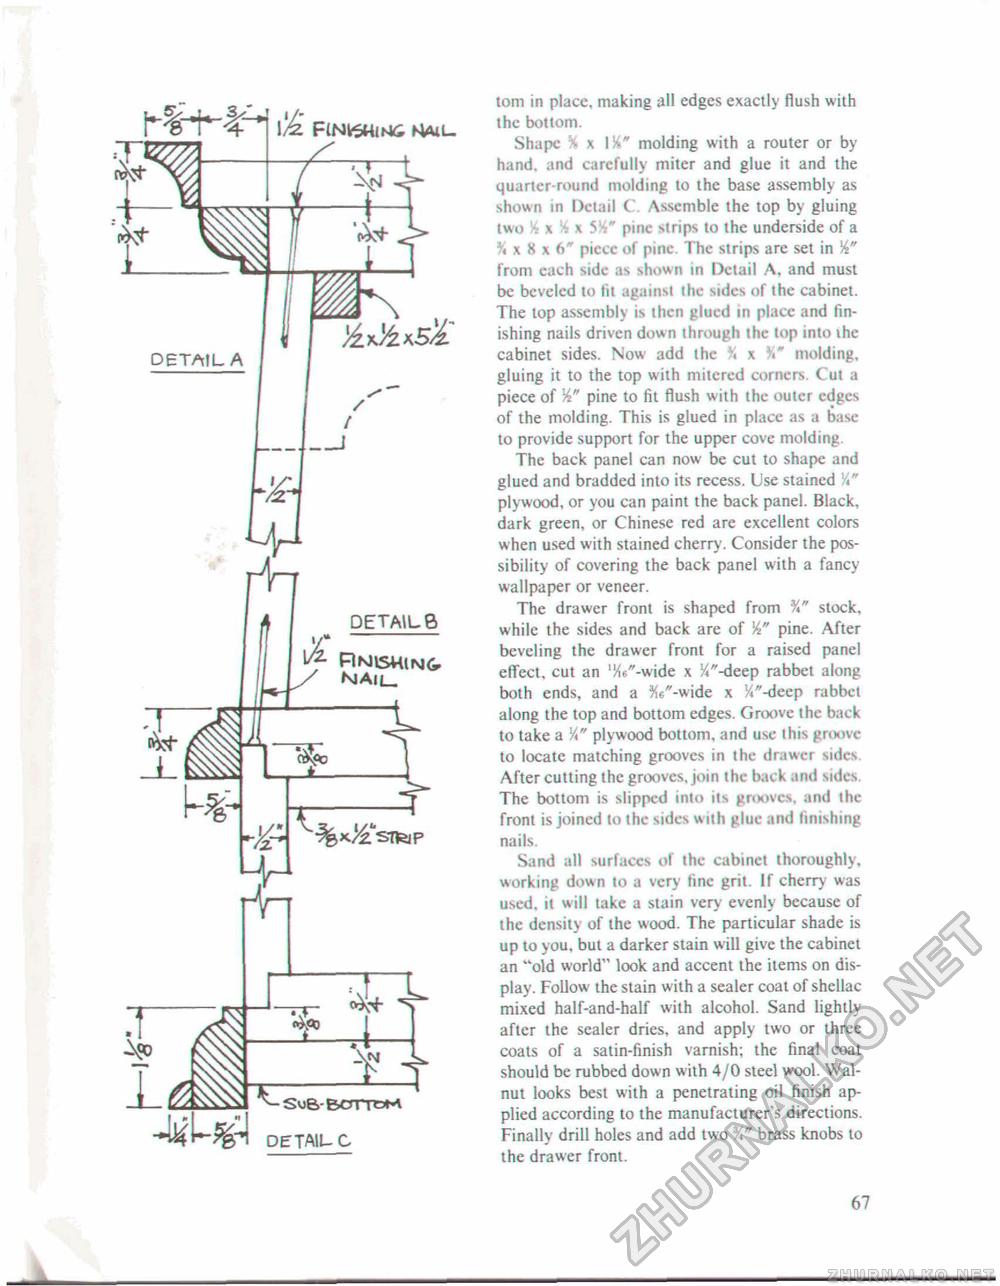
F(Nt6UiM£ Mail. SuB-BcrmsM 3~ DETAIL C torn in place, making all edges exactly flush with the bottom. Shape % x molding with a router or by hand, and carefully miter and glue it and the quarter-round molding to the base assembly as shown in Detail ( Assemble the top by gluing two x . v y- " pine strips to the underside of a \ x X x 6" piecc of pine. The strips are set in from each side as shown in Detail A, and must be beveled to fit against the sides of the cabinet. The top assembly is then glued in place and finishing nails driven down through the lop into ihe cabinet sides. Now add the \ x molding, gluing it to the top with mitered corners Cut a piece of pine to fit flush with the outer edges of the molding. This is glued in place as a base to provide support for the upper cove molding. The back panel can now be cut to shape and glued and bradded into its recess. Use stained plywood, or you can paint the back panel. Black, dark green, or Chinese red are excellent colors when used with stained cherry. Consider the possibility of covering the back panel with a fancy-wallpaper or veneer. The drawer front is shaped from stock, while the sides and back are of W pine. After beveling the drawer front for a raised panel elTect. cut an %^-wide x ^"-deep rabbet along both ends, and a 5i6"-wide x y<"-deep rabbet along the top and bottom edges. Groove the back to take a V<" plywood bottom, and use this groove to locate matching grooves in the drawer sides After cutting the grooves, join the back and sides. The bottom is slipped into its grooves, and the front is joined to the sides with glue and finishing nails. Sand all surfaces of the cabinet thoroughly, working down to a very fine grit. If cherry was used, it will take a stain very evenly because of the density of the wood. The particular shade is up to you, but a darker stain will give the cabinet an "old world" look and accent the items on display. Follow the stain with a sealer coat of shellac mixed half-and-half with alcohol. Sand lightly after the sealer dries, and apply two or three coats of a satin-finish varnish; the final coat should be rubbed down with 4/0 steel wool. Walnut looks best with a penetrating oil finish applied according to the manufacturer's directions. Finally drill holes and add two brass knobs to the drawer front. 67 _ |


