Woodworker's Journal 1983-7-1, страница 22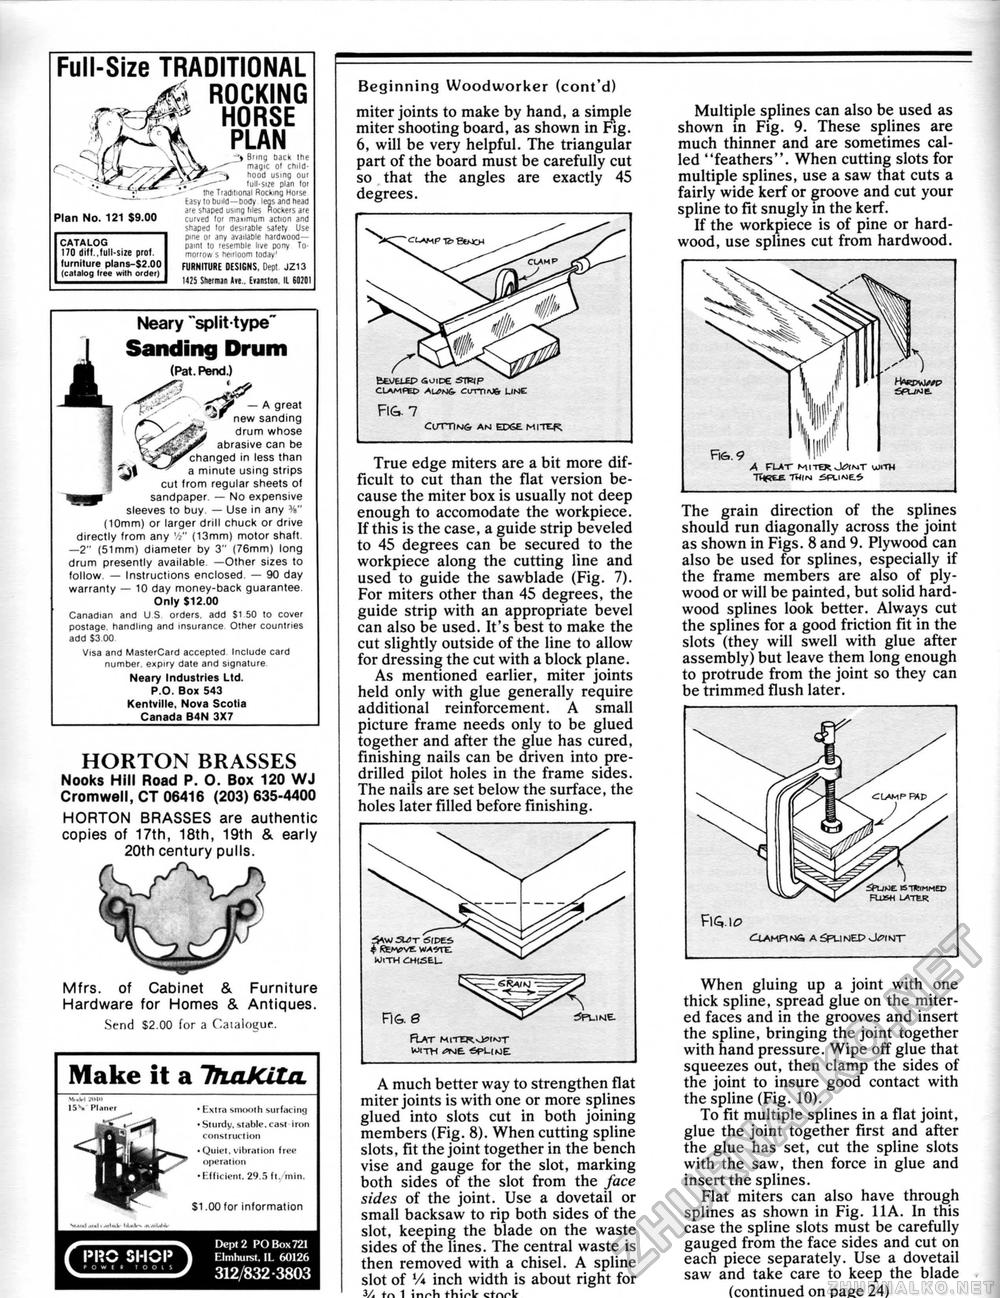
Full-Size TRADITIONAL jti ROCKING f "f nt HORSE ' JkFl PLAN Plan No. 121 $9.00 CATALOG 170 diff,full-size prof, furniture plans-$2.00 (catalog Iree with order) Bring back the "" magic of childhood using our full-size plan for the Traditional Rocking Horse Easy to build—body leas and head are shaped using tiles Rockers are curved for maximum action and shaped for desirable safety Use pine or any available hardwood— paint to resemble live pony Tomorrow s heirloom today' FURNITURE DESI6NS. Dept. JZ13 1425 Sherman Ave.. Evanston. IL 60201 Neary "split-type" Sanding Drum (Pat. Rend.) ^fj? — A great n A , , . ■*' new sanding C ' drum whose t abrasive can be Xgjr changed in less than 1 a minute using strips j cut from regular sheets of MS sandpaper — No expensive sleeves to buy — Use in any %" (10mm) or larger drill chuck or drive directly from any W (13mm) motor shaft. —2" (51mm) diameter by 3" (76mm) long drum presently available —Other sizes to follow — Instructions enclosed. — 90 day warranty — 10 day money-back guarantee Only $12.00 Canadian and U S orders, add St 50 to cover postage, handling and insurance Other countries add S3 00 Visa and MasterCard accepted Include card number, expiry date and signature Neary Industries Ltd. P.O. Box 543 Kentville. Nova Scotia Canada B4N 3X7 HORTON BRASSES Nooks Hill Road P. O. Box 120 WJ Cromwell, CT 06416 (203) 635-4400 Mfrs. of Cabinet & Furniture Hardware for Homes & Antiques. Send $2.00 for a Catalogue. Make it a lfinKitn. I. .tilmlr .n.«M4.- PI?C SHOP • Extra smooth surfacing • Sturdy, stable, cast iron construction • Quiet, vibration free operation •Efficient. 29.5 ft/min. $1.00 for Information Dept 2 PO Box 721 Elmhuist. IL 60126 312/832-3803 Beginning Woodworker (cont'd) miter joints to make by hand, a simple miter shooting board, as shown in Fig. 6, will be very helpful. The triangular part of the board must be carefully cut so that the angles are exactly 45 degrees. Bevei fp aoioe simp ciAMftc curriivb LIMC FI6. 7 cutting an edge miter True edge miters are a bit more difficult to cut than the flat version because the miter box is usually not deep enough to accomodate the workpiece. If this is the case, a guide strip beveled to 45 degrees can be secured to the workpiece along the cutting line and used to guide the sawblade (Fig. 7). For miters other than 45 degrees, the guide strip with an appropriate bevel can also be used. It's best to make the cut slightly outside of the line to allow for dressing the cut with a block plane. As mentioned earlier, miter joints held only with glue generally require additional reinforcement. A small picture frame needs only to be glued together and after the glue has cured, finishing nails can be driven into pre-drilled pilot holes in the frame sides. The nails are set below the surface, the holes later filled before finishing.
A much better way to strengthen flat miter joints is with one or more splines glued into slots cut in both joining members (Fig. 8). When cutting spline slots, fit the joint together in the bench vise and gauge for the slot, marking both sides of the slot from the face sides of the joint. Use a dovetail or small backsaw to rip both sides of the slot, keeping the blade on the waste sides of the lines. The central waste is then removed with a chisel. A spline slot of V4 inch width is about right for 3/a tr, 1 inr'h think ctnnlf Multiple splines can also be used as shown in Fig. 9. These splines are much thinner and are sometimes called "feathers". When cutting slots for multiple splines, use a saw that cuts a fairly wide kerf or groove and cut your spline to fit snugly in the kerf. If the workpiece is of pine or hardwood, use splines cut from hardwood. fie,. 9 A fut mitw j^imt uiith THREE thin SPLINE.^ The grain direction of the splines should run diagonally across the joint as shown in Figs. 8 and 9. Plywood can also be used for splines, especially if the frame members are also of plywood or will be painted, but solid hardwood splines look better. Always cut the splines for a good friction fit in the slots (they will swell with glue after assembly) but leave them long enough to protrude from the joint so they can be trimmed flush later. ipuioe is trimmed Fujsw later CLAMP\SA ASPLINEP J^(NT When gluing up a joint with one thick spline, spread glue on the miter-ed faces and in the grooves and insert the spline, bringing the joint together with hand pressure. Wipe off glue that squeezes out, then clamp the sides of the joint to insure good contact with the spline (Fig. 10). To fit multiple splines in a flat joint, glue the joint together first and after the glue has set, cut the spline slots with the saw, then force in glue and insert the splines. Flat miters can also have through splines as shown in Fig. 11 A. In this case the spline slots must be carefully gauged from the face sides and cut on each piece separately. Use a dovetail saw and take care to keep the blade (continued on page 24) HORTON BRASSES are authentic copies of 17th, 18th, 19th & early 20th century pulls. |
||||||||||||||||||


