Woodworker's Journal 1983-7-2, страница 40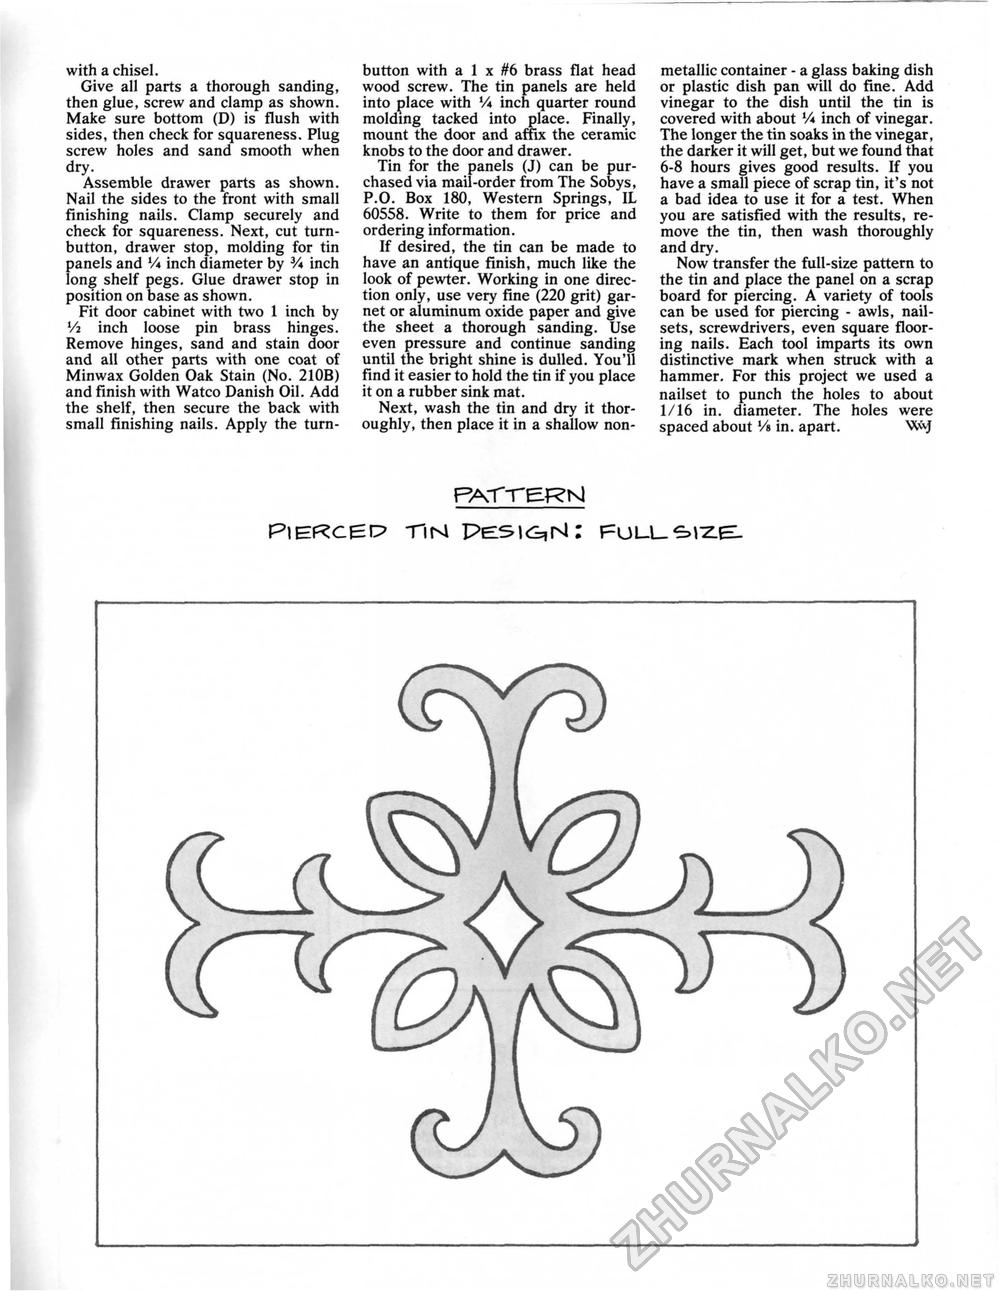
with a chisel. Give all parts a thorough sanding, then glue, screw and clamp as shown. Make sure bottom (D) is flush with sides, then check for squareness. Plug screw holes and sand smooth when dry. Assemble drawer parts as shown. Nail the sides to the front with small finishing nails. Clamp securely and check for squareness. Next, cut turn-button, drawer stop, molding for tin panels and Vi inch diameter by 3/« inch long shelf pegs. Glue drawer stop in position on base as shown. Fit door cabinet with two 1 inch by V2 inch loose pin brass hinges. Remove hinges, sand and stain door and all other parts with one coat of Minwax Golden Oak Stain (No. 210B) and finish with Watco Danish Oil. Add the shelf, then secure the back with small finishing nails. Apply the turn- button with a 1 x #6 brass flat head wood screw. The tin panels are held into place with Vi inch quarter round molding tacked into place. Finally, mount the door and affix the ceramic knobs to the door and drawer. Tin for the panels (J) can be purchased via mail-order from The Sobys, P.O. Box 180, Western Springs, IL 60558. Write to them for price and ordering information. If desired, the tin can be made to have an antique finish, much like the look of pewter. Working in one direction only, use very fine (220 grit) garnet or aluminum oxide paper and give the sheet a thorough sanding. Use even pressure and continue sanding until the bright shine is dulled. You'll find it easier to hold the tin if you place it on a rubber sink mat. Next, wash the tin and dry it thoroughly, then place it in a shallow non- metallic container - a glass baking dish or plastic dish pan will do fine. Add vinegar to the dish until the tin is covered with about V* inch of vinegar. The longer the tin soaks in the vinegar, the darker it will get, but we found that 6-8 hours gives good results. If you have a small piece of scrap tin, it's not a bad idea to use it for a test. When you are satisfied with the results, remove the tin, then wash thoroughly and dry. Now transfer the full-size pattern to the tin and place the panel on a scrap board for piercing. A variety of tools can be used for piercing - awls, nail-sets, screwdrivers, even square flooring nails. Each tool imparts its own distinctive mark when struck with a hammer. For this project we used a nailset to punch the holes to about 1/16 in. diameter. The holes were spaced about Vs in. apart. Wvj PATTERN) piercei^ tin pe5i<s,n: full |


