Woodworker's Journal 1983-7-4, страница 27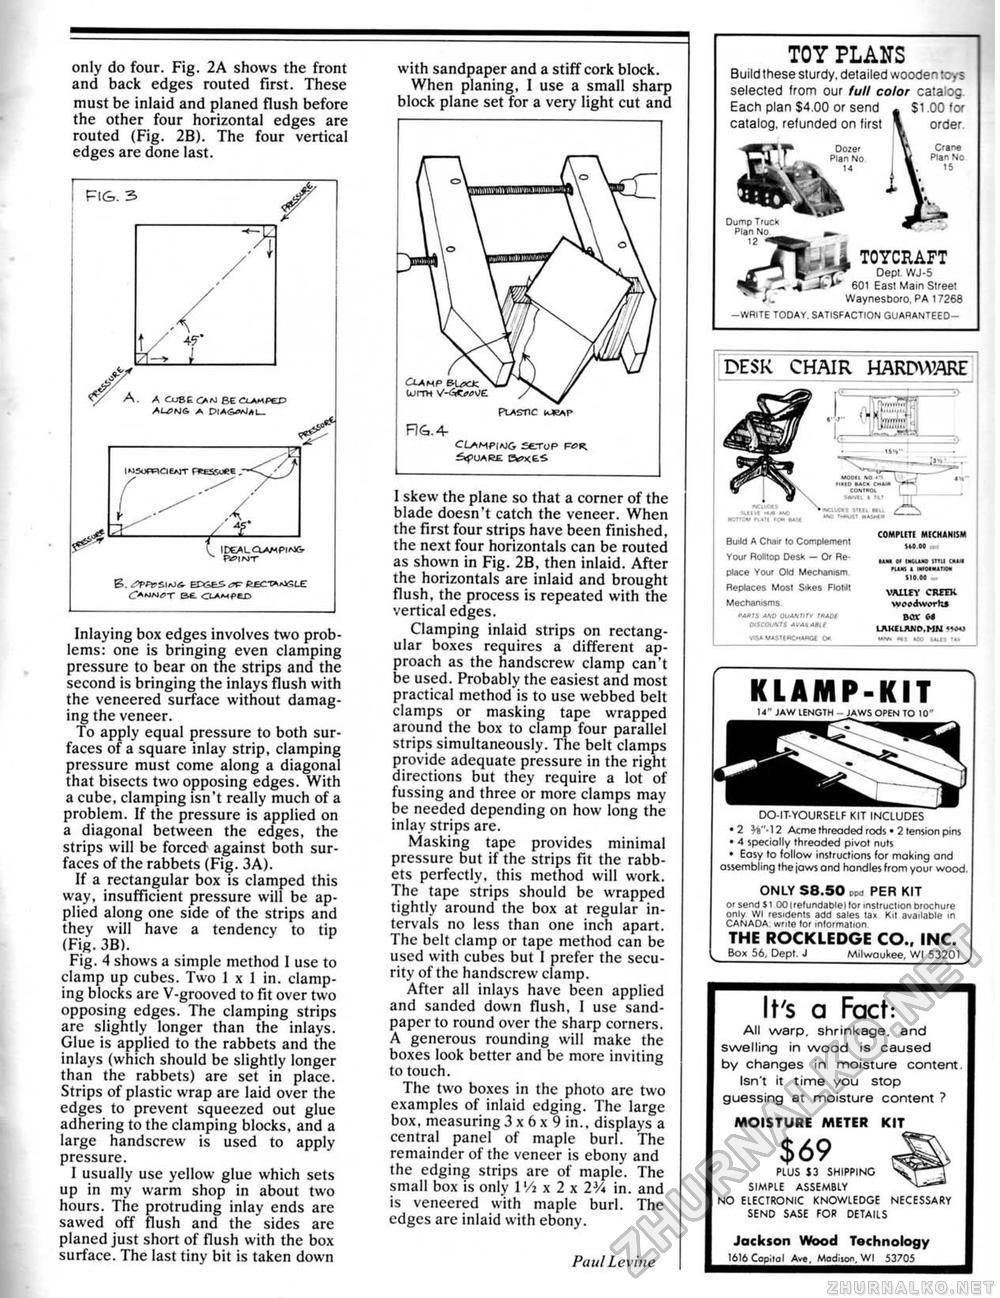
only do four. Fig. 2A shows the front and back edges routed first. These must be inlaid and planed flush before the other four horizontal edges are routed (Fig. 2B). The four vertical edges are done last. FIG. 3 vy A. A coseBe^mKPec IDEAL CLAMP I MGr fWINT Inlaying box edges involves two problems: one is bringing even clamping pressure to bear on the strips and the second is bringing the inlays flush with the veneered surface without damaging the veneer. To apply equal pressure to both surfaces of a square inlay strip, clamping pressure must come along a diagonal that bisects two opposing edges. With a cube, clamping isn't really much of a problem. If the pressure is applied on a diagonal between the edges, the strips will be forced' against both surfaces of the rabbets (Fig. 3A). If a rectangular box is clamped this way, insufficient pressure will be applied along one side of the strips and they will have a tendency to tip (Fig. 3B). Fig. 4 shows a simple method 1 use to clamp up cubes. Two 1 x I in. clamping blocks are V-grooved to fit over two opposing edges. The clamping strips are slightly longer than the inlays. Glue is applied to the rabbets and the inlays (which should be slightly longer than the rabbets) are set Sri place. Strips of plastic wrap are laid over the edges to prevent squeezed out glue adhering to the clamping blocks, and a large handscrew is used to apply pressure. 1 usually use yellow glue which sets up in my warm shop in about two hours. The protruding inlay ends are sawed off flush and the sides are planed just short of flush with the box surface. The last tiny bit is taken down with sandpaper and a stiff cork block. When planing, 1 use a small sharp block plane set for a very light cut and Clamp e.u>at LurrH V-^tftfue PlASnc RG.4- CLampwg fie-rup f^r. I skew the plane so that a corner of the blade doesn't catch the veneer. When the first four strips have been finished, the next four horizontals can be routed as shown in Fig. 2B, then inlaid. After the horizontals are inlaid and brought flush, the process is repeated with the vertical edges. Clamping inlaid strips on rectangular boxes requires a different approach as the handscrew clamp can't be used. Probably the easiest and most practical method is to use webbed belt clamps or masking tape wrapped around the box to clamp four parallel strips simultaneously. The belt clamps provide adequate pressure in the right directions but they require a lot of fussing and three or more clamps may be needed depending on how long the inlay strips are. Masking tape provides minimal pressure but if the strips fit the rabbets perfectly, this method will work. The tape strips should be wrapped tightly around the box at regular intervals no less than one inch apart. The belt clamp or tape method can be used with cubes but I prefer the security of the handscrew clamp. After all inlays have been applied and sanded down flush, 1 use sandpaper to round over the sharp corners. A generous rounding will make the boxes look better and be more inviting to touch, The two boxes in the photo are two examples of inlaid edging. The large box. measuring 3 x 6 x 9 in,, displays a central panel of maple burl, the remainder of the veneer is ebony and the edging strips are of maple. The small box is only 1 Vi x 2 x 2¥i in. and is veneered with maple burl. The edges are inlaid with ebony. Paul Lev hie TOY PLANS Build these sturdy, detailed wooden toys selected from our full color catalog Each plan S4.00 or send - $1.00 for catalog, refunded on first \ order TOYCRAFT -J Dept WJ-5 _ f * A J*-** 601 East Mam Street WaynesBoto, PA 17268 -WHITE TODAY. SATISFACTION GUARANTEED)- DESK CHAIR HARDWARE Build A Chair lo Complement Your RolUop Desk — Of Re place Your Old Mechanism Replaces Most Sikes FloMl Mechanisms Pants ANO QOAHtirv TftADl OtSCOL'\ tS M'AAABlt trt&A V*5tEBCHAHOf Q*. COMPUTE MECHANISM 1*0 00 »e UNt Of IHtLUB ITTU <M< »U«i I mlOtMAWi 110 00 - VALtFY CR£FK wcodwcrht frOtr C-l LAKE LAND. MN IW* *M J0O UOI '*< KLAMP-KIT 14" JAW LENGTH - OPEN TO 10" DO-IT-YOURSELF KIT INCLUDES •2 W*12 Acme threaded rods • 2 tension pins • 4 specially threaded pivot nuti ■ Eosy to follow instructions for making ond assembling the jaws and handles from your wood. ONLY S8.S0 sm PER KIT or send 11 OO irefundable} tar instruction brochure only Wl residents add sales tai Kit available in CANADA write lor information THE ROCKLEDGE CO., INC. j. Box 56, Qept <1_Milwaukee. Wl 53201 j It's a Fact: All warp, shrinkage, and swelling in wood is caused by changes in moisture content Isn't it time you stop guessing at moisture content ? MOISTURE METER KIT $69 PLUS J3 SHIPPING SIMPLE ASSEMBLY NO ELECTRONIC KNOWLEDGE NECESSARY SEND SA5E FOR DETAILS Jackson Wood Technology 1616 Cap,ml Ave, Modison, Wl 53705_ |


