Woodworker's Journal 1983-7-4, страница 36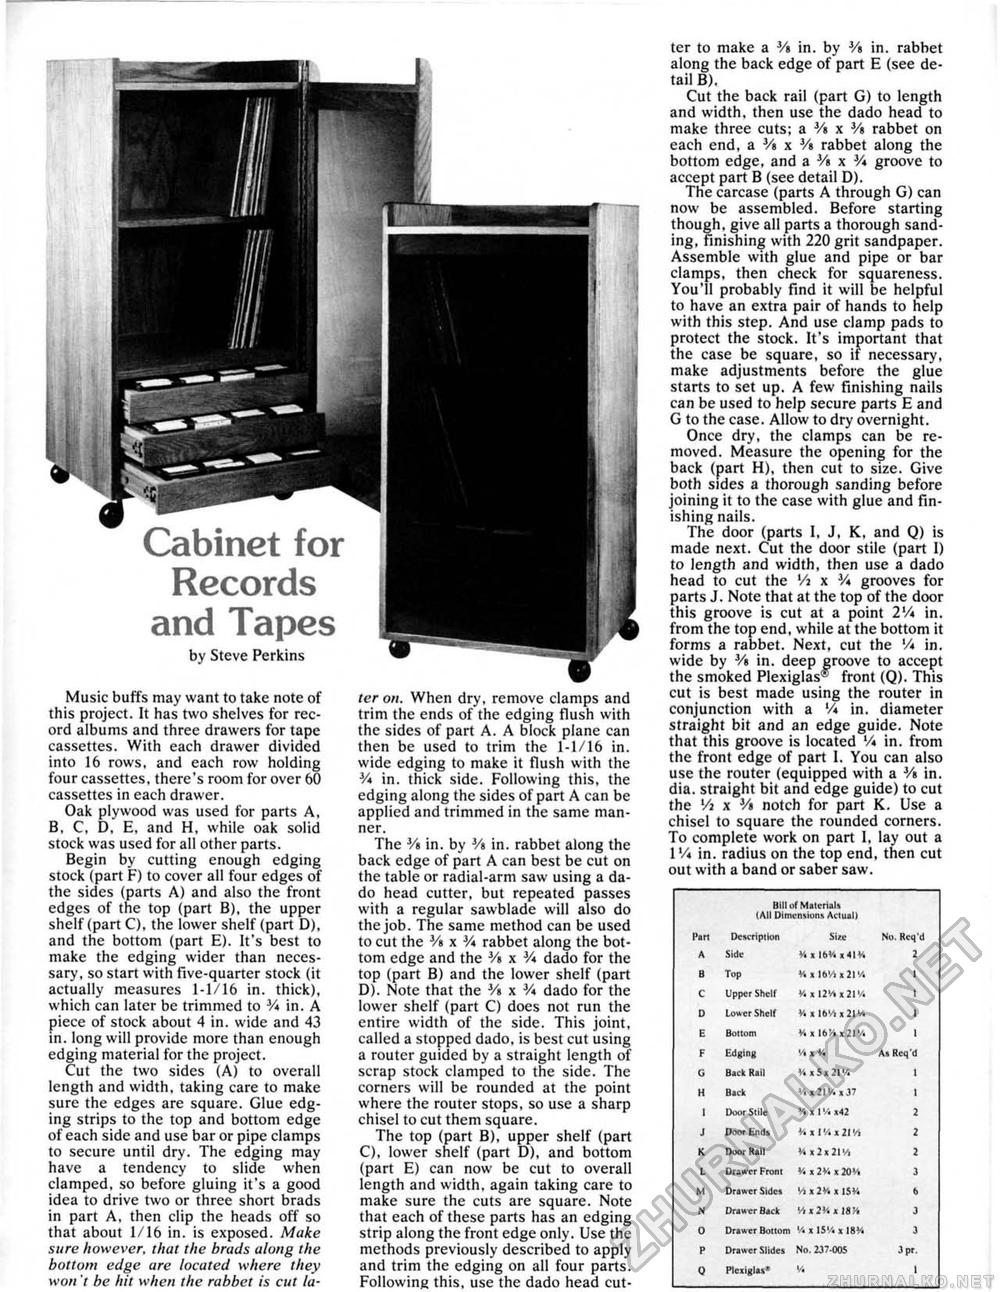
Music buffs may want to take note of this project. It has two shelves for record albums and three drawers for tape cassettes. With each drawer divided into 16 rows, and each row holding four cassettes, there's room for over 60 cassettes in each drawer. Oak plywood was used for parts A, B, C, D, E, and H, while oak solid stock was used for all other parts. Begin by cutting enough edging stock (part F) to cover all four edges of the sides (parts A) and also the front edges of the top (part B), the upper shelf (part C), the lower shelf (part D), and the bottom (part E). It's best to make the edging wider than necessary, so start with five-quarter stock (it actually measures 1-1/16 in. thick), which can later be trimmed to 3A in. A piece of stock about 4 in. wide and 43 in. long will provide more than enough edging material for the project. Cut the two sides (A) to overall length and width, taking care to make sure the edges are square. Glue edging strips to the top and bottom edge of each side and use bar or pipe clamps to secure until dry. The edging may have a tendency to slide when clamped, so before gluing it's a good idea to drive two or three short brads in part A, then clip the heads off so that about 1/16 in. is exposed. Make sure however, that the brads along the bottom edge are located where they won't be hit when the rabbet is cut la ter on. When dry, remove clamps and trim the ends of the edging flush with the sides of part A. A block plane can then be used to trim the 1-1/16 in. wide edging to make it flush with the V* in. thick side. Following this, the edging along the sides of part A can be applied and trimmed in the same manner. The Vt in. by Vt in. rabbet along the back edge of part A can best be cut on the table or radial-arm saw using a dado head cutter, but repeated passes with a regular sawblade will also do the job. The same method can be used to cut the Vt x V* rabbet along the bottom edge and the Vt x SA dado for the top (part B) and the lower shelf (part D). Note that the Vt x *A dado for the lower shelf (part C) does not run the entire width of the side. This joint, called a stopped dado, is best cut using a router guided by a straight length of scrap stock clamped to the side. The corners will be rounded at the point where the router stops, so use a sharp chisel to cut them square. The top (part B), upper shelf (part C), lower shelf (part D), and bottom (part E) can now be cut to overall length and width, again taking care to make sure the cuts are square. Note that each of these parts has an edging strip along the front edge only. Use the methods previously described to apply and trim the edging on all four parts. Following this, use the dado head cut ter to make a Vt in, by Vt in, rabbet along the back edge of part E (see detail B). Cut the back rail {pan G) to length and width, then use the dado head to make three cuts; a Vt x Vt rabbet on each end, a Vt x Vt rabbet along the bottom edge, and a Vt x V* groove to accept part B (see detail D). The carcase (parts A through G) can now be assembled. Before starting though, give all parts a thorough sanding, finishing with 220 grit sandpaper. Assemble with glue and pipe or bar clamps, then check for squareness. You'll probably find it will be helpful to have an extra pair of hands to help with this step. And use clamp pads to protect the stock. It's important that the case be square, so if necessary, make adjustments before the glue starts to set up. A few finishing nails can be used to help secure parts E and G to the case. Allow to dry overnight. Once dry, the clamps can be removed. Measure the opening for the back (part H). then cut to size. Give both sides a thorough sanding before joining it to the case with glue and finishing nails. The door (parts 1, J, K, and Q) is made next. Cut the door stile (part I) to length and width, then use a dado head to cut the Vi x V* grooves for parts J. Note that at the top of the door this groove is cut at a point 2V* in. from the top end, while at the bottom it forms a rabbet. Next, cut the V* in. wide by Vt in. deep groove to accept the smoked Plexiglas® front (Q). This cut is best made using the router in conjunction with a 'A in, diameter straight bit and an edge guide. Note that this groove is located V* in. from the front edge of part I. You can also use the router (equipped with a Vt in. dia. straight bit and edge guide) to cut the Vi x Vi notch for part K. Use a chisel to square the rounded corners. To complete work on part I, lay out a 1 'A in. radius on the top end, then cut out with a band or saber saw.
|
||||||||||||||||||||||||||||||||||||||||||||||||||||||||||||||||||||||||||||||||


