Woodworker's Journal 1983-7-4, страница 33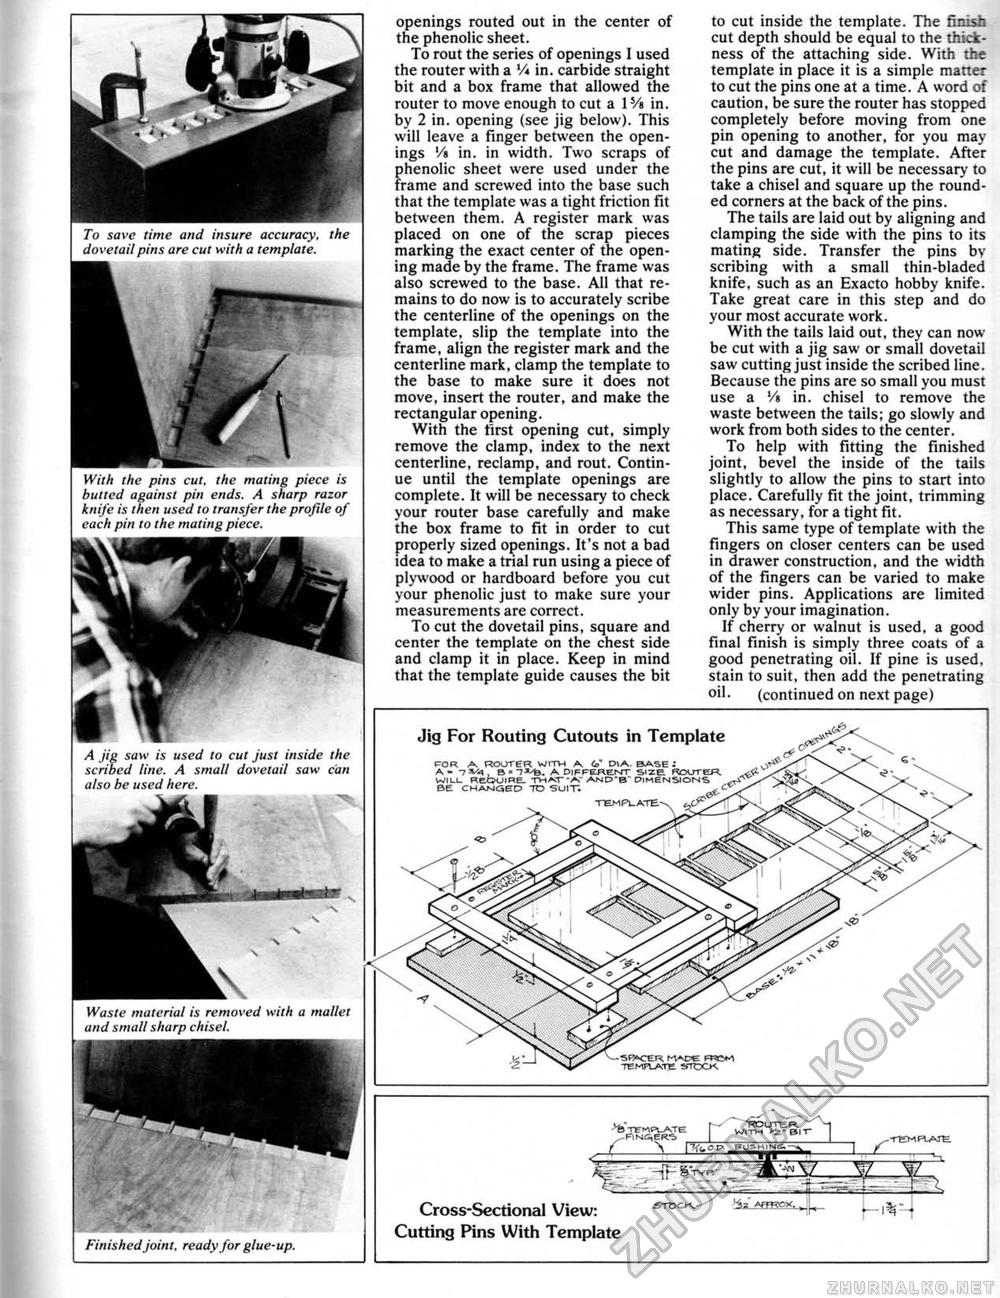
Finished joint, ready for glue-up. Cross-Sectional View: Cutting Pins With Template To save time and insure accuracy, the dovetail pins are cut with a template. openings routed out in the center of the phenolic sheet. To rout the series of openings 1 used the router with a '/* in. carbide straight bit and a box frame that allowed the router to move enough to cut a lVt in. by 2 in. opening (see jig below). This will leave a finger between the openings '/b in. in width. Two scraps of phenolic sheet were used under the frame and screwed into the base such that the template was a tight friction fit between them. A register mark was placed on one of the scrap pieces marking the exact center of the opening made by the frame. The frame was also screwed to the base. All that remains to do now is to accurately scribe the centerline of the openings on the template, slip the template into the frame, align the register mark and the centerline mark, clamp the template to the base to make sure it does not move, insert the router, and make the rectangular opening. With the first opening cut, simply remove the clamp, index to the next centerline, reclamp, and rout. Continue until the template openings are complete. It will be necessary to check your router base carefully and make the box frame to fit in order to cut properly sized openings. It's not a bad idea to make a trial run using a piece of plywood or hardboard before you cut your phenolic just to make sure your measurements are correct. To cut the dovetail pins, square and center the template on the chest side and clamp it in place. Keep in mind that the template guide causes the bit to cut inside the template. The finish cut depth should be equal to the thickness of the attaching side. With the template in place it is a simple matter to cut the pins one at a time. A word of caution, be sure the router has stopped completely before moving from one pin opening to another, for you may cut and damage the template. After the pins are cut, it will be necessary to take a chisel and square up the rounded corners at the back of the pins. The tails are laid out by aligning and clamping the side with the pins to its mating side. Transfer the pins by scribing with a small thin-bladed knife, such as an Exacto hobby knife. Take great care in this step and do your most accurate work. With the tails laid out, they can now be cut with a jig saw or small dovetail saw cutting just inside the scribed line. Because the pins are so small you must use a '/s in. chisel to remove the waste between the tails; go slowly and work from both sides to the center. To help with fitting the finished joint, bevel the inside of the tails slightly to allow the pins to start into place. Carefully fit the joint, trimming as necessary, for a tight fit. This same type of template with the fingers on closer centers can be used in drawer construction, and the width of the fingers can be varied to make wider pins. Applications are limited only by your imagination. If cherry or walnut is used, a good final finish is simply three coats of a good penetrating oil. If pine is used, stain to suit, then add the penetrating (continued on next page) With the pins cut, the mating piece is butted against pin ends. A sharp razor knife is then used to transfer the projile of each pin to the mating piece. Jig For Routing Cutouts in Template Waste material is removed with a mallet and small sharp chisel. A jig saw is used to cut just inside the scribed line. A small dovetail 5dw can also be used here. FOR A. RCOT6R wrrvt A. & A - -I VA , & * H'fe. A DlFFEJieMT I.!. REQUIRE. -TH^cr-A." ANJCJ-B" BE CHwaep TO SUIT; |


