Woodworker's Journal 1983-7-5, страница 44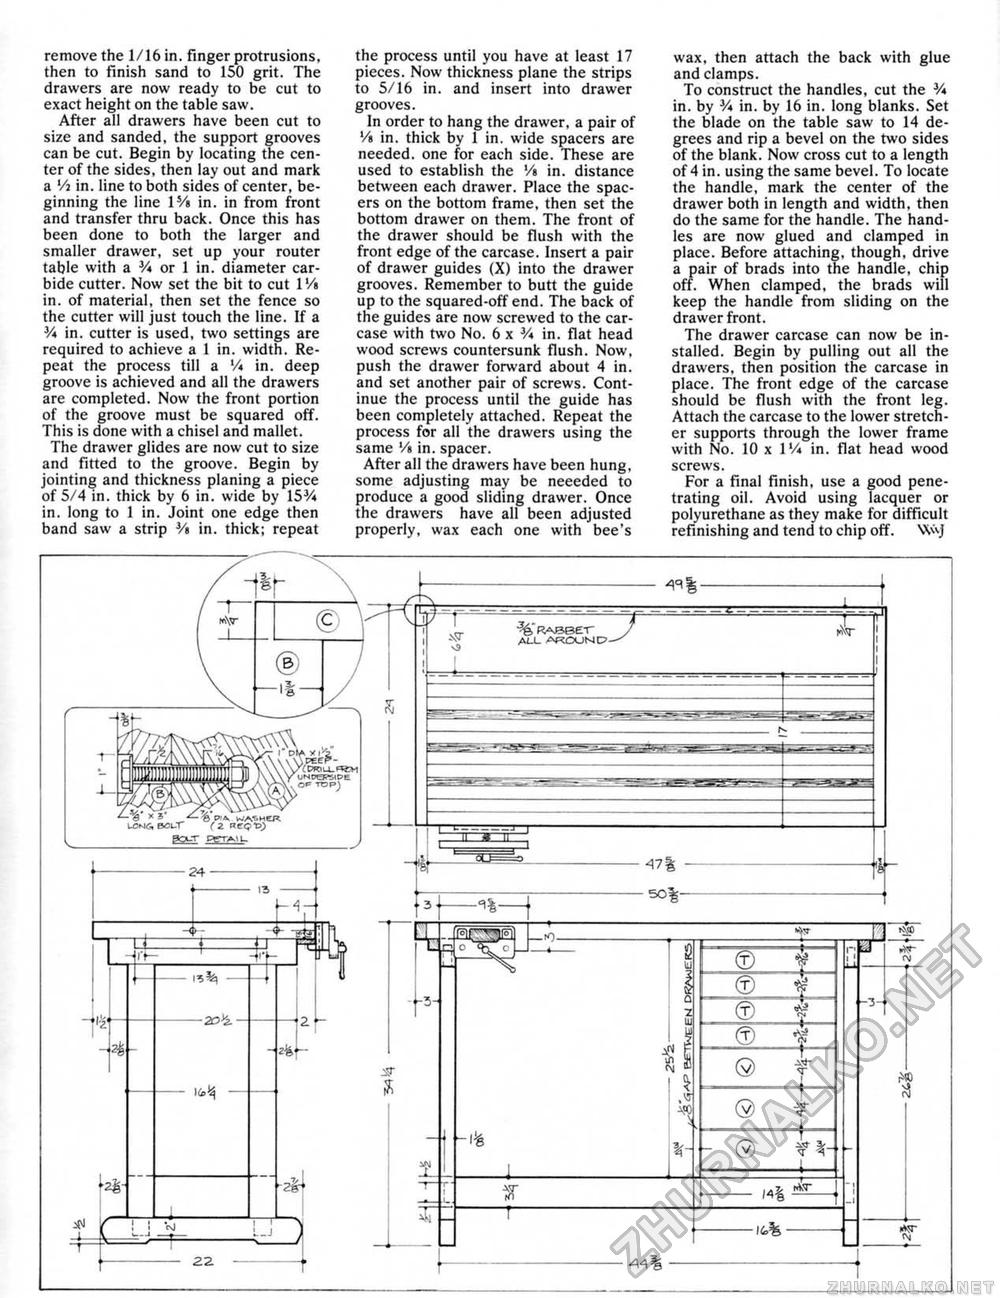
remove the 1/16 in. finger protrusions, then to finish sand to 150 grit. The drawers are now ready to be cut to exact height on the table saw. After all drawers have been cut to size and sanded, the support grooves can be cut. Begin by locating the center of the sides, then lay out and mark a Vi in. line to both sides of center, beginning the line lVs in. in from front and transfer thru back. Once this has been done to both the larger and smaller drawer, set up your router table with a M or 1 in. diameter carbide cutter. Now set the bit to cut l'/i in. of material, then set the fence so the cutter will just touch the line. If a V* in. cutter is used, two settings are required to achieve a 1 in. width. Repeat the process till a lA in. deep groove is achieved and all the drawers are completed. Now the front portion of the groove must be squared off. This is done with a chisel and mallet. The drawer glides are now cut to size and fitted to the groove. Begin by jointing and thickness planing a piece of 5/4 in. thick by 6 in. wide by IS1/* in. long to 1 in. Joint one edge then band saw a strip Vt in. thick; repeat the process until you have at least 17 pieces. Now thickness plane the strips to 5/16 in. and insert into drawer grooves. In order to hang the drawer, a pair of Vt in. thick by I in. wide spacers are needed, one for each side. These are used to establish the '/» in. distance between each drawer. Place the spacers on the bottom frame, then set the bottom drawer on them. The front of the drawer should be flush with the front edge of the carcase. Insert a pair of drawer guides (X) into the drawer grooves. Remember to butt the guide up to the squared-off end. The back of the guides are now screwed to the carcase with two No. 6 x V* in. flat head wood screws countersunk flush. Now, push the drawer forward about 4 in. and set another pair of screws. Continue the process until the guide has been completely attached. Repeat the process for all the drawers using the same V% in. spacer. After all the drawers have been hung, some adjusting may be neeeded to produce a good sliding drawer. Once the drawers have all been adjusted properly, wax each one with bee's wax, then attach the back with glue and clamps. To construct the handles, cut the J/« in. by y* in. by 16 in. long blanks. Set the blade on the table saw to 14 degrees and rip a bevel on the two sides of the blank. Now cross cut to a length of 4 in. using the same bevel. To locate the handle, mark the center of the drawer both in length and width, then do the same for the handle. The handles are now glued and clamped in place. Before attaching, though, drive a pair of brads into the handle, chip off. When clamped, the brads will keep the handle from sliding on the drawer front. The drawer carcase can now be installed. Begin by pulling out all the drawers, then position the carcase in place. The front edge of the carcase should be flush with the front leg. Attach the carcase to the lower stretcher supports through the lower frame with No. 10 x I'/a in. flat head wood screws. For a final finish, use a good penetrating oil. Avoid using lacquer or polyurethane as they make for difficult refinishing and tend to chip off.
i.'t3ftlU.FS£>l UNOepSIC'E G* TOP j Ki' Zl^ pia, UHJC, BCL.T (2 HFQ1D) — 24 ■ I* Tjfc IB 4 -4- -20%. - - m zfef- |
||||||||||||


