Woodworker's Journal 1983-7-6, страница 51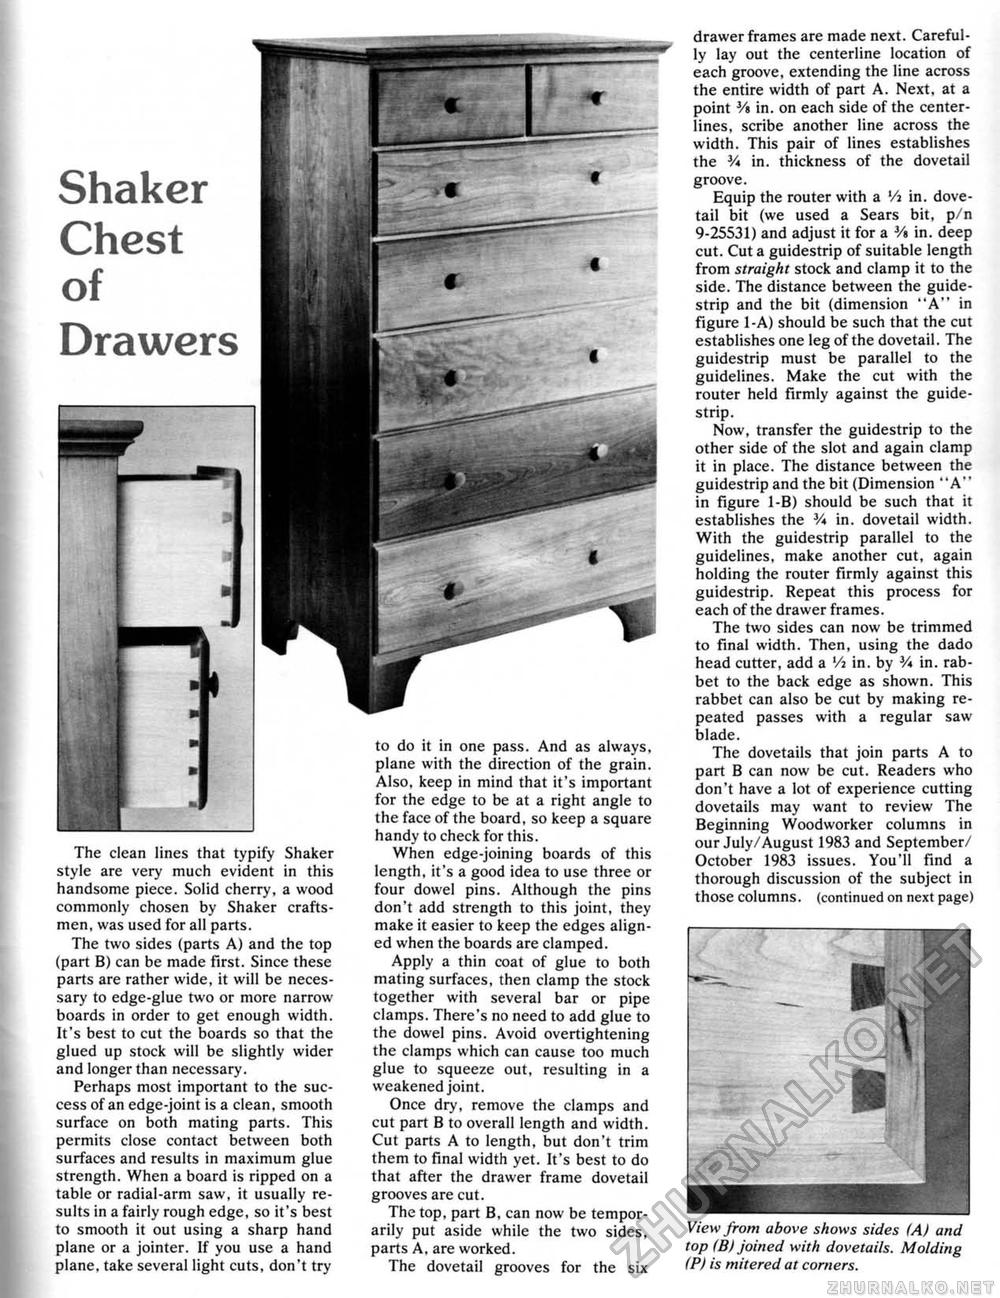
Shaker Chest of Drawers The clean lines that typify Shaker style are very much evident in this handsome piece. Solid cherry, a wood commonly chosen by Shaker craftsmen, was used for all parts. The two sides (parts A) and the top (part B) can be made first. Since these parts are rather wide, it will be necessary to edge-glue two or more narrow boards in order to get enough width. It's best to cut the boards so that the glued up stock will be slightly wider and longer than necessary. Perhaps most important to the success of an edge-joint is a clean, smooth surface on both mating parts. This permits close contact between both surfaces and results in maximum glue strength. When a board is ripped on a table or radial-arm saw, it usually results in a fairly rough edge, so it's best to smooth it out using a sharp hand plane or a jointer. If you use a hand plane, take several light cuts, don't try to do it in one pass. And as always, plane with the direction of the grain. Also, keep in mind that it's important for the edge to be at a right angle to the face of the board, so keep a square handy to check for this. When edge-joining boards of this length, it's a good idea to use three or four dowel pins. Although the pins don't add strength to this joint, they make it easier to keep the edges aligned when the boards are clamped. Apply a thin coat of glue to both mating surfaces, then clamp the stock together with several bar or pipe clamps. There's no need to add glue to the dowel pins. Avoid overtightening the clamps which can cause too much glue to squeeze out, resulting in a weakened joint. Once dry, remove the clamps and cut part B to overall length and width. Cut parts A to length, but don't trim them to final width yet. it's best to do that after the drawer frame dovetail grooves are cut. The top, part B, can now be temporarily put aside while the two sides, parts A, are worked. The dovetail grooves for the six drawer frames are made next. Carefully lay out the centerline location of each groove, extending the line across the entire width of part A, Next, at a point Vt in. on each side of the center-lines, scribe another line across the width. This pair of lines establishes the V* in. thickness of the dovetail groove. Equip the router with a Vi in. dovetail bit (we used a Sears bit, p/n 9-25531) and adjust it for a Vt in. deep cut. Cut a guidestrip of suitable length from straight stock and clamp it to the side. The distance between the guide-strip and the bit (dimension "A" in Figure 1-A) should be such that the cut establishes one leg of the dovetail. The guidestrip must be parallel to the guidelines. Make the cut with the router held firmly against the guide-strip. Now, transfer the guidestrip to the other side of the slot and again clamp it in place. The distance between the guidestrip and the bit (Dimension "A" in figure 1-B) should be such that it establishes the V* in. dovetail width. With the guidestrip parallel to the guidelines, make another cut, again holding the router firmly against this guidestrip. Repeat this process for each of the drawer frames. The two sides can now be trimmed to final width. Then, using the dado head cutter, add a Va in. by V* in. rabbet to the back edge as shown. This rabbet can also be cut by making repeated passes with a regular saw blade. The dovetails that join parts A to part B can now be cut. Readers who don't have a lot of experience cutting dovetails may want to review The Beginning Woodworker columns in our July/August 1983 and September/ October 1983 issues. You'll find a thorough discussion of the subject in those columns, (continued on next page)
View from above shows sides (A) and top (B) joined with dovetails. Molding (PI is mitered at corners. View from above shows sides (A) and top (B) joined with dovetails. Molding (PI is mitered at corners. |
|||||||||||||||||||||||||||||


