Woodworker's Journal 1983-7-6, страница 53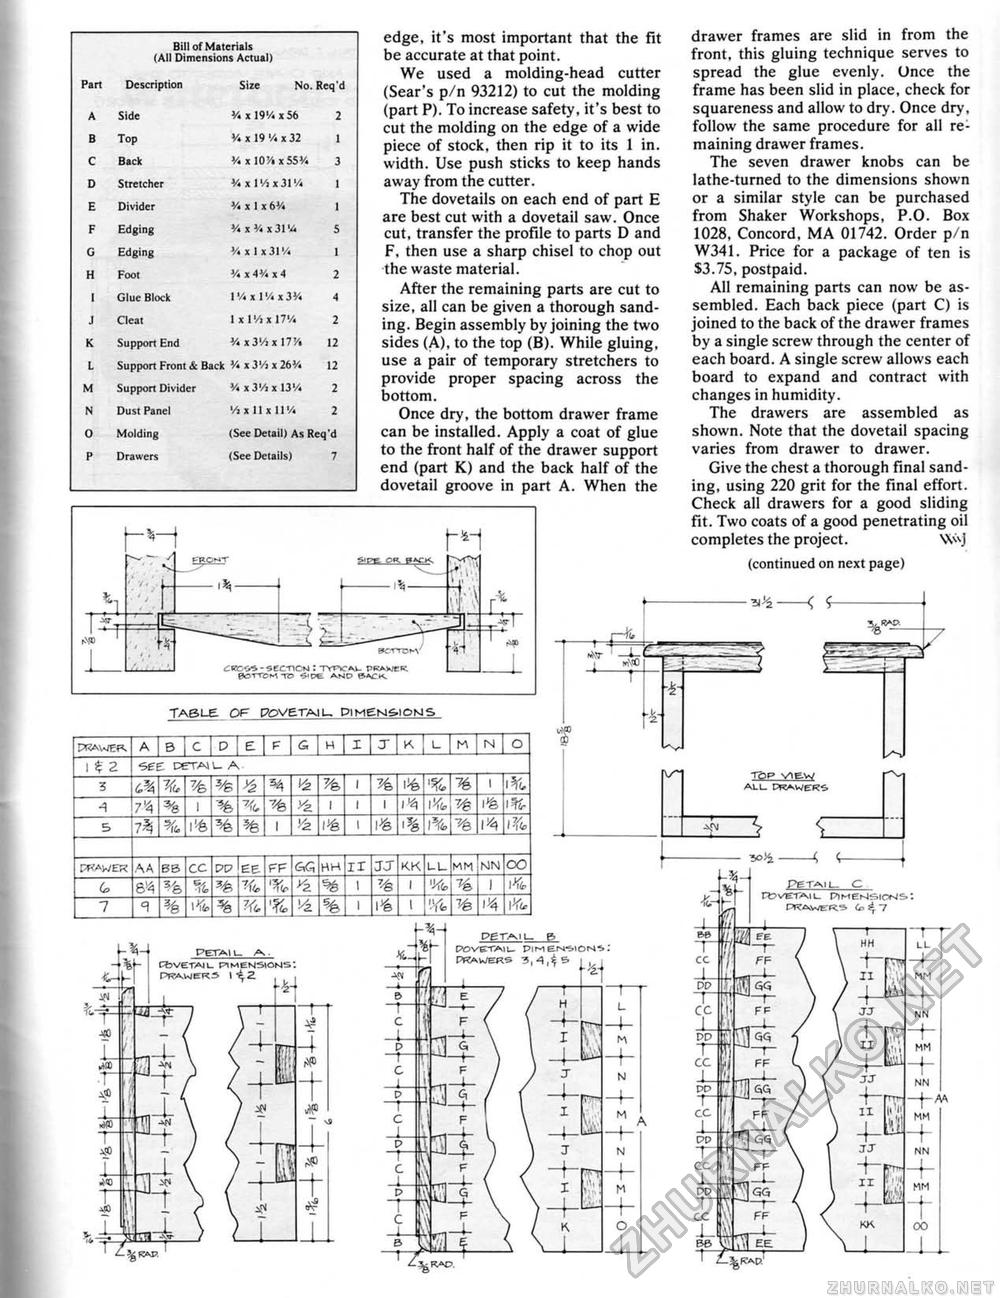
edge, it's most important that the fit be accurate at that point. We used a molding-head cutter (Sear's p/n 93212) to cut the molding (part P). To increase safety, it's best to cut the molding on the edge of a wide piece of stock, then rip it to its 1 in. width. Use push sticks to keep hands away from the cutter. The dovetaiis on each end of part E are best cut with a dovetail saw. Once cut, transfer the profile to pans D and F, then use a sharp chisel to chop out the waste material. After the remaining parts are cut to size, all can be given a thorough sanding. Begin assembly by joining the two sides (A), to the top (B). White gluing, use a pair of temporary stretchers to provide proper spacing across the bottom. Once dry, the bottom drawer frame can be installed. Apply a coat of glue to the front half of the drawer support end (part K) and the back half of the dovetail groove in part A. When the dffc^-secnctJ: Tvrv»,L ptwr'; &STTCK1TE, "."-'IX AMP ecu drawer frames are slid in from the front, this gluing technique serves to spread the glue evenly. Once the frame has been slid in place, check for squareness and allow to dry. Once dry, follow the same procedure for ail remaining drawer frames. The seven drawer knobs can be lathe-turned to the dimensions shown or a similar style can be purchased from Shaker Workshops, P.O. Box 1028, Concord, MA 01742. Order p/n W341, Price for a package of ten is $3.75, postpaid. All remaining parts can now be assembled. Each back piece (part C) is joined to the back of the drawer frames by a single screw through the center of each board. A single screw allows each board to expand and contract with changes in humidity. The drawers are assembled as shown. Note that the dovetail spacing varies from drawer to drawer. Give the chest a thorough final sanding, using 220 grit for the final effort. Check all drawers for a good sliding fit. Two coats of a good penetrating oil completes the project. VvvJ (continued on next page) TABLE OF povetaiu PIHEMS.IOMS TABLE OF povetaiu PIHEMS.IOMS
pgj-^i i- ^. rbVET«L PIMESStOKJ-SL PRAWER3 I ■E 2 KJVETOIL- EiM EM^ItlN'!. J POWERS B JjiiMoia PETAIL C "t^vT'l-'Vr* MG&41 >|Qfsl' . Pfv^V^EK.^. if. ^ V 4- |
||||||||||||||||||||||||||||||||||||||||||||||||||||||||||||||||||||||||||||||||||||||||||||||||||||||||||||||||||||||||||||||||||||||||||||||||||||||||||||||||||||||||||||||||||||||||||||||||||||||||||||||||||||||||


