Woodworker's Journal 1984-8-2, страница 38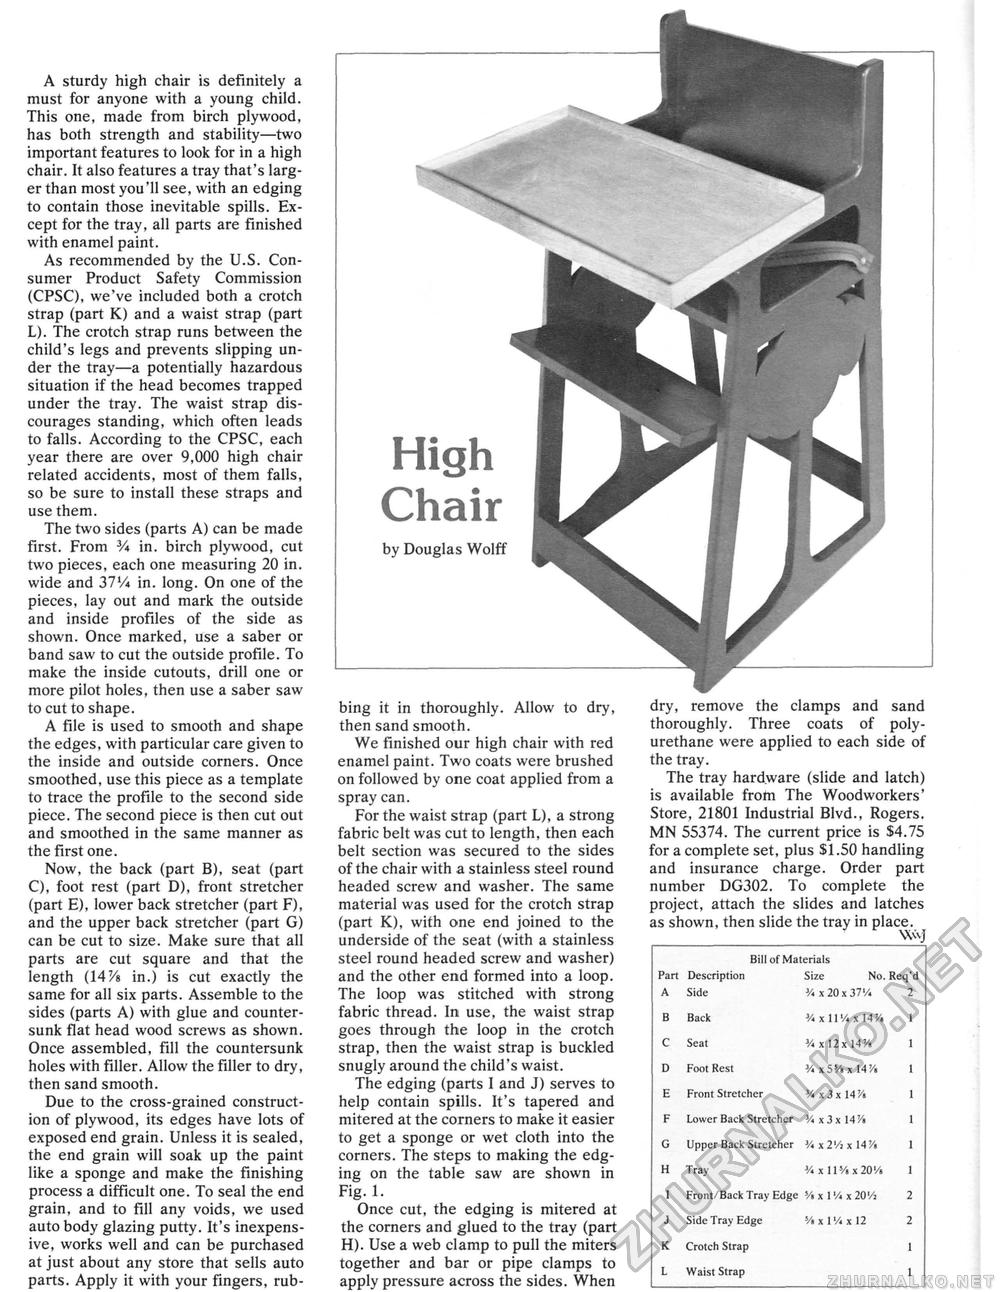
A sturdy high chair is definitely a must for anyone with a young child. This one, made from birch plywood, has both strength and stability—two important features to look for in a high chair. It also features a tray that's larger than most you'll see, with an edging to contain those inevitable spills. Except for the tray, all parts are finished with enamel paint. As recommended by the U.S. Consumer Product Safety Commission (CPSC), we've included both a crotch strap (part K) and a waist strap (part L). The crotch strap runs between the child's legs and prevents slipping under the tray—a potentially hazardous situation if the head becomes trapped under the tray. The waist strap discourages standing, which often leads to falls. According to the CPSC, each year there are over 9,000 high chair related accidents, most of them falls, so be sure to install these straps and use them. The two sides (parts A) can be made first. From V* in. birch plywood, cut two pieces, each one measuring 20 in, wide and 37'/i in. long. On one of the pieces, lay out and mark the outside and inside profiles of the side as shown. Once marked, use a saber or band saw to cut the outside profile. To make the inside cutouts, drill one or more pilot holes, then use a saber saw to cut to shape. A file is used to smooth and shape the edges, with particular care given to the inside and outside corners. Once smoothed, use this piece as a template to trace the profile to the second side piece. The second piece is then cut out and smoothed in the same manner as the first one. Now, the back (part B), seat (part C), foot rest (part D), front stretcher (part E), lower back stretcher (part F), and the upper back stretcher (part G) can be cut to size. Make sure that all parts are cut square and that the length (14 Vs in.) is cut exactly the same for all six parts. Assemble to the sides (parts A) with glue and countersunk flat head wood screws as shown. Once assembled, fill the countersunk holes with filler. Allow the filler to dry, then sand smooth. Due to the cross-grained construction of plywood, its edges have lots of exposed end grain. Unless it is sealed, the end grain will soak up the paint like a sponge and make the finishing process a difficult one. To seal the end grain, and to fill any voids, we used auto body glazing putty. It's inexpensive, works well and can be purchased at just about any store that sells auto parts. Apply it with your fingers, rub bing it in thoroughly. Allow to dry, then sand smooth. We finished our high chair with red enamel paint. Two coats were brushed on followed by one coat applied from a spray can. For the waist strap (part L), a strong fabric belt was cut to length, then each belt section was secured to the sides of the chair with a stainless steel round headed screw and washer. The same material was used for the crotch strap (part K), with one end joined to the underside of the seat (with a stainless steel round headed screw and washer) and the other end formed into a loop. The loop was stitched with strong fabric thread. In use, the waist strap goes through the loop in the crotch strap, then the waist strap is buckled snugly around the child's waist. The edging (parts 1 and J) serves to help contain spills. It's tapered and mitered at the corners to make it easier to get a sponge or wet cloth into the corners. The steps to making the edging on the table saw are shown in Fig. 1. Once cut, the edging is mitered at the corners and glued to the tray (part H). Use a web clamp to pull the miters together and bar or pipe clamps to apply pressure across the sides. When dry, remove the clamps and sand thoroughly. Three coats of poly-urethane were applied to each side of the tray. The tray hardware (slide and latch) is available from The Woodworkers' Store, 21801 Industrial Blvd., Rogers. MN 55374. The current price is S4.75 for a complete set, plus SI,50 handling and insurance charge. Order part number DG302. To complete the project, attach the slides and latches as shown, then slide the tray in place.
High Chair by Douglas Wolff |
||||||||||||||||||||||||||||||||||||||||||||||||||||||||


