Woodworker's Journal 1984-8-2, страница 44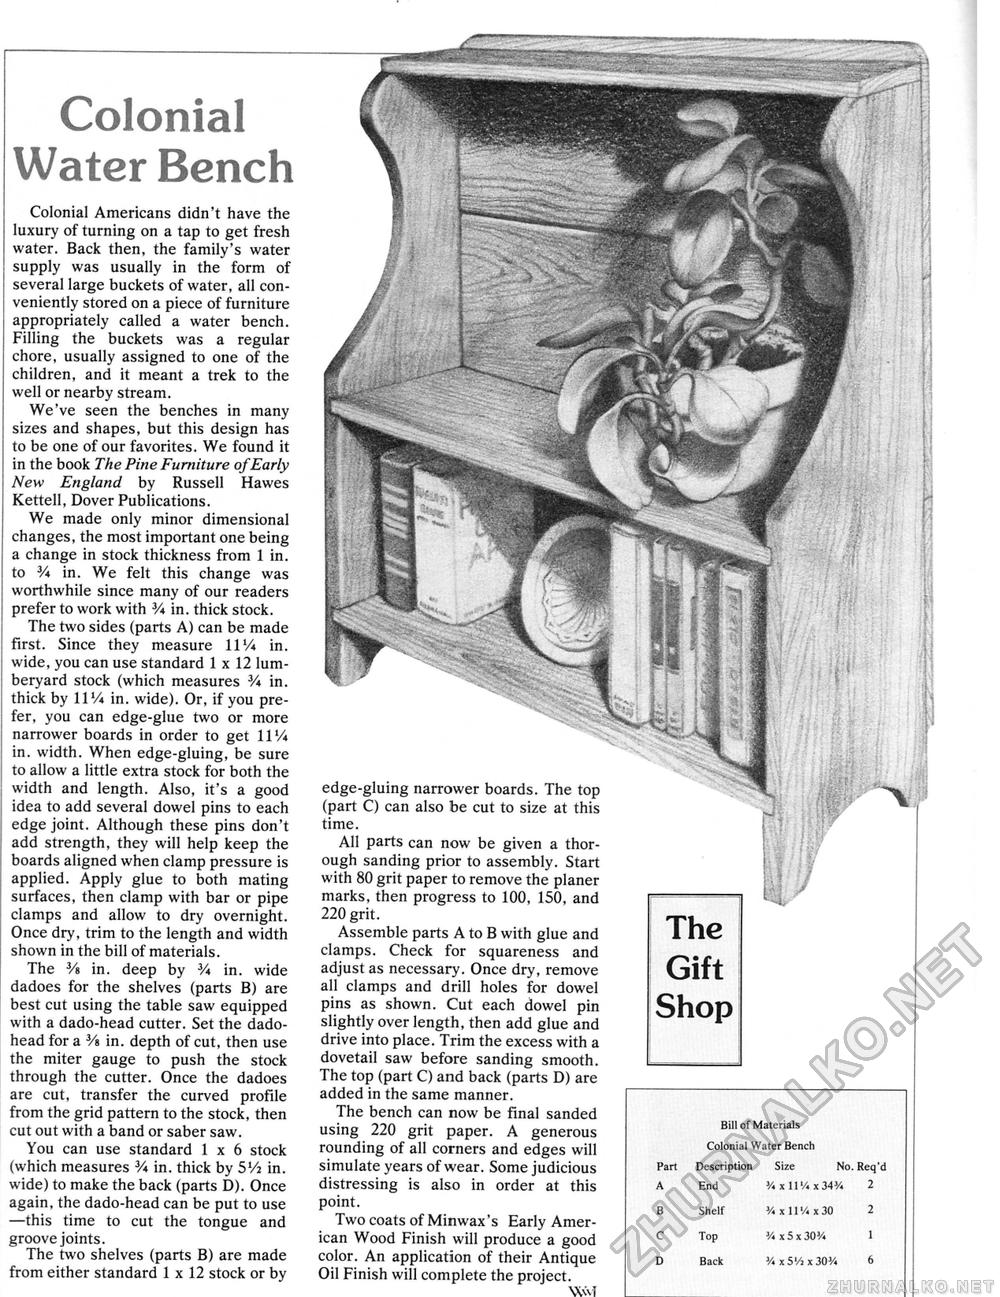
Colonial Water Bench Colonial Americans didn't have the luxury of turning on a tap to get fresh water. Back then, the family's water supply was usually in the form of several large buckets of water, all conveniently stored on a piece of furniture appropriately called a water bench. Filling the buckets was a regular chore, usually assigned to one of the children, and it meant a trek to the well or nearby stream. We've seen the benches in many sizes and shapes, but this design has to be one of our favorites. We found it in the book The Pine Furniture ofEarly New England by Russell Hawes Kettell, Dover Publications. We made only minor dimensional changes, the most important one being a change in stock thickness from 1 in. to 3A in. We felt this change was worthwhile since many of our readers prefer to work with V* in. thick stock. The two sides {parts A) can be made first. Since they measure 11% in. wide, you can use standard 1x12 lumberyard stock (which measures % in. thick by 11% in. wide). Or, if you prefer, you can edge-glue two or more narrower boards in order to get 11Vi in. width. When edge-gluing, be sure to allow a little extra stock for both the width and length. Also, it's a good idea to add several dowel pins to each edge joint. Although these pins don't add strength, they will help keep the boards aligned when clamp pressure is applied. Apply glue to both mating surfaces, then clamp with bar or pipe clamps and allow to dry overnight. Once dry, trim to the length and width shown in the bill of materials. The 3/e in. deep by 3A in. wide dadoes for the shelves (parts B) are best cut using the table saw equipped with a dado-head cutter. Set the dado-head for a 3A in. depth of cut, then use the miter gauge to push the stock through the cutter. Once the dadoes are cut, transfer the curved profile from the grid pattern to the stock, then cut out with a band or saber saw. You can use standard 1 x 6 stock (which measures 3A in. thick by 5Va in. wide) to make the back (parts D). Once again, the dado-head can be put to use —this time to cut the tongue and groove joints. The two shelves (parts B) are made from either standard 1 x 12 stock or by edge-gluing narrower boards. The top (part C) can also be cut to size at this time. All parts can now be given a thorough sanding prior to assembly. Start with 80 grit paper to remove the planer marks, then progress to 100, 150, and 220 grit. Assemble parts A to B with glue and clamps. Check for squareness and adjust as necessary. Once dry, remove all clamps and drill holes for dowel pins as shown. Cut each dowel pin slightly over length, then add glue and drive into place. Trim the excess with a dovetail saw before sanding smooth. The top (part C) and back (parts D) are added in the same manner. The bench can now be final sanded using 220 grit paper. A generous rounding of all corners and edges will simulate years of wear. Some judicious distressing is also in order at this point. Two coats of Minwax's Early American Wood Finish will produce a good color. An application of their Antique Oil Finish will complete the project. Wvvl Bill of Materials Colonial Water Bench Part Description Size No. Req'd A End %xlVAxS4% 2 B Shelf % x 1!'/« x 30 2 C Top «x5x3(m 1 D Back V. x 5'/j x 30M 6 |


