Woodworker's Journal 1984-8-2, страница 54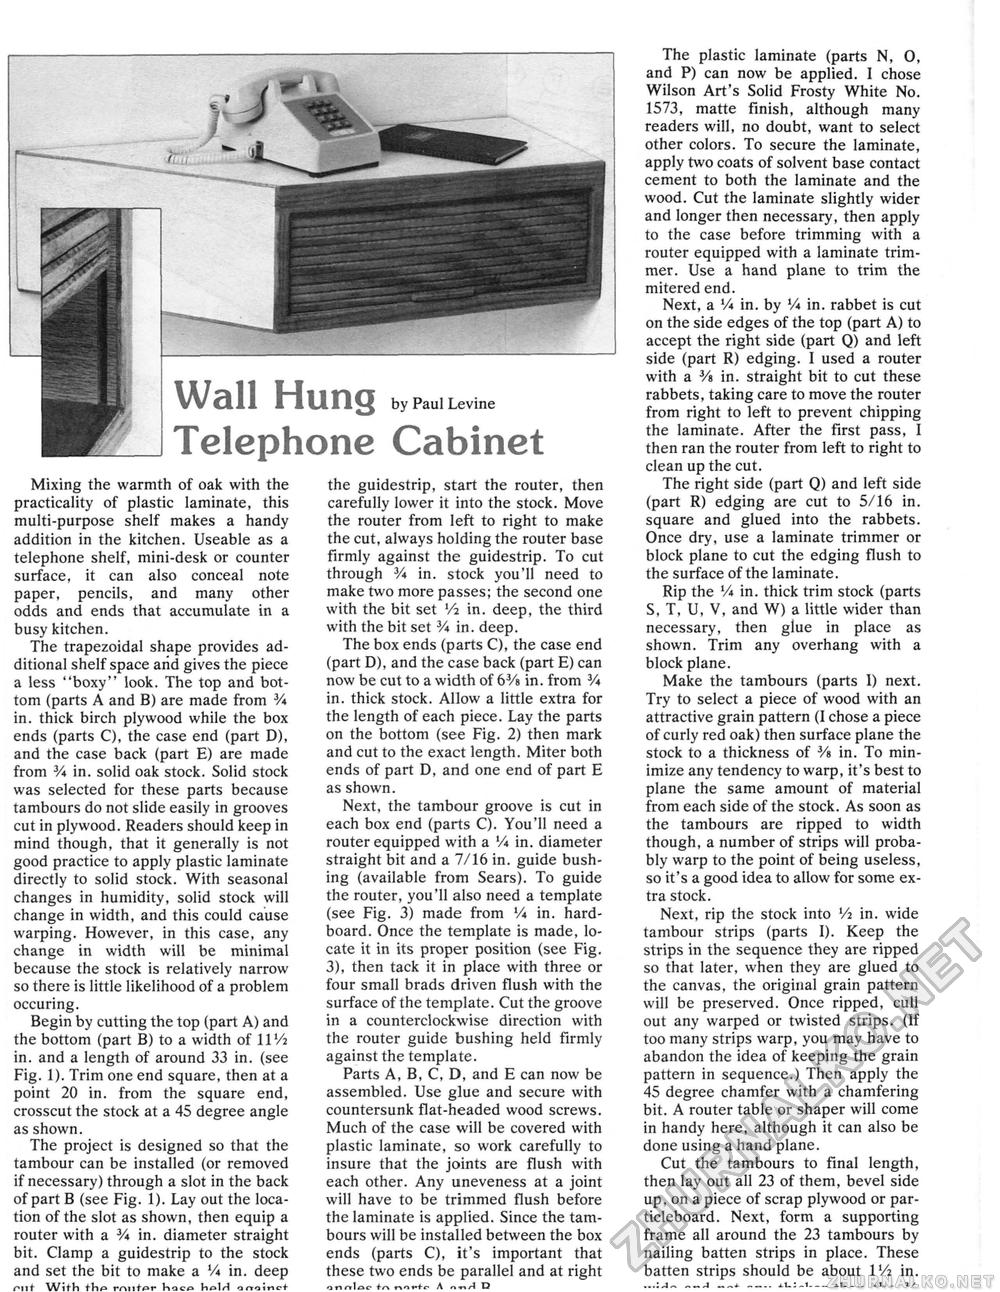
Wall Hung by Paul Levine Telephone Cabinet Mixing the warmth of oak with the practicality of plastic laminate, this multi-purpose shelf makes a handy addition in the kitchen. Useable as a telephone shelf, mini-desk or counter surface, it can also conceal note paper, pencils, and many other odds and ends that accumulate in a busy kitchen. The trapezoidal shape provides additional shelf space arid gives the piece a less "boxy" look. The top and bottom (parts A and B) are made from V* in. thick birch plywood while the box ends (parts C), the case end (part D), and the case back {part E) are made from V* in. solid oak stock. Solid stock was selected for these parts because tambours do not slide easily in grooves cut in plywood. Readers should keep in mind though, that it generally is not good practice to apply plastic laminate directly to solid stock. With seasonal changes in humidity, solid stock will change in width, and this could cause warping. However, in this case, any change in width will be minimal because the stock is relatively narrow so there is little likelihood of a problem occuring. Begin by cutting the top (part A) and the bottom (part B) to a width of 11 Vi in. and a length of around 33 in. (see Fig. 1). Trim one end square, then at a point 20 in. from the square end, crosscut the stock at a 45 degree angle as shown. The project is designed so that the tambour can be installed (or removed if necessary) through a slot in the back of part B (see Fig. 1). Lay out the location of the slot as shown, then equip a router with a 3/< in. diameter straight bit. Clamp a guidestrip to the stock and set the bit to make a Vi in. deep flit With tVi^ rmit£>r Koc*s holri anoinct the guidestrip, start the router, then carefully lower it into the stock. Move the router from left to right to make the cut, always holding the router base firmly against the guidestrip. To cut through 3A in. stock you'll need to make two more passes; the second one with the bit set Vi in. deep, the third with the bit set 3A in. deep. The box ends (parts C), the case end (part D), and the case back (part E) can now be cut to a width of 63A in. from 3A in. thick stock. Allow a little extra for the length of each piece. Lay the parts on the bottom (see Fig. 2) then mark and cut to the exact length. Miter both ends of part D, and one end of part E as shown. Next, the tambour groove is cut in each box end (parts C). You'll need a router equipped with a Vi in. diameter straight bit and a 7/16 in. guide bushing (available from Sears). To guide the router, you'll also need a template (see Fig. 3) made from Vi in. hard-board. Once the template is made, locate it in its proper position (see Fig. 3), then tack it in place with three or four small brads driven flush with the surface of the template. Cut the groove in a counterclockwise direction with the router guide bushing held firmly against the template. Parts A, B, C, D, and E can now be assembled. Use glue and secure with countersunk flat-headed wood screws. Much of the case will be covered with plastic laminate, so work carefully to insure that the joints are flush with each other. Any uneveness at a joint will have to be trimmed flush before the laminate is applied. Since the tambours will be installed between the box ends (parts C), it's important that these two ends be parallel and at right a nrrloc tr\ nuHr A D The plastic laminate (parts N, 0, and P) can now be applied. ] chose Wilson Art's Solid Frosty White No. 1573, matte finish, although many readers will, no doubt, want to select other colors. To secure the laminate, apply two coats of solvent base contact cement to both the laminate and the wood. Cut the laminate slightly wider and longer then necessary, then apply to the case before trimming with a router equipped with a laminate trimmer, Use a hand plane to trim the mitered end. Next, a Vi in. by Vi in. rabbet is cut on the side edges of the top (part A) to accept the right side (part 0) and left side (part R) edging. 1 used a router with a Vi in. straight bit to cut these rabbets, taking care to move the router from right to left to prevent chipping the laminate. After the first pass, I then ran the router from left to right to clean up the cut. The right side (part Q) and left side (part R) edging are cut to 5/16 in. square and glued into the rabbets. Once dry, use a laminate trimmer or block plane to cut the edging flush to the surface of the laminate. Rip the Vi in. thick trim stock (parts S, T, U, V, and W) a little wider than necessary, then glue in place as shown. Trim any overhang with a block plane. Make the tambours (parts 1} next. Try to select a piece of wood with an attractive grain pattern (I chose a piece of curly red oak) then surface plane the stock to a thickness of Vs in. To minimize any tendency to warp, it's best to plane the same amount of material from each side of the stock. As soon as the tambours are ripped to width though, a number of strips will probably warp to the point of being useless, so it's a good idea to allow for some extra stock. Next, rip the stock into Vi in. wide tambour strips (parts I). Keep the strips in the sequence they are ripped so that later, when they are glued to the canvas, the original grain pattern will be preserved. Once ripped, cull out any warped or twisted strips. (If too many strips warp, you may have to abandon the idea of keeping the grain pattern in sequence.) Then apply the 45 degree chamfer with a chamfering bit. A router table or shaper will come in handy here, although it can also be done using a hand plane. Cut the tambours to final length, then lay out all 23 of them, bevel side up, on a piece of scrap plywood or par-ticleboard. Next, form a supporting frame all around the 23 tambours by nailing batten strips in place. These batten strips should be about 1 Vi in. |


