Woodworker's Journal 1984-8-2, страница 55
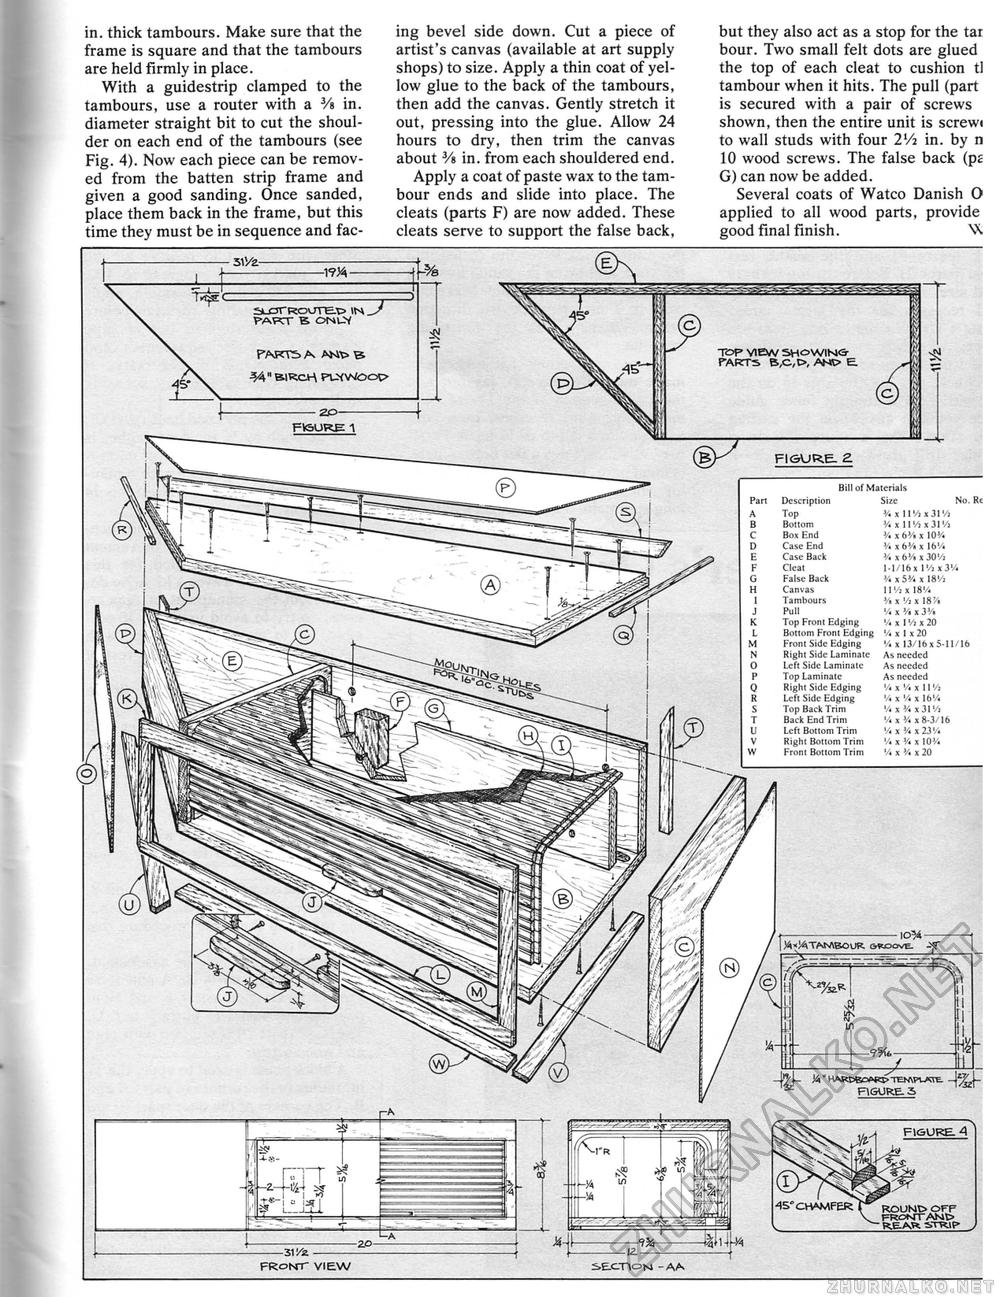
in. thick tambours. Make sure that the frame is square and that the tambours are held firmly in place. With a guidestrip clamped to the tambours, use a router with a 3/s in. diameter straight bit to cut the shoulder on each end of the tambours (see Fig. 4). Now each piece can be removed from the batten strip frame and given a good sanding. Once sanded, place them back in the frame, but this time they must be in sequence and fac ing bevel side down. Cut a piece of artist's canvas (available at art supply shops) to size. Apply a thin coat of yellow glue to the back of the tambours, then add the canvas. Gently stretch it out, pressing into the glue. Allow 24 hours to dry, then trim the canvas about 3/s in. from each shouldered end. Apply a coat of paste wax to the tambour ends and slide into place. The cleats (parts F) are now added. These cleats serve to support the false back, but they also act as a stop for the tar bour. Two small felt dots are glued the top of each cleat to cushion tl tambour when it hits. The pull (part is secured with a pair of screws shown, then the entire unit is screwi to wall studs with four 2Vi in. by n 10 wood screws. The false back (pE G) can now be added. Several coats of Watco Danish O applied to all wood parts, provide good final finish. \\ TOP view SH<=WIN& PARTS B,C,t>, AHt> E. Bill of Materials Part Description Size No. A Top V. x 11 '/i * 31 Vi B Bottom W r 11 '/a x 31 Vi C Bui Rnd % 16V. x 10% D Case End 'A « 6J/i x 16'/. E Case Back 'A x b'J, X 30'/i F Cleat 1-1/16* 1 Vj x y/t G Falsi; Back 'A x 5'A * IS'/j H Canvas l]Vi 118'/, 1 lambours '/, x V, x 18'/i J Pul! V. x V, x 3% K Top From Edging '/. x I V, x 20 L Bottom Front Edging % x I x 20 M Front Side Edging '/, x13/16 x 5-11 /16 !S Right Side Laminate As needed O Left Side Laminate As needed P Top Laminate As needed Q Right Side Edging '/■ i W x 11W R Left Side Edging V. x 'A x 16'/. S Top Back Trim '/. x '/, x 31•/, T Back End Trim Vt x 'A x 8-3/16 U Left Bottom Trim '/< x 'A x 23V. V Right Bonom Trim '/. x 'A x 10'A W From Bottom Trim '/» x W x 20 —-SltH- front view |


