Woodworker's Journal 1984-8-3, страница 38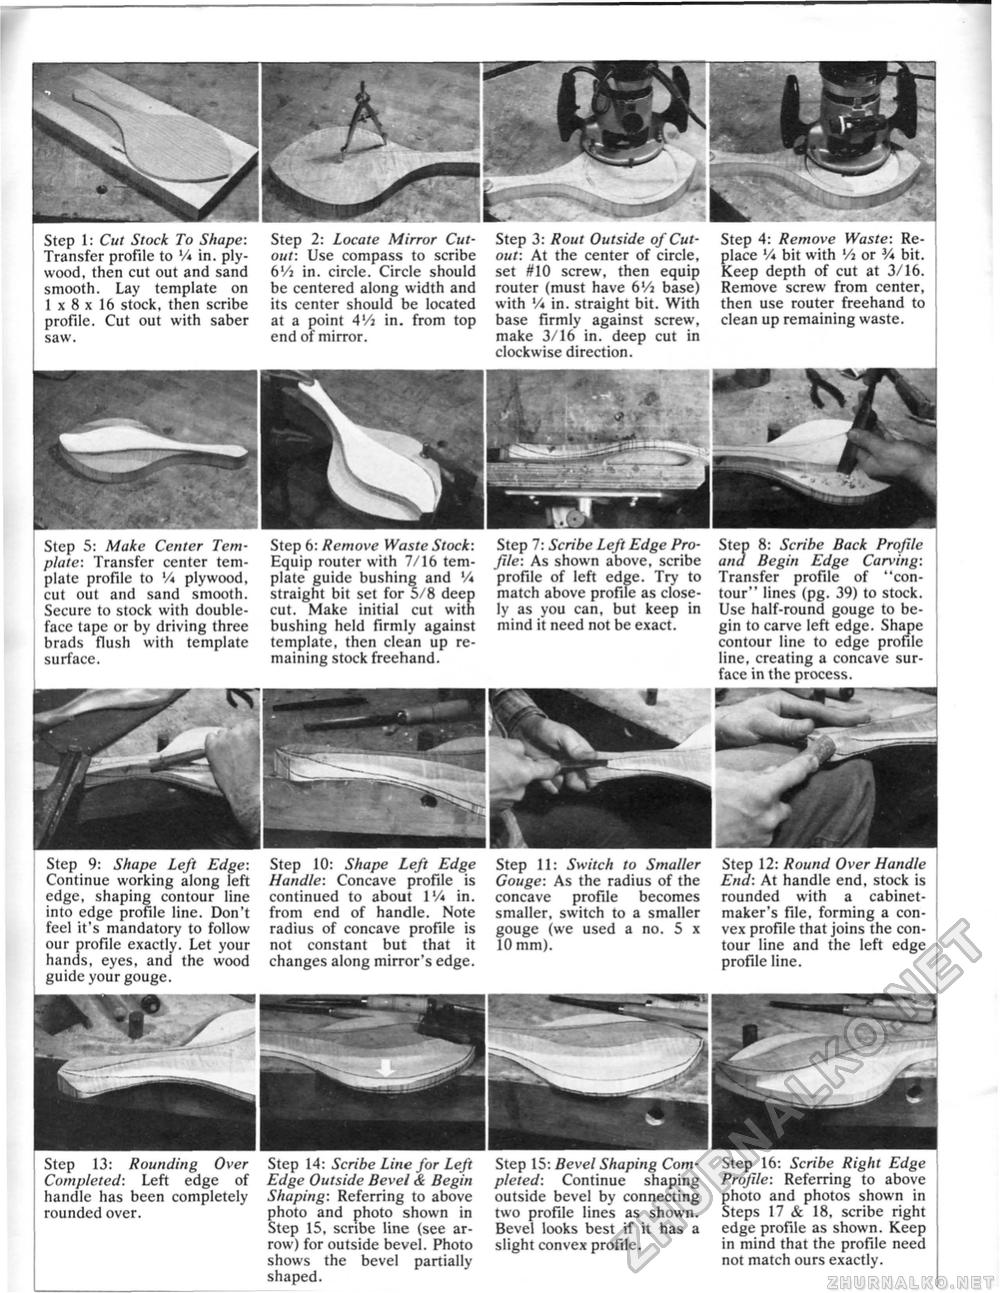
Step ___r 5: Make Center Template: Transfer center template profile to '/* plywood, cut out and sand smooth. Secure to stock with double-face tape or by driving three brads flush with template surface. Step 6: Remove Waste Stock: Equip router with 7/16 template guide bushing and 'A straight bit set for 5/8 deep cut. Make initial cut with bushing held firmly against template, then clean up remaining stock freehand. Step 7: Scribe Left Edge Profile: As shown above, scribe profile of left edge. Try to match above profile as closely as you can, but keep in mind it need not be exact. :ep 8: Scribe Back Profile td Begin Edge Step and Begin Edge Carving: Transfer profile of "contour" lines (pg. 39) to stock. Use half-round gouge to begin to carve left edge. Shape contour line to edge profile line, creating a concave surface in the process. Step 1: Cut Stock To Shape: Transfer profile to V* in. plywood, then cut out and sand smooth. Lay template on 1 x 8 x 16 stock, then scribe profile. Cut out with saber saw. Step 2: Locate Mirror Cutout: Use compass to scribe 6'/i in. circle. Circle should be centered along width and its center should be located at a point 4'/a in. from top end of mirror. Step 3: Rout Outside of Cutout: At the center of circle, set #10 screw, then equip router (must have 6'/a base) with Vi in. straight bit. With base firmly against screw, make 3/16 in. deep cut in clockwise direction. Step 4: Remove Waste: Replace Vi bit with Vi or Vi bit. Keep depth of cut at 3/16. Remove screw from center, then use router freehand to clean up remaining waste. Step 13: Rounding Over Completed: Left edge of handle has been completely rounded over. Step 14: Scribe Line for Left Edge Outside Bevel & Begin Shaping: Referring to above photo and photo shown in Step 15, scribe line (see arrow) for outside bevel. Photo shows the bevel partially shaped. Step 15: Bevel Shaping Completed: Continue shaping outside bevel by connecting two profile lines as shown. Bevel looks best if it has a slight convex profile. Step 16: Scribe Right Edge Profile: Referring to above photo and photos shown in Steps 17 & 18, scribe right edge profile as shown. Keep in mind that the profile need not match ours exactly. Step 9: Shape Left Edge: Continue working along left edge, shaping contour tine into edge profile line. Don't feel it's mandatory to follow our profile exactly. Let your hands, eyes, and the wood guide your gouge. Step 10: Shape Left Edge Handle: Concave profile is continued to about 1 'A in. from end of handle. Note radius of concave profile is not constant but that it changes along mirror's edge. Step 11: Switch to Smaller Gouge: As the radius of the concave profile becomes smaller, switch to a smaller gouge (we used a no. 5 x 10 mm). Step 12: Round Over Handle End: At handle end, stock is rounded with a cabinetmaker's file, forming a convex profile that joins the contour line and the left edge profile line. |


