Woodworker's Journal 1984-8-3, страница 41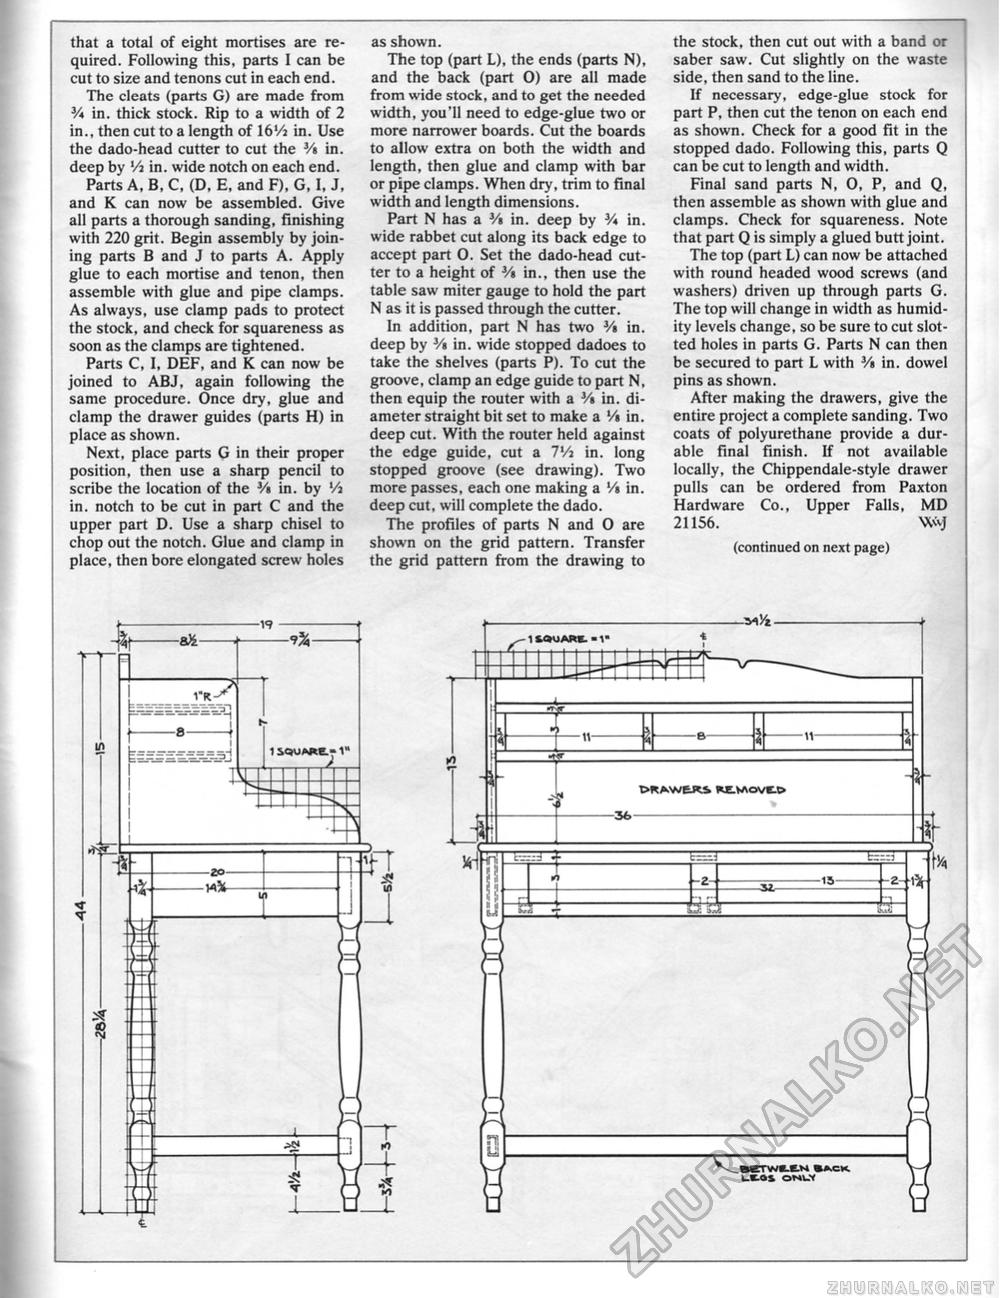
that a total of eight mortises are required. Following this, parts 1 can be cut to size and tenons cut in each end. The cleats (parts G) are made from 3A in. thick stock. Rip to a width of 2 in., then cut to a length of 16'/i in. Use the dado-head cutter to cut the Vt in. deep by Vi in. wide notch on each end. Parts A, B, C, (D, E, and F), G, I, J, and K can now be assembled. Give all parts a thorough sanding, finishing with 220 grit. Begin assembly by joining parts B and J to parts A. Apply glue to each mortise and tenon, then assemble with glue and pipe clamps. As always, use clamp pads to protect the stock, and check for squareness as soon as the clamps are tightened. Parts C, I, DEF, and K can now be joined to ABJ, again following the same procedure. Once dry, glue and clamp the drawer guides (parts H) in place as shown. Next, place parts G in their proper position, then use a sharp pencil to scribe the location of the V* in. by Vi in. notch to be cut in part C and the upper part D. Use a sharp chisel to chop out the notch. Glue and clamp in place, then bore elongated screw holes as shown. The top (part L), the ends (parts N), and the back (part O) are all made from wide stock, and to get the needed width, you'll need to edge-glue two or more narrower boards. Cut the boards to allow extra on both the width and length, then glue and clamp with bar or pipe clamps. When dry, trim to final width and length dimensions. Part N has a V» in. deep by V* in. wide rabbet cut along its back edge to accept part 0. Set the dado-head cutter to a height of V» in., then use the table saw miter gauge to hold the part N as it is passed through the cutter. In addition, part N has two V» in. deep by Vt in. wide stopped dadoes to take the shelves (parts P). To cut the groove, clamp an edge guide to part N, then equip the router with a V% in. diameter straight bit set to make a '/« in. deep cut. With the router held against the edge guide, cut a 7'/i in. long stopped groove (see drawing). Two more passes, each one making a V» in. deep cut, will complete the dado. The profiles of parts N and 0 are shown on the grid pattern. Transfer the grid pattern from the drawing to the stock, then cut out with a band or saber saw. Cut slightly on the waste side, then sand to the line. If necessary, edge-glue stock for part P, then cut the tenon on each end as shown. Check for a good fit in the stopped dado. Following this, parts Q can be cut to length and width. Final sand parts N, 0, P, and Q, then assemble as shown with glue and clamps. Check for squareness. Note that part Q is simply a glued butt joint. The top (part L) can now be attached with round headed wood screws (and washers) driven up through parts G. The top will change in width as humidity levels change, so be sure to cut slotted holes in parts G. Parts N can then be secured to part L with Vt in. dowel pins as shown. After making the drawers, give the entire project a complete sanding. Two coats of polyurethane provide a durable final finish. If not available locally, the Chippendale-style drawer pulls can be ordered from Paxton Hardware Co., Upper Falls, MD 21156. Wvj (continued on next page) |


