Woodworker's Journal 1984-8-4, страница 47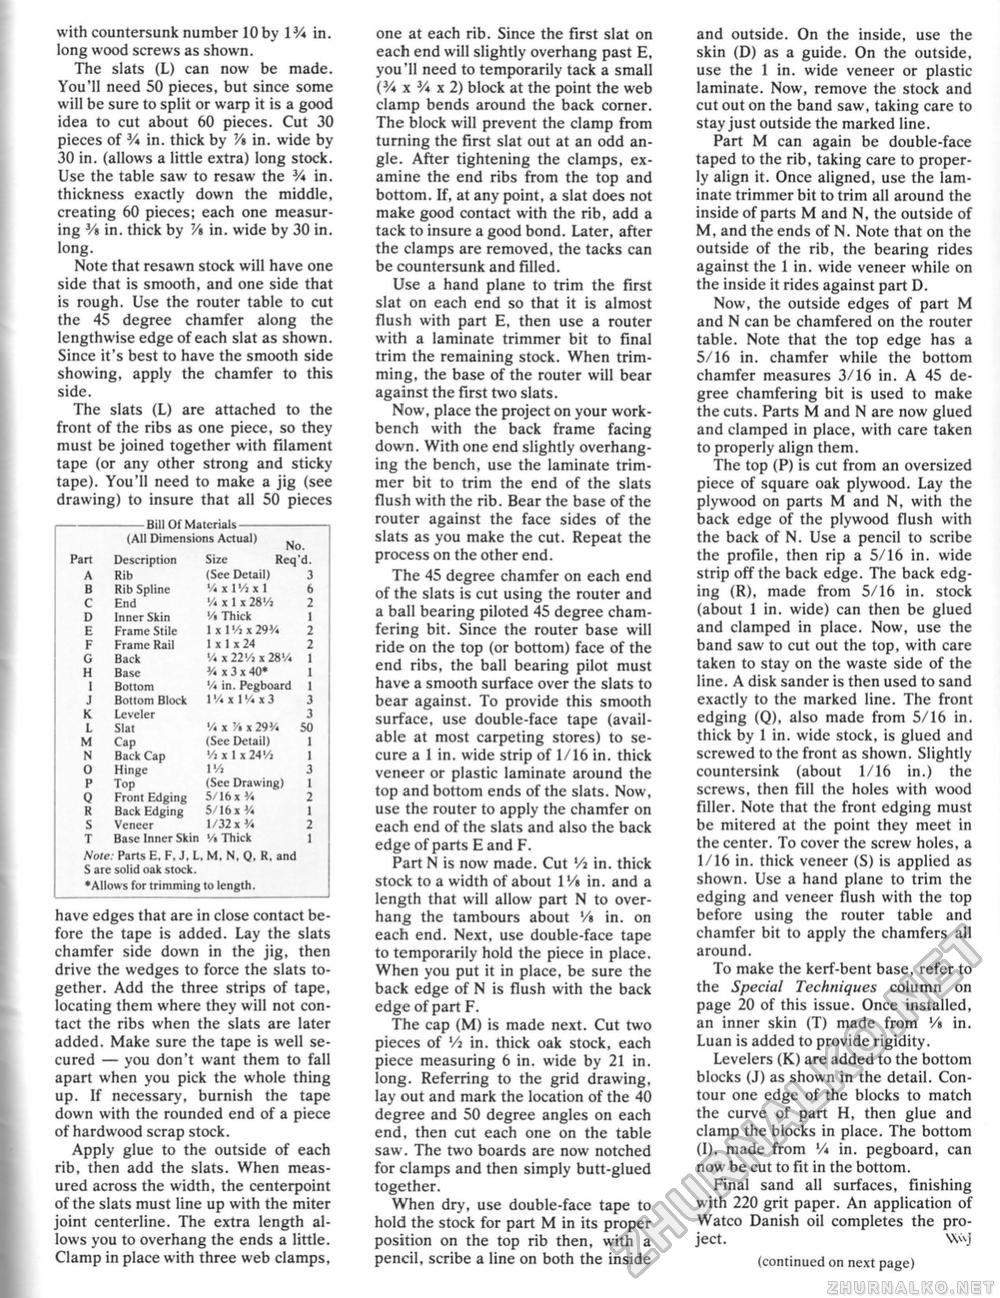
with countersunk number 10 by IV* in. long wood screws as shown. The slats (L) can now be made. You'll need 50 pieces, but since some will be sure to split or warp it is a good idea to cut about 60 pieces. Cut 30 pieces of V* in. thick by V* in. wide by 30 in. (allows a little extra) long stock. Use the table saw to resaw the 3A in. thickness exactly down the middle, creating 60 pieces; each one measuring 3/» in. thick by Vi in. wide by 30 in. long. Note that resawn stock will have one side that is smooth, and one side that is rough. Use the router table to cut the 45 degree chamfer along the lengthwise edge of each slat as shown. Since it's best to have the smooth side showing, apply the chamfer to this side. The slats (L) are attached to the front of the ribs as one piece, so they must be joined together with filament tape (or any other strong and sticky tape). You'll need to make a jig (see drawing) to insure that all 50 pieces --Bill Of Materials- (All Dimensions Actual) M --Bill Of Materials- (All Dimensions Actual) M
Note: Paris E. F. J, L, M. N. 0. R. and S are solid oak stock. •Allows for trimming to length. Note: Paris E. F. J, L, M. N. 0. R. and S are solid oak stock. •Allows for trimming to length. have edges that are in close contact before the tape is added. Lay the slats chamfer side down in the jig, then drive the wedges to force the slats together. Add the three strips of tape, locating them where they will not contact the ribs when the slats are later added. Make sure the tape is well secured — you don't want them to fall apart when you pick the whole thing up. If necessary, burnish the tape down with the rounded end of a piece of hardwood scrap stock. Apply glue to the outside of each rib, then add the slats. When measured across the width, the centerpoint of the slats must line up with the miter joint centerline. The extra length allows you to overhang the ends a little. Clamp in place with three web clamps. one at each rib. Since the first slat on each end will slightly overhang past E, you'll need to temporarily tack a small (% x % x 2) block at the point the web clamp bends around the back corner. The block will prevent the clamp from turning the first slat out at an odd angle. After tightening the clamps, examine the end ribs from the top and bottom. If, at any point, a slat does not make good contact with the rib, add a tack to insure a good bond. Later, after the clamps are removed, the tacks can be countersunk and filled. Use a hand plane to trim the first slat on each end so that it is almost flush with part E, then use a router with a laminate trimmer bit to final trim the remaining stock. When trimming, the base of the router will bear against the first two siats. Now, place the project on your workbench with the back frame facing down. With one end slightly overhanging the bench, use the laminate trimmer bit to trim the end of the slats flush with the rib. Bear the base of the router against the face sides of the slats as you make the cut. Repeat the process on the other end. The 45 degree chamfer on each end of the slats is cut using the router and a ball bearing piloted 45 degree chamfering bit. Since the router base will ride on the top (or bottom) face of the end ribs, the ball bearing pilot must have a smooth surface over the slats to bear against. To provide this smooth surface, use double-face tape (available at most carpeting stores) to secure a 1 in. wide strip of 1/16 in. thick veneer or plastic laminate around the top and bottom ends of the slats. Now, use the router to apply the chamfer on each end of the slats and also the back edge of parts E and F. Part N is now made. Cut Vi in. thick stock to a width of about 1'/» in. and a length that will allow part N to overhang the tambours about '/» in. on each end. Next, use double-face tape to temporarily hold the piece in place. When you put it in place, be sure the back edge of N is flush with the back edge of part F. The cap (M) is made next. Cut two pieces of '/j in. thick oak stock, each piece measuring 6 in. wide by 21 in. long. Referring to the grid drawing, lay out and mark the location of the 40 degree and 50 degree angles on each end, then cut each one on the table saw. The two boards are now notched for clamps and then simply butt-glued together. When dry, use double-face tape to hold the stock for part M in its proper position on the top rib then, with a pencil, scribe a line on both the inside and outside. On the inside, use the skin (D) as a guide. On the outside, use the 1 in. wide veneer or plastic laminate. Now, remove the stock and cut out on the band saw, taking care to stay just outside the marked line. Part M can again be double-face taped to the rib, taking care to properly align it. Once aligned, use the laminate trimmer bit to trim all around the inside of parts M and N, the outside of M, and the ends of N. Note that on the outside of the rib, the bearing rides against the 1 in. wide veneer while on the inside it rides against part D. Now, the outside edges of part M and N can be chamfered on the router table. Note that the top edge has a 5/16 in. chamfer while the bottom chamfer measures 3/16 in, A 45 degree chamfering bit is used to make the cuts. Parts M and N are now glued and clamped in place, with care taken to properly align them. The top (P) is cut from an oversized piece of square oak plywood. Lay the plywood on parts M and N, with the back edge of the plywood flush with the back of N. Use a pencil to scribe the profile, then rip a 5/16 in. wide strip off the back edge. The back edging (R), made from 5/16 in. stock (about I in. wide) can then be glued and clamped in place. Now, use the band saw to cut out the top, with care taken to stay on the waste side of the line. A disk sander is then used to sand exactly to the marked line. The front edging (Q), also made from 5/16 in. thick by 1 in. wide stock, is glued and screwed to the front as shown. Slightly countersink (about 1/16 in.) the screws, then fill the holes with wood filler. Note that the front edging must be mitered at the point they meet in the center. To cover the screw holes, a 1/16 in. thick veneer (S) is applied as shown. Use a hand plane to trim the edging and veneer flush with the top before using the router table and chamfer bit to apply the chamfers all around. To make the kerf-bent base, refer to the Special Techniques column on page 20 of this issue. Once installed, an inner skin (T) made from V* in. Luan is added to provide rigidity. Levelers (K) are added to the bottom blocks (J) as shown in the detail. Contour one edge of the blocks to match the curve of part H, then glue and clamp the blocks in place. The bottom (I), made from V* in, pegboard, can now be cut to fit in the bottom. Final sand all surfaces, finishing with 220 grit paper. An application of Watco Danish oil completes the project. W\J (continued on next page) |


