Woodworker's Journal 1985-9-1, страница 46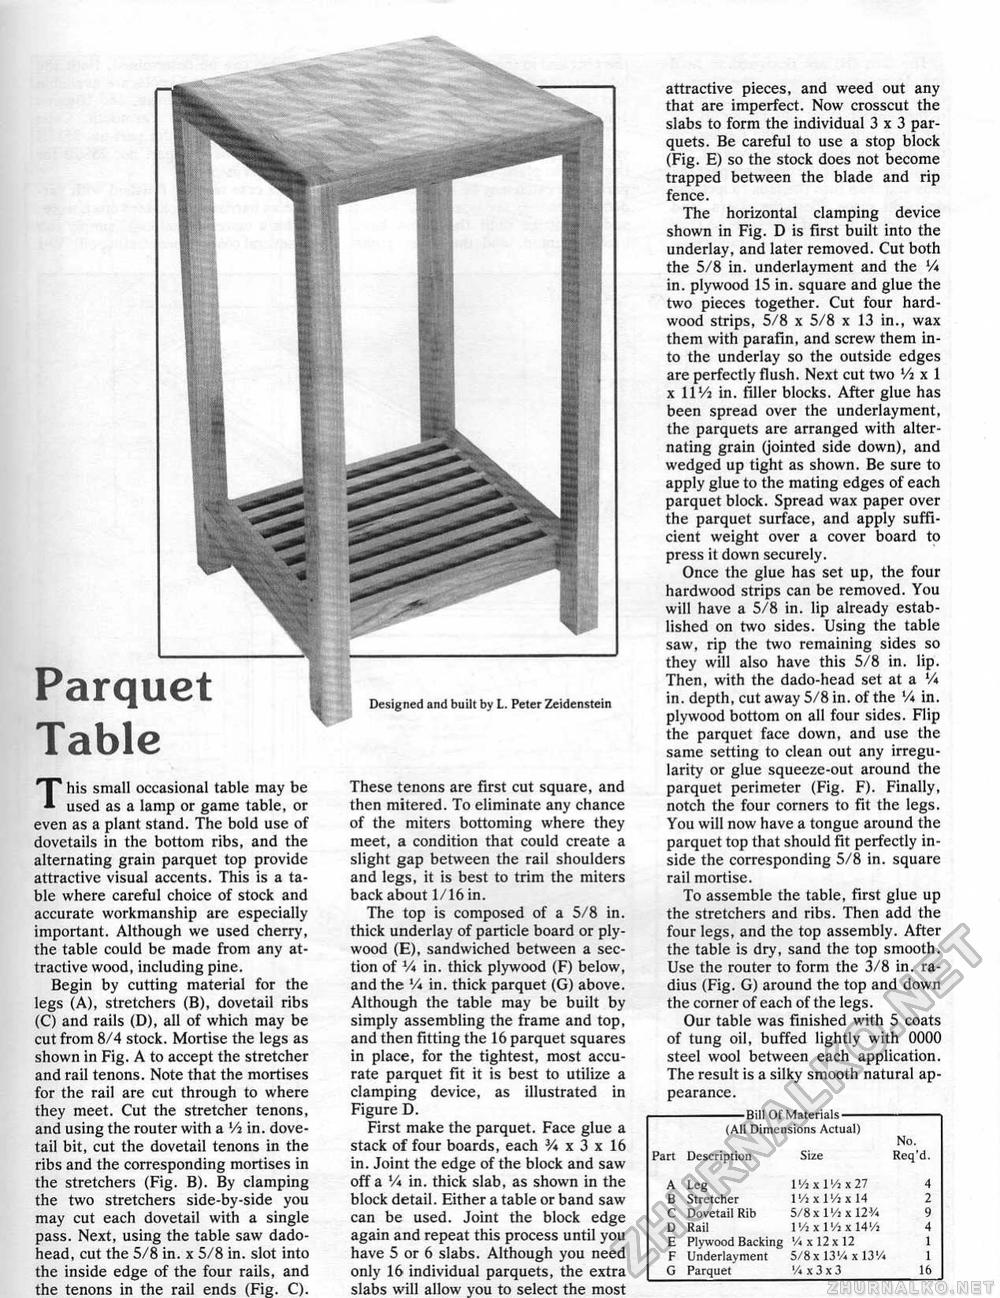
Parquet Table Designed and built by L. Peter Zeidenstein This small occasional table may be used as a lamp or game table, or even as a plant stand. The bold use of dovetails in the bottom ribs, and the alternating grain parquet top provide attractive visual accents. This is a table where careful choice of stock and accurate workmanship are especially important. Although we used cherry, the table could be made from any attractive wood, including pine. Begin by cutting material for the legs (A), stretchers (B), dovetail ribs (C) and rails (D), all of which may be cut from 8/4 stock. Mortise the legs as shown in Fig. A to accept the stretcher and rail tenons. Note that the mortises for the rail are cut through to where they meet. Cut the stretcher tenons, and using the router with a Vi in. dovetail bit, cut the dovetail tenons in the ribs and the corresponding mortises in the stretchers (Fig. B). By clamping the two stretchers side-by-side you may cut each dovetail with a single pass. Next, using the table saw dado-head, cut the 5/8 in. x 5/8 in. slot into the inside edge of the four rails, and the tenons in the rail ends (Fig. C). These tenons are first cut square, and then mitered. To eliminate any chance of the miters bottoming where they meet, a condition that could create a slight gap between the rail shoulders and legs, it is best to trim the miters back about 1/16 in. The top is composed of a 5/8 in. thick underlay of particle board or plywood (E), sandwiched between a section of V* in. thick plywood (F) below, and the V* in. thick parquet (G) above. Although the table may be built by simply assembling the frame and top, and then fitting the 16 parquet squares in place, for the tightest, most accurate parquet fit it is best to utilize a clamping device, as illustrated in Figure D. First make the parquet. Face glue a stack of four boards, each V* x 3 x 16 in. Joint the edge of the block and saw off a Vi in. thick slab, as shown in the block detail. Either a table or band saw can be used. Joint the block edge again and repeat this process until you have 5 or 6 slabs. Although you need only 16 individual parquets, the extra slabs will allow you to select the most attractive pieces, and weed out any that are imperfect. Now crosscut the slabs to form the individual 3x3 parquets. Be careful to use a stop block (Fig. E) so the stock does not become trapped between the blade and rip fence. The horizontal clamping device shown in Fig. D is first built into the underlay, and later removed. Cut both the 5/8 in, underlayment and the V* in. plywood 15 in. square and glue the two pieces together. Cut four hardwood strips, 5/8 x 5/8 x 13 in., wax them with parafin, and screw them into the underlay so the outside edges are perfectly flush. Next cut two Vi x 1 x 11 Vi in. filler blocks. After glue has been spread over the underlayment, the parquets are arranged with alternating grain (jointed side down), and wedged up tight as shown. Be sure to apply glue to the mating edges of each parquet block. Spread wax paper over the parquet surface, and apply sufficient weight over a cover board to press it down securely. Once the glue has set up, the four hardwood strips can be removed. You will have a 5/8 in. lip already established on two sides. Using the table saw, rip the two remaining sides so they will also have this 5/8 in, lip. Then, with the dado-head set at a '/« in. depth, cut away 5/8 in. of the V* in, plywood bottom on all four sides. Flip the parquet face down, and use the same setting to clean out any irregularity or glue squeeze-out around the parquet perimeter (Fig. F). Finally, notch the four corners to fit the legs. You will now have a tongue around the parquet top that should fit perfectly inside the corresponding 5/8 in. square rail mortise. To assemble the table, first glue up the stretchers and ribs. Then add the four legs, and the top assembly. After the table is dry, sand the top smooth. Use the router to form the 3/8 in, radius (Fig. G) around the top and down the corner of each of the legs. Our table was finished with 5 coats of tung oil, buffed lightly with 0000 steel wool between each application. The result is a silky smooth natural appearance. — 8ill Of Materials- {All Dimensions Actual) No. — 8ill Of Materials- {All Dimensions Actual) No.
|


