Woodworker's Journal 1985-9-3, страница 37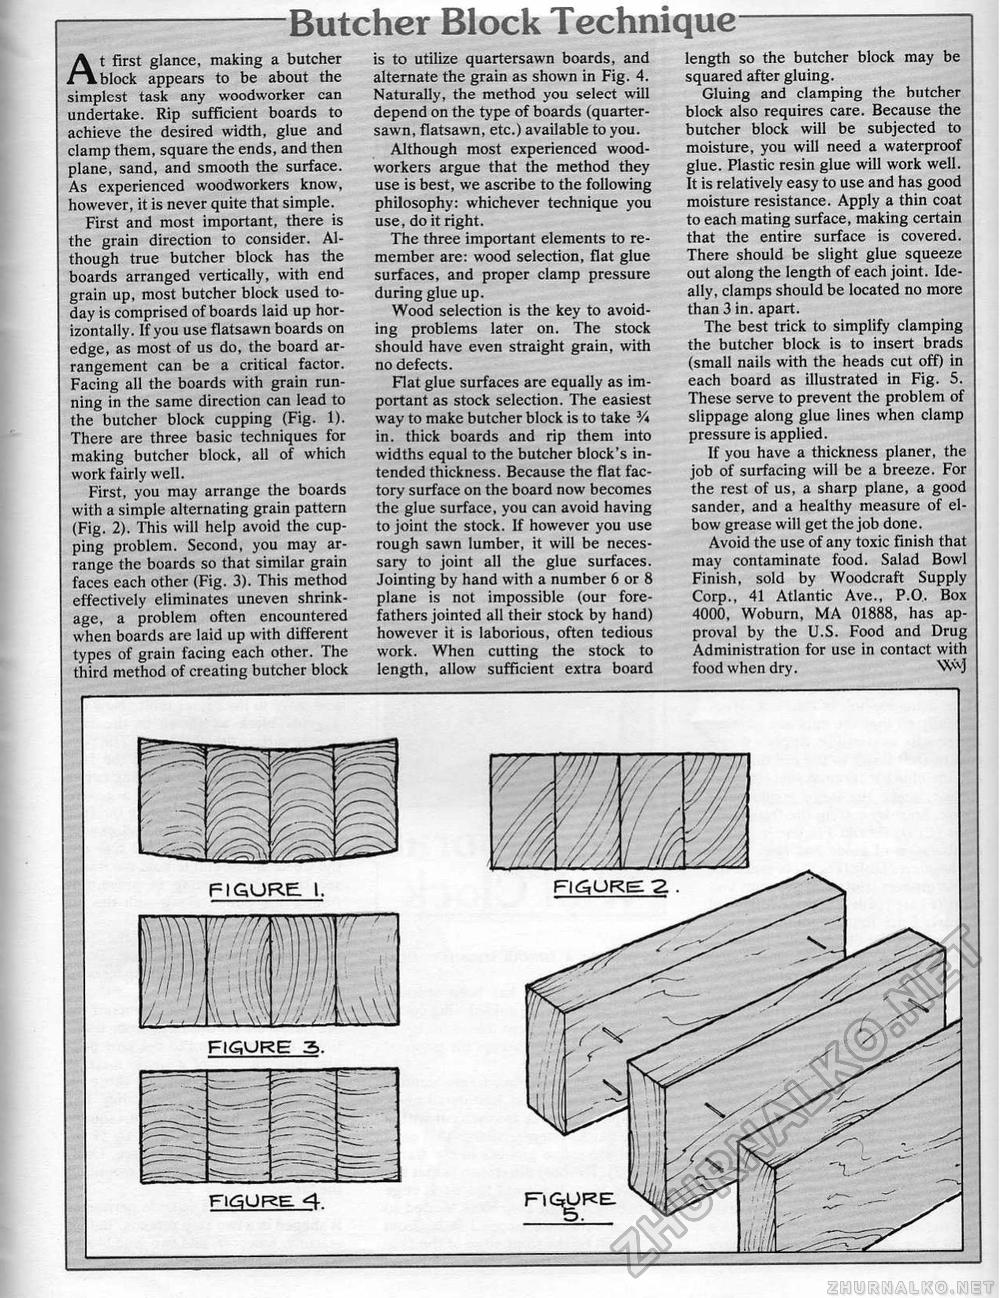
Butcher Block TechniqueAt first glance, making a butcher block appears to be about the simplest task any woodworker can undertake. Rip sufficient boards to achieve the desired width, glue and clamp them, square the ends, and then plane, sand, and smooth the surface. As experienced woodworkers know, however, it is never quite that simple. First and most important, there is the grain direction to consider. Although true butcher block has the boards arranged vertically, with end grain up, most butcher block used today is comprised of boards laid up horizontally. If you use flatsawn boards on edge, as most of us do, the board arrangement can be a critical factor. Facing all the boards with grain running in the same direction can lead to the butcher block cupping (Fig. 1). There are three basic techniques for making butcher block, all of which work fairly well. First, you may arrange the boards with a simple alternating grain pattern (Fig. 2). This will help avoid the cupping problem. Second, you may arrange the boards so that similar grain faces each other (Fig. 3). This method effectively eliminates uneven shrinkage, a problem often encountered when boards are laid up with different types of grain facing each other. The third method of creating butcher biock is to utilize quartersawn boards, and alternate the grain as shown in Fig. 4. Naturally, the method you select will depend on the type of boards (quarter-sawn, flatsawn, etc.) available to you. Although most experienced woodworkers argue that the method they use is best, we ascribe to the following philosophy: whichever technique you use, do it right. The three important elements to remember are: wood selection, flat glue surfaces, and proper clamp pressure during glue up. Wood selection is the key to avoiding problems iater on. The stock should have even straight grain, with no defects. Flat glue surfaces are equally as important as stock selection. The easiest way to make butcher block is to take V* in. thick boards and rip them into widths equal to the butcher block's intended thickness. Because the flat factory surface on the board now becomes the glue surface, you can avoid having to joint the stock, if however you use rough sawn lumber, it will be necessary to joint all the glue surfaces. Jointing by hand with a number 6 or 8 plane is not impossible (our forefathers jointed all their stock by hand) however it is laborious, often tedious work. When cutting the stock to length, allow sufficient extra board length so the butcher block may be squared after gluing. Gluing and clamping the hutcher block also requires care. Because the butcher block will be subjected to moisture, you will need a waterproof glue. Plastic resin glue will work well. It is relatively easy to use and has good moisture resistance. Apply a thin coat to each mating surface, making certain that the entire surface is covered. There should be slight glue squeeze out along the length of each joint. Ideally, clamps should be located no more than 3 in. apart. The best trick to simplify clamping the butcher block is to insert brads (small nails with the heads cut off) in each board as illustrated in Fig, 5. These serve to prevent the problem of slippage along glue lines when clamp pressure is applied. If you have a thickness planer, the job of surfacing will be a breeze, For the rest of us, a sharp plane, a good sander, and a healthy measure of elbow grease will get the job done. Avoid the use of any toxic finish that may contaminate food. Salad Bowl Finish, sold by Woodcraft Supply Corp., 41 Atlantic Ave., P.O. Box 4000, Woburn, MA 01888, has approval by the U.S. Food and Drug Administration for use in contact with food when dry. |


