Woodworker's Journal 1985-9-5, страница 26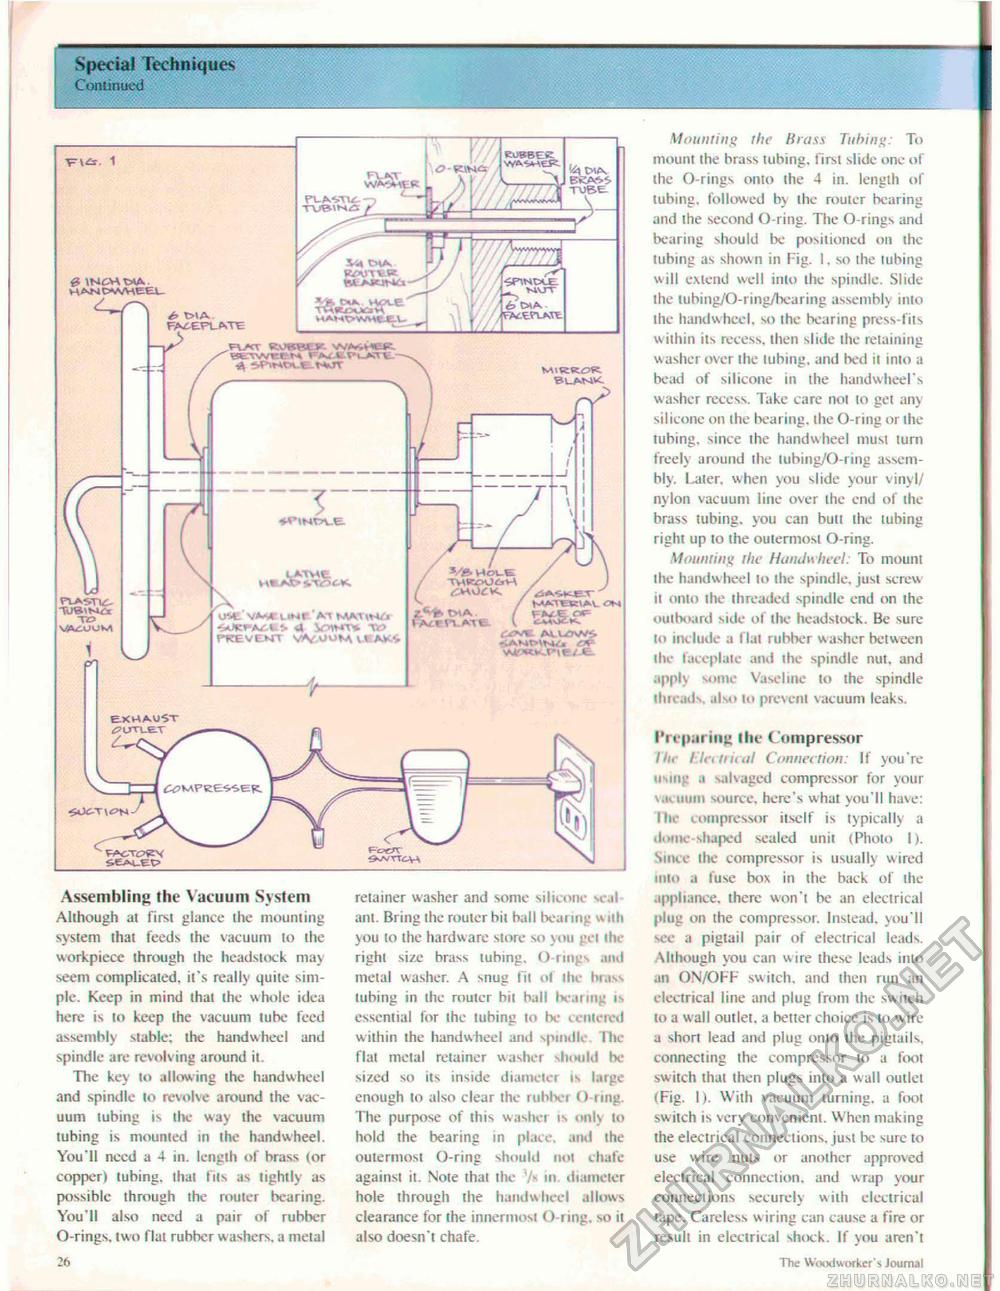
Special Techniques Continued 1 0 IM£-V\ WA £> TMA FACEPLATE FVJKT KlWti'' W^HeK HEWtEN FMXVU.1T •a mtjt T UlVtt o-^t v*-sr nwe mmuvj ■frOWAZ L N Jk ifflMT* TK> PREVENT V^.OUH H A-WV ^■swer (^VE Al USWi. Assembling the Vacuum System Although at first glance the mounting system that feeds the vacuum to the workpiece through the head slock may seem complicated, it's really quite simple. Keep in mind that the whole idea here is to keep the vacuum tube feed assembly stable: the hand wheel and spindle are revolving around it. The key to allowing ihe handwheel and spindle lo revolve around the vacuum tubing is ihe way the vacuum tubing is mounted in the handwheel. You'll need a 4 in. length of brass (or copper) tubing, that fits as tightly as possible ihrough the router bearing. You'll also need a pair of rubber O-rings, two flat rubber w ashers. a metal 26 retainer washer and some silicone seal ant. Bring the router bit ball bearing wilh you to the hardware store so yon gel the right size brass tubing. O-rings and metal washer. A snug lit ol the brass tubing in the router hil ball bearing is essential for the tubing to be centered w ithin the handwheel and spindle Ihe flal metal retainer washer should be sized so its inside diameter is large enough to also clear the rubbci O-ring. The purpose of this washer is only lo hold the bearing in place, and the outermost O-ring should not chafe against it. Note thai the 'A in. diameter hole ihrough ihe handwheel allows clearance for the innermost O-ring, so it also doesn't chafe. Mounting the Brass Tubing: To mount the brass tubing, first slide one of the O-rings onto the 4 in. length of tubing, followed by the router bearing and the second O-ring. The O-rings and bearing should lie positioned on the tubing as shown in Fig. 1. so the tubing will extend well into the spindle. Slide the tubing/O-ring/bearing assembly into ihe handwheel, so the bearing press-fits within its recess, then slide the retaining washer over the tubing, and bed it into a bead of silicone in the handwheel's washer recess. Take care not lo get any silicone on the bearing, the O-ring or the tubing, since the handwheel must lurn freely around the lubing/O-ring assembly. I_ater. when you slide your vinyl/ nylon vacuum line over ihe end of ihe brass tubing, you can bun the tubing right up lo the outermost O-ring. Mounting the Handwheel To mount Ihe handw heel lo the spindle, just screw it onio the threaded spindle end on the outboard side of the headstock. Be sure lo include a flal rubber washer between the faceplate and ihe spindle nut. and apply some Vaseline lo ihe spindle threads, also to prevent vacuum leaks, Preparing Ihe Compressor Ih. riciliual Connection: If you're Using a salvaged compressor for your *.ii uum source, here's what you'll have: rhr compressor itself is typically a dome-shaped seated unit (Pholo 1). Since ihe compressor is usually wired iiiio a fuse box in the back of the appliance, there won't be an electrical plug on the compressor. Instead, you'll sec a pigtail pair of electrical leads. Although you can wire these leads into an ON/OFF switch, and then run an electrical line and plug from ihe switch to a wall outlet, a better choice is lo w ire a short lead and plug onto the pigtails, connecting the compressor to a foot switch that then plugs into a wall outlet (Fig. I). Wiih vacuum turning, a foot swiich is very convenient. When making the electrical connections, just be sure to use wire nuls or another approved electrical connection, and wrap your connections securely with electrical tape. Careless wiring can cause a fire or result in electrical shock. If you aren't The Woodworker's journal |


