Woodworker's Journal 1993-17-3, страница 32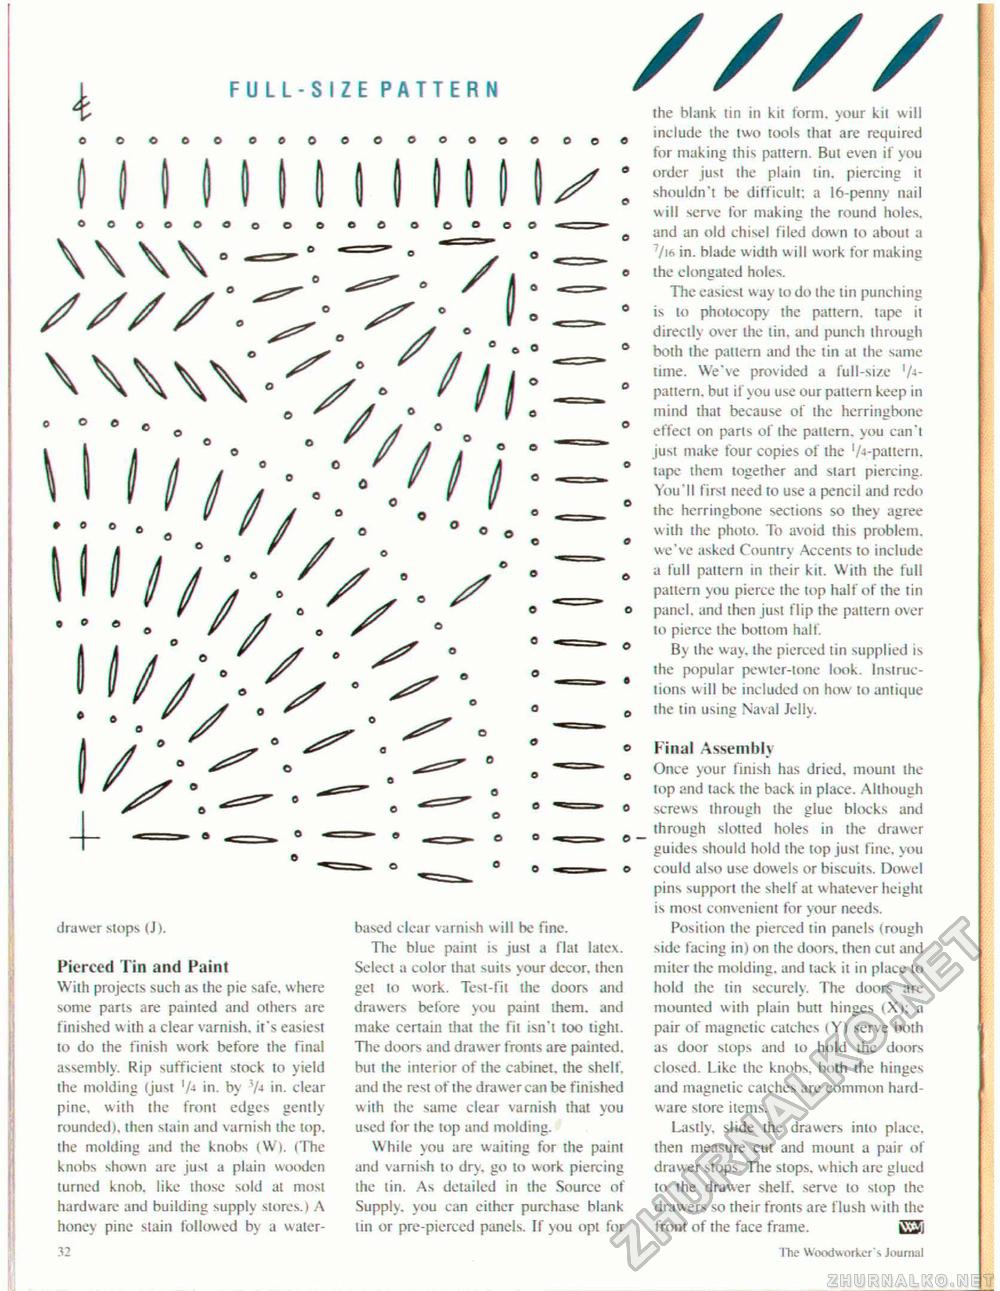
FULL-SIZE PATTERN X WW //// \\\\\ drawer slops (J). Pierced Tin and Paint With projects such as the pie safe, where some parts are painted and others are finished w ith a clear varnish, it's easiest to do the finish work before the final assembly. Rip sufficient stock to yield the molding (just 'A in. by 7+ in. clear pine, with the front edges gently rounded), then stain and varnish the lop. the molding and the knobs (W). (The knobs shown are just a plain wooden turned knob, like those sold at most hardware and building supply stores.) A honey pine slain followed b\ a water- 32 based clear varnish will be fine. The blue paint is just a flat latex. Select a color lhat suits your decor, then gel to work. Test-fit the doors and drawers before you paint them, and make certain that the fit isn't too tight. The doors and drawer fronts are painted, but the interior of the cabinet, the shelf, and the rest of the drawer can be finished with the same clear varnish that you used for the lop and molding. While you are waiting for the paint and varnish to dry, go to work piercing the tin. As detailed in the Source of Suppls. you can either purchase blank tin or pre-pierced panels. If you opt for //// the blank tin in kit lonn. your kil will , include the two tools thai are required for making this pattern. But even if you * order just the plain tin. piercing it ^ shouldn't be difficult: a 16-penny nail will serve for making the round holes. , and an old chisel filed down to aboui a 7/j6 in. blade width will work tor making > the elongated holes. The easiest way to do the tin punching * is lo photocopy the pattern, tape it directly over ihe tin. and punch through ' both the pattern and the tin al the same time. We've provided a full-size '/■»-pattern, but if you use our pattern keep in mind that because of the herringbone * effect on parts of ihe pailem. you can't just make tour copies of the 'A-pattern. * tape them together and start piercing. You'll first need to use a pencil and redo the herringbone sections so they agree with the photo. To avoid this problem, we've asked Country Accents to include > a full pattern in their kit. With the full pattern you pierce the top half of the tin o panel, and then just flip the pattern over to pierce the boliom half. ' By ihe way. the pierced tin supplied is the popular pewter-tone look. Instructions will be included on how to antique 3 the tin using Naval Jell v. Final Assembly Once your finish has dried, mount the lop and tack ihe back in place. Although screws through the glue blocks and through slotted holes in the drawer guides should hold the top jusl fine, you could also use dowels or biscuits. Dowel pins support the shelf at w hatever height is most convenient for your needs. Position the pierced tin panels (rough side facing in) on the doors, then cut and miter the molding, and tack it in place lo hold the lin securely. The doors are mourned with plain butt hinges (X): a pair of magnetic catches (Y) serve both as door stops and lo hold the doors closed. Like the knohs. both the hinges and magnetic catches are common hard-w are siore items. Lastly, slide the drawers into place, then measure cut and mount a pair of drawer slops. The stops, which arc glued to the drawer shelf, serve lo stop ihe drawers so their fronts are flush with ihe front of the face frame. © - ~t"he Woodworker's Journal |


